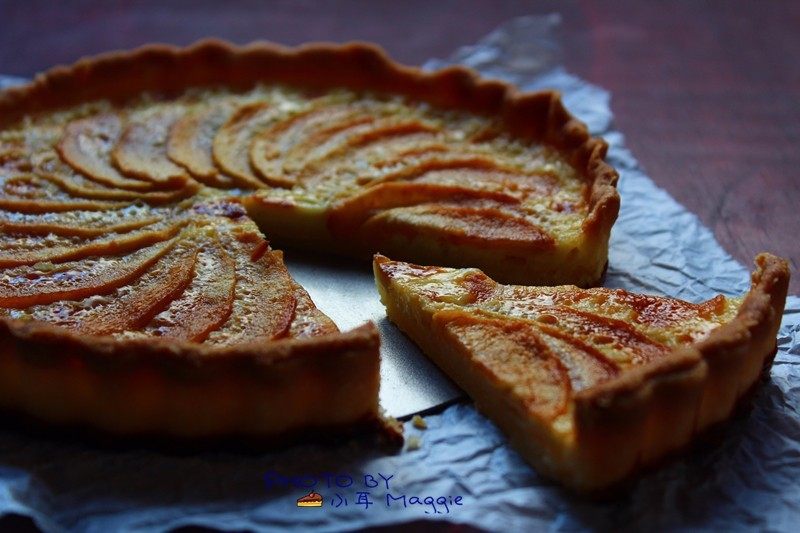

Alright, let’s talk about my latest baking obsession: Apple Pudding Pie! Picture this: warm, buttery pie crust filled with a silky-smooth apple-infused pudding that’s so creamy, it practically melts in your mouth. Yep, that’s exactly what this recipe is all about. I first stumbled upon it last autumn, and honestly? I’ve been making it every chance I get—for family gatherings, potlucks, even just because I needed a little sweet pick-me-up. Let me tell you, once you take that first bite, you’ll see why I’m hooked. It’s like a cozy hug from your favorite dessert memory, but with a modern twist that takes apple pie to a whole new level.
What Makes Apple Pudding Pie So Special?
The name says it all: the filling tastes and feels just like pudding—creamy, sweet, and packed with that fresh apple flavor you love. But here’s the secret: it’s not just a fancy name. The pudding filling is thick enough to hold its shape in the pie crust, but still light enough to feel indulgent. And the crust? Oh, the crust! It’s flaky, tender, and buttery—no dry, tough mess here. Plus, the apples add a subtle tartness that balances the sweetness perfectly. Trust me, this isn’t your grandma’s apple pie. It’s the upgrade your dessert needs.
Let’s Gather the Ingredients (No Fancy Stuff Required!)
First, let’s break down what you’ll need for the crust and the filling. I’ll list them out clearly, and I’ll explain why each ingredient matters—so you don’t end up scratching your head later!
For the Flaky Pie Crust:
- 75g cold butter: This is non-negotiable! Cold butter is key for that flaky texture. If you soften it too much, the crust turns into a soggy mess. Trust me, I’ve tested this—so stick with cold butter.
- 100g all-purpose flour (low-gluten, if you can find it): Low-gluten flour helps keep the crust tender. If you only have regular flour, it’s fine too, but maybe a tiny bit more patience with the dough!
- 10g powdered sugar: Adds a touch of sweetness without overpowering the crust.
- 20g ice-cold water: Cold water keeps the butter from melting too early, so the crust stays flaky.
- 1g salt: Enhances the flavors of the butter and sugar—don’t skip it!
For the Creamy Pudding Filling:
- 90g heavy cream (or thickened cream): This is what makes the filling rich and creamy. If you’re avoiding dairy, coconut cream works too (though it’ll be a bit thicker).
- 2 large eggs: These bind the filling together and add structure. Use room-temperature eggs so they mix smoothly!
- 40g granulated sugar: Sweetens the filling. Adjust this if you like less sugar—start with 40g and go from there.
- 90g whole milk: Adds moisture and a subtle sweetness.
- 5g honey: This is my secret weapon! It adds a hint of floral sweetness that regular sugar just can’t match.
- Apple slices: I used about 2 medium apples, cored and thinly sliced. Use your favorite apple variety—Granny Smith for tartness, Honeycrisp for sweetness, or a mix!
Step 1: Make the Silky Pudding Filling (So Good, You’ll Scoop It Straight from the Bowl!)
Let’s start with the filling because it needs to chill while we work on the crust. Trust me, this is the part that makes the “pudding” part of the pie actually pudding-like.
1. Crack the eggs into a bowl and add the sugar. Whisk them together until the sugar dissolves. Pro tip: If the eggs are cold, let them sit at room temp for 10 minutes first—this helps them mix more smoothly.
2. Pour in the milk and whisk again. You want everything to blend into a smooth base, no lumps here.
3. Add the heavy cream (or thickened cream) and stir gently. Now the mixture is starting to look creamy—so close to pudding!
4. Drizzle in the honey and mix well. Taste a spoonful here—oh, it’s already sweet! Adjust the sugar if you want it sweeter, but I find 40g sugar + honey is perfect for balance.
Step 2: Craft the Flaky Pie Crust (No Fuss, No Fail!)
Now, the crust. This part is where the magic happens—cold butter, cutting it into flour, and keeping everything chill. Let’s get into it:
1. Take the butter out of the fridge 10 minutes early (I know, I said 10 minutes before, but double-check!). Let it sit on the counter, but not so long it melts. Pro tip: If you’re in a hurry, pop it in the freezer for 5 minutes to harden it more—this helps the crust stay flaky longer.
2. Chop the butter into small cubes (about 1cm each). Place them in a bowl with the flour, powdered sugar, and salt.
3. Cut the butter into the flour using a silicone spatula or a plastic scraper. This is called “cutting in” the butter, and you want to get it into tiny, crumbly bits—not smooth. Imagine you’re making gravel, not cookies! The goal is to have small pieces of butter visible in the flour.
4. Add the ice-cold water slowly, stirring with the spatula until the dough just comes together. Important: Don’t overmix! A few lumps are okay—we want the butter to stay intact for that flaky goodness.
5. Wrap the dough in plastic wrap or a clean towel and chill it in the fridge for 10 minutes. This gives the butter a chance to firm up again and relax the gluten in the flour, making the crust easier to roll out.
Step 3: Assemble Your Apple Pudding Pie (Let’s Get Baking!)
Now it’s time to put it all together. Here’s where we’ll add the apple slices, pour in the pudding filling, and bake it to perfection.
1. Preheat your oven to 170°C (340°F). While the oven heats up, line a pie dish (9-inch is standard) with foil or parchment paper. This helps with cleanup, and we’ll use it for blind baking the crust later.
2. Take the chilled dough out of the fridge and roll it out on a floured surface. Flour the surface and the rolling pin! You don’t want the dough to stick. Roll it into a circle about 12-14 inches in diameter—big enough to cover the pie dish with a little extra for the edges.
3. Transfer the dough to the pie dish. Gently press it into the dish, making sure it covers the bottom and sides. Use your fingers to crimp the edges—you can fold them under, pinch them, or even use a fork to create a decorative edge. Pro tip: If the dough cracks, don’t panic! Just wet your finger and press the cracks together.
4. Prick the bottom of the crust all over with a fork—this stops air bubbles from forming when baking.
5. Line the inside of the crust with foil and fill it with pie weights (or dried beans!) to weigh it down. The weights prevent the crust from puffing up or collapsing while baking empty—so important!
6. Bake the crust for 30 minutes at 170°C. After 30 minutes, carefully remove the foil and weights, then bake for an additional 5 minutes. This “blind bake” step ensures the crust is fully cooked and dry on the inside—no soggy bottoms here!
7. Let the crust cool slightly (about 5 minutes) while you prep the apples. Thinly slice 2 medium apples, removing the cores. I like to use Granny Smith for a tart contrast, but feel free to mix varieties if you want.
8. Assemble the pie: Once the crust is cool, spread the apple slices evenly on the bottom. Pour the pudding filling over the apples—try not to splash! Use a spatula to smooth it out.
9. Bake for another 30 minutes at 170°C. The filling will set into a creamy, glossy pudding, and the apples will soften slightly. Check the edges of the crust—if they’re getting too brown, cover them with foil to prevent burning.
10. Let it cool completely before slicing. I know, it’s tempting to dig in right away, but cooling for 30-60 minutes helps the filling set and the crust firm up. Trust me, patience pays off here!
Pro Tips to Avoid Common Mistakes (From My Mistakes!)
I’ve made this recipe a million times, and here are the critical tips I wish I’d known sooner:
- Butter must be cold and cubed: This is the #1 mistake! If your butter is too soft, the crust will be greasy and tough. Keep it in the fridge until right before you use it, and cut it into small cubes for easier mixing.
- Don’t overmix the dough: If you mix the dough too much, the flour’s gluten becomes tough, and the crust turns chewy. Stop when it just comes together—lumps are okay!
- Blind bake with weights: This is non-negotiable. If you skip the pie weights, the crust will puff up and crack. Beans or rice work perfectly as substitutes.
- Cool the crust first: If you add the filling while the crust is still warm, the filling will melt the butter in the crust. Always let the blind-baked crust cool!
Why This Apple Pudding Pie is a Must-Try
Let me sum it up: this pie is creamy, flaky, sweet-tart, and so comforting. It’s perfect for fall, winter, or any time you want to treat yourself. The pudding filling is like a fancy dessert in a pie, and the apples add that fresh, homey touch. Plus, it’s surprisingly easy to make—no professional skills required. I’ve even made it for last-minute guests, and they’ve all begged for the recipe!
Final Bite: Go Bake This Today!
If you’re tired of the same old apple pie, or if you just love creamy desserts, this Apple Pudding Pie is your new go-to. It’s Instagram-worthy, delicious, and a little bit fancy without the hassle. Grab your ingredients, put on your favorite baking playlist, and get ready to impress everyone at your next gathering. Trust me, once you taste it, you’ll be hooked.
And if you do make it, tag me on Instagram—I’d love to see your version! Until then, happy baking, and enjoy every bite!
apple pudding pie recipe, creamy apple pudding pie, flaky apple pie crust, easy apple pudding pie, homemade apple pudding pie, fall apple recipes, best apple dessert, apple pie with pudding filling, apple dessert ideas, apple pie alternative