Introduction: Why This Pine Nut Corn Dish is a Game-Changer
Let me start by saying—if you’ve ever struggled to get your kids to eat veggies, or if you’re just tired of serving the same old, boring side dishes, this Pine Nut Corn recipe is about to change your life. I swear by it, especially now that my toddler is in the middle of a teething phase (and let me tell you, those little gnawing gums make even the most “kid-friendly” foods seem like a chore). But this? This Pine Nut Corn? It’s like a flavor explosion that sneaks in all the good stuff without a single complaint.

Let me explain why it’s a hit with kids and adults: Pine nuts are soft enough to chew (perfect for little ones with sore gums), and the corn is sweet and crunchy. Plus, it’s packed with nutrients—hello, vitamin E, fiber, and those brain-boosting fats from pine nuts! My kid will gobble this up faster than I can say “dinner’s ready,” and I’ll feel like a superhero mom for slipping in veggies and protein. Win-win, right?
Why You’ll Obsess Over This Pine Nut Corn (Spoiler: It’s Not Just the Taste)
Okay, let’s get real. I’ve made a lot of kid-friendly recipes, and most of them fall flat—either too bland, too weird, or just not worth the cleanup. But this Pine Nut Corn? It’s different. Here’s why:
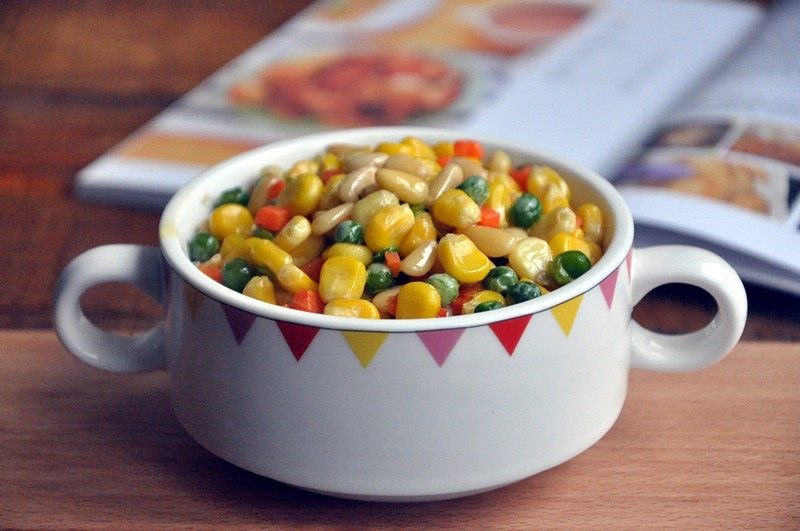
- Texture Magic: Corn is sweet and tender, carrots add a slight crunch, and pine nuts bring that nutty, buttery finish. It’s like a party in your mouth!
- Easy Peasy Prep: No fancy ingredients or hard-to-find spices here. You probably have most of this stuff in your fridge right now.
- Healthy Without the Guilt: No added sugars, no weird preservatives, just veggies, corn, and pine nuts. It’s basically a nutrient-packed snack masquerading as a side dish.
- Flexible! Hate carrots? Swap them for peas or bell peppers. Not a fan of corn? Use quinoa or edamame instead. The base recipe is adaptable to your family’s tastes.
Pro tip: I’ve even served this as a “finger food” at playdates, and every kid (and parent) has begged for the recipe. It’s that good.
What You’ll Need: Ingredients Breakdown
Let’s list out the stars of the show. You’ll need:
Ingredients (Serves 4–6, but leftovers are a problem in the best way)
- Corn: 150g (fresh is ideal, but frozen works too! Thaw frozen corn before using if you go that route)
- Carrot: ½ medium carrot (diced into tiny bits—no big chunks, since kids (and adults) hate chewy veggies!)
- Green beans: 50g (fresh, if possible. If not, frozen green beans work, but thaw them first to avoid soggy mess)
- Pine nuts: A handful (about 30–40g, depending on how much flavor you want! I buy pre-toasted ones, but if you have raw pine nuts, you’ll need to toast them first—more on that later)
- Salt: 1 tablespoon (or to taste. I use sea salt for a little extra flavor, but regular table salt works too)
- Oil: 1–2 tablespoons (I like to use olive oil or corn oil for a neutral flavor—avocado oil is fancy, but not necessary!)
Okay, so that’s the list. Nothing too wild, right? Now, let’s get cooking!
Step-by-Step Pine Nut Corn Recipe: Let’s Get This Show On the Road
Alright, let’s walk through the process step by step. I’ll be honest—I was skeptical at first (I’m a “wing-it” cook, okay?), but this recipe is surprisingly foolproof. Let’s go!
Step 1: Prep Your Ingredients (And Gather the Kids!)

First, grab all your ingredients and prep them. Wash the carrot and dice it into tiny pieces (like ½ cm cubes—small enough for little hands to pick up). If you’re using fresh corn, shuck it and cut the kernels off the cob. If you’re using frozen corn, thaw it in a colander first. Dice the carrot, trim the green beans (if fresh) and cut them into small rounds, or just use pre-cut frozen green beans if you’re short on time. Trust me, pre-cut veggies save SO much stress when you’re chasing a toddler around.
Step 2: Blanch the Green Beans (Quick Fix for Tender Veggies)

Next, blanch the green beans. Bring a small pot of water to a boil, add the green beans, and let them cook for 5 minutes. They should be “soft but still bright”—not mushy! Drain them in a colander and rinse with cold water to stop the cooking. This keeps them crisp and green, which is way more appealing to kids than limp, overcooked veggies. Plus, blanching removes any bitterness, so they taste sweeter. Win!
Step 3: Blanch the Corn (Sweet, Tender Kernels)

While the green beans are blanching, do the same for the corn! Boil a small pot of water, add the corn kernels, and let them cook for 2 minutes. They should be tender but still have a slight bite—this is key for that sweet, crunchy texture. Drain and rinse with cold water. Set both veggies aside on a plate to cool.
Step 4: Heat the Oil (Don’t Overdo It!)

Now, heat your oil in a large skillet over medium heat. I use a flat pan because it spreads the oil nicely, but any non-stick pan works. Start with 1 tablespoon of oil—you don’t need much. Let it heat until it’s shimmering (not smoking!). If you heat it too high, the veggies will burn, so keep the heat medium-low. Trust me, a little oil goes a long way here.
Step 5: Sauté the Carrots (Add Color and Flavor)

Add the diced carrot to the hot oil. Stir them around for 3–4 minutes until they start to soften. They’ll get a little translucent and smell sweet—this is the “carrot perfume” stage, and it’s delicious. Don’t rush this step; carrots need to cook through but stay tender-crisp. If they’re too raw, they’ll taste like… raw carrots, which kids (and adults) don’t love. So patience here!
Step 6: Toss in the Green Beans (Quick Stir-Fry)

Next, add the blanched green beans to the pan. Stir them quickly for 1–2 minutes. They’ll cook up bright green and still have a slight crunch. If they’re too soft, they’ll turn mushy, so keep the heat medium and stir constantly. You want them to be tender, not soggy!
Step 7: Add the Corn (The Sweet Star)

Now, pour in the corn! Stir everything together, and let it cook for 2–3 minutes. The corn will warm up, and the natural sweetness will start to mingle with the veggies. This is where the dish really starts to smell amazing—like a sweet, nutty, veggie party in your pan.
Step 8: Season with Salt (Don’t Overdo It)

Add the tablespoon of salt and stir everything evenly. Taste as you go—sometimes the salt needs a little extra, sometimes less. The key is not to over-salt, but you do want enough flavor to make the veggies pop. Also, pro tip: don’t use soy sauce or any dark sauce here! The corn and carrots are already sweet, and adding a dark sauce would muddy the bright color. We want this dish to look as good as it tastes, so stick to salt only.
Step 9: Fold in the Pine Nuts (The Crunchy Finish)

Now, here’s the fun part: add the pine nuts! If you’re using pre-toasted pine nuts (which I always do to save time), add them now and stir quickly for 1 minute. If you have raw pine nuts, you’ll need to toast them first—add them to the pan with the oil before the carrots, and stir for 2 minutes until they’re golden. But trust me, pre-toasted is a lifesaver for busy weeknights.
Stir the pine nuts gently so they’re coated with the veggie mixture but not burnt. The pine nuts will get a little toasty and add that “buttery” flavor we all love. After stirring for a minute, you’re done!
Step 10: Serve Immediately (While It’s Hot and Fresh)

Pour the Pine Nut Corn into a serving dish and dig in! The kids will gobble it up, and you’ll be smiling because you know they’re getting veggies, protein, and healthy fats. Pro tip: Let it cool for a minute if you’re serving it to a toddler—hot food = burns, and no one wants that. But honestly, even cold, it’s good! My kid will pick at it cold, too.
Optional: Add a sprinkle of extra pine nuts on top for that extra crunch and visual appeal!
Nutritional Breakdown: Why This Dish is a Superfood in Disguise
Let’s talk about the good stuff here. Pine Nut Corn isn’t just delicious—it’s a nutritional powerhouse. Let’s break down each ingredient:
Pine Nuts: The Brain Boosters
Pine nuts are tiny but mighty! They’re loaded with unsaturated fats (the “good” fats your brain and heart crave). These fats help build cell membranes in your brain, so they’re basically like “brain fuel.” They’re also rich in vitamin E, an antioxidant that fights free radicals and keeps your skin and hair healthy. Plus, pine nuts have magnesium, which is great for muscle function and sleep quality. Oh, and they’re high in protein—about 5g per 30g serving. So good for growing kids!
Corn: The Sweet, Fiber-Packed Veggie
Corn is a classic side dish, and for good reason! It’s packed with dietary fiber (hello, gut health!), vitamin C (immune support!), and lutein (good for eye health). It also has small amounts of B vitamins, which help convert food into energy. Fresh corn is even higher in nutrients than canned or frozen, so if you can get fresh, go for it!
Carrots: The Beta-Carotene Heroes
Carrots are famous for their beta-carotene, which converts to vitamin A in your body. Vitamin A is essential for eye health, especially night vision—perfect for kids who love staring at screens (and parents who love sleep). They’re also high in fiber and vitamin K, which helps with bone health. Plus, carrots have a naturally sweet flavor, so they make this dish taste amazing without needing sugar.
Green Beans: The Low-Calorie Crunchers
Green beans are low in calories but high in nutrients! They’re loaded with vitamin K (bone and blood clotting), vitamin C, and folate (great for cell growth). They’re also a good source of fiber, so they’ll keep you full and regular. The blanching step I mentioned earlier preserves all those nutrients, so you’re getting the maximum benefits here.
Putting it all together: This Pine Nut Corn dish has it all—protein, healthy fats, fiber, and a rainbow of vitamins. It’s basically a balanced meal in a bowl, and kids don’t even realize they’re eating veggies. Magic, right?
Pro Tips for Perfect Pine Nut Corn Every Time
Let me share some little hacks I’ve learned to make this dish even better:
- Prep Ahead: Wash and dice the veggies the night before. Store them in a container in the fridge, so morning cooking is a breeze. No more scrambling in the morning rush!
- Toasted Pine Nuts = Better Flavor: If you have raw pine nuts, toast them in a dry pan over low heat for 2–3 minutes until golden. They’ll get a nutty, toasty flavor that takes this dish to the next level. Pre-toasted pine nuts work too, but make sure they’re not burnt!
- Swap Veggies: Not a fan of green beans? Use peas, snap peas, or even diced bell peppers. Want more veggies? Add a handful of spinach (but that will change the color a bit, so maybe stick to green veggies for the best look). Carrots can be swapped for sweet potatoes for a different flavor profile.
- Add a Kick (If You Want!): For adults who want a little spice, add a pinch of chili flakes or a drizzle of honey. Kids might not love the spice, but adults will enjoy it. It’s totally optional, though!
- Serve Cold: Leftovers are delicious cold! Store them in an airtight container in the fridge, and your kid will ask for “the corn salad” at lunchtime. Perfect for busy days when you need quick snacks.
Trust me, once you try these tips, you’ll wonder how you ever made this dish without them. It’s all about making it work for your family’s needs!
Final Thoughts: Let’s Get Cooking!
By now, I’m sure you’re convinced that this Pine Nut Corn is the ultimate kid-friendly, nutritious side dish. It’s easy, adaptable, and tastes amazing. Whether you’re serving it at a dinner party, a playdate, or just a regular weeknight dinner, your kids (and you!) will love it. And if you’re like me, you’ll be making it weekly because it’s that good.
So what are you waiting for? Grab your ingredients, preheat the pan, and get ready to watch your kids (and yourself) dig in. Trust me, once you taste it, you’ll be hooked. And hey, if you ever need another recipe, I’ve got you covered—just let me know!
Happy cooking, and remember: Eating healthy doesn’t have to be boring. Sometimes it’s just a little corn, carrots, green beans, and pine nuts, turned into magic. 🥦🌽🥜