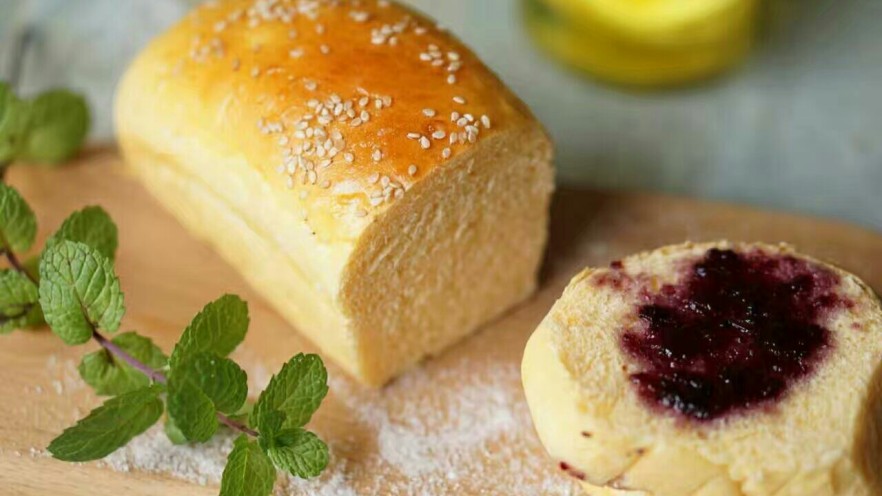

Let’s be real, is there anything better than a soft, sweet little toast that you can pop in your mouth in two bites? I’ve tested so many mini bread recipes over the years, and this condensed milk mini toast is hands down my family’s absolute favorite. It’s so fluffy it practically melts, has that perfect subtle sweet, creamy note from the condensed milk, and this recipe makes exactly 8 loaves that fit perfectly in that standard linked mini bread pan we all have hiding in our baking cabinets. My kid begs for these every weekend, and I don’t even mind making them because they’re way easier than you’d think – no fancy skills required, I promise.
Ingredients You’ll Need for Condensed Milk Mini Toast
Let’s start with the basics, okay? I’ve tried tweaking this recipe a dozen times, and this exact ratio gives the perfect soft, chewy crumb every single time. No weird, hard edges, no dense centers, just perfect little loaves.
- 250g bread flour (high gluten flour – don’t swap for all-purpose here, I beg you, the chew won’t be the same)
- 50g cake flour (low gluten flour – this keeps it light and fluffy, not tough)
- 3g instant yeast (make sure it’s high-sugar tolerant, since we’ve got condensed milk and sugar in here, regular yeast might not rise properly)
- 2g salt (yes, even sweet bread needs salt, it cuts the sweetness and makes all the flavors pop, trust me)
- 40g granulated sugar
- 40g sweetened condensed milk (the full-fat regular stuff, not the low-sugar version, that’s where all the flavor lives)
- 130g water (hold off on pouring it all in at once, we’ll talk about that later)
- 30g corn oil (you can use melted unsalted butter if you want a richer flavor, I use corn oil when I’m feeling lazy and don’t want to melt butter)
- 1 large egg (room temp is best, but I’ve used cold eggs plenty of times and it still works)
- White sesame seeds, for topping (totally optional, but they add a nice little crunch and look so pretty)
Step-by-Step Instructions to Make the Best Condensed Milk Mini Toast
Alright, let’s get baking! I’ve included all my little hacks and tips so you don’t make the mistakes I did the first time I tried this recipe. No sad, flat loaves on our watch, okay?
1. Gather All Your Ingredients First

Let’s start with the most basic step that I always skip and regret later: get all your stuff out first! I can’t tell you how many times I’ve been halfway through mixing dough only to realize I’m out of condensed milk, or my yeast is expired. Measure everything out, make sure your yeast is still good (if it’s been open for 6 months, just buy a new pack, it’s cheap), and you’re not missing anything. This takes 2 minutes and saves you so much stress later.
2. Add All Ingredients to Your Bread Machine

Now, dump everything into your bread machine bucket! I usually add the wet ingredients first (water, egg, condensed milk, oil) then the dry ingredients (flours, sugar, salt, yeast on top, so it doesn’t hit the liquid right away). If you don’t have a bread machine, you can mix this by hand or with a stand mixer and dough hook, I just use my bread machine because I’m lazy and it does all the work for me.
3. Give It a Quick Stir First

Take a pair of chopsticks or a spatula and give everything a quick stir before you turn the bread machine on. I do this because if you don’t, sometimes the flour gets stuck in the bottom corners of the bucket, and you end up with dry flour pockets in your dough. It takes 10 seconds, no big deal, just make sure there’s no loose flour sitting at the bottom.
4. Knead the Dough Until It Reaches the Windowpane Stage

Now run your bread machine’s dough kneading setting for 35 minutes. If you’re using a stand mixer, knead on low speed for about 10-12 minutes. You want the dough to be smooth, elastic, and pass the “windowpane test” – take a small piece of dough, stretch it out thin between your fingers, and it should make a translucent “window” without tearing. That means the gluten is developed enough, and your bread will be fluffy, not dense. Don’t skip this step! If you under-knead, your loaves will be tiny and tough.
5. First Rise Until Dough Doubles in Size

Once it’s done kneading, just leave the dough in the bread machine and run the first rise setting, or leave it in a warm spot in your kitchen for 1-1.5 hours, until it’s doubled in size. The easiest way to check if it’s done? Poke a hole in the center with a floured finger. If the hole stays and doesn’t bounce back, it’s perfect. If it bounces right back, it needs more time. If it deflates completely, you let it rise too long (don’t worry, you can still use it, it just might be a little less fluffy).
6. Divide the Dough Into 8 Equal Portions

Take the dough out of the machine, punch it down to get all the air out, and divide it into 8 equal little dough balls. I weigh mine to make sure they’re all the same size – each one should be about 60-65g. That way they all bake evenly, and you don’t end up with one giant loaf and one tiny sad loaf. No judgment if you don’t weigh them, though, just eyeball it as best you can.
7. Let the Dough Balls Rest for 15 Minutes

Cover all the little dough balls with a piece of plastic wrap so they don’t dry out, and let them rest for 15 minutes. This relaxes the gluten, so they’re easier to roll out later. If you try to roll them right after dividing, they’ll just shrink back on you, it’s so annoying. Trust me, go make yourself a cup of coffee while you wait, you deserve it.
8. Roll Out and Shape the Dough, Then Place in Molds

Take one dough ball, roll it out into a long, flat oval with a rolling pin to get all the air bubbles out, then roll it up tight from the short end, like a little burrito. Pinch the seam closed, then plop it seam-side down into your mini bread pan. Repeat for all 8 dough balls. It’s okay if they don’t look perfect at this stage, they’ll rise and fill out the molds nicely later.
9. Second Rise Until Dough Doubles Again

Now we do the second rise! Put the whole pan in your oven (turned off!) or a proofing box, and put a small bowl of hot water on the rack below it. You want the temperature to stay around 38°C (100°F) with a little humidity, which helps the dough rise nicely. Let them rise for 45 minutes to an hour, until they’re doubled in size and puff up over the top of the molds a little bit. When you gently press the side of a loaf, it should bounce back slowly – that means it’s ready to bake.
10. Add Sesame Seed Topping

Take the pan out of the oven (don’t forget to take the bowl of hot water out too!) and brush the top of each loaf with a little bit of plain water. Then sprinkle on as many white sesame seeds as you want. The water helps the seeds stick, so they don’t all fall off when you take them out of the pan later. You can skip this step if you don’t like sesame seeds, or use poppy seeds, or even a little bit of melted butter and cinnamon, whatever you’re into.
11. Bake Until Golden Brown

Preheat your oven to 210°C (410°F) for 10 minutes first – you want it fully preheated, otherwise your loaves won’t rise properly when you put them in. Once it’s preheated, bake the loaves for 18-20 minutes, until the tops are a nice golden brown. If they’re getting too dark too fast, you can tent a piece of aluminum foil over the top for the last 5 minutes of baking. My oven runs hot, so I usually only need 18 minutes, but everyone’s oven is different, so keep an eye on them after 15 minutes.
12. Cool and Store Your Mini Toast

As soon as they come out of the oven, pop them out of the molds and put them on a wire rack to cool. Don’t leave them in the hot pan, otherwise the bottoms will get soggy. Let them cool until they’re just slightly warm to the touch, then put them in an airtight plastic bag or container at room temperature. They stay soft for 3 whole days, if they even last that long in your house – mine are usually gone by day 2.
13. The Finished Condensed Milk Mini Toast

Look at that! Are these not the cutest little loaves you’ve ever seen? They’re soft, sweet, and perfect to eat plain, or toast them up a little and spread with butter, or jam, or more condensed milk (no judgment, I’ve done it). The crumb is so light and fluffy, you’d never guess how easy they are to make.
14. Fun Serving Idea: Mini Breakfast Sandwiches for Kids

If you want to turn these into a full breakfast for your kids (or let’s be real, for yourself), slice one of the mini loaves in half, fry up a little ham sausage, add a piece of crisp lettuce, and squeeze on some ketchup or mayo. It’s the perfect handheld breakfast, fits in a lunchbox, and my kid goes crazy for them. I’ve even made mini egg salad sandwiches with these for work lunches, they’re so versatile.
15. More Finished Loaf Inspiration

Just one more look at how perfect these are, okay? I’m telling you, once you make this recipe once, you’ll be making it every weekend. It’s become our go-to for lazy Sundays, and I even make a double batch sometimes to freeze for busy weekdays – just pop a frozen loaf in the toaster for 2 minutes, and it’s as good as fresh.
Pro Tips to Avoid Common Mistakes
I’ve messed up this recipe enough times to know exactly what can go wrong, so here are my top tips to make sure your loaves turn out perfect every single time:
- Oven temperatures vary wildly! The 210°C and 18-20 minutes is just a guideline. Invest in an inexpensive oven thermometer to know what your oven’s actual temperature is, and adjust the time as needed. If your loaves are coming out too dark, lower the temperature by 10°C next time.
- Flour absorbs water differently depending on the brand, how old it is, and even the humidity in your kitchen! Don’t pour all 130g of water in at once. Add 110g first, then add the rest 10g at a time, until the dough comes together into a smooth, non-sticky ball. If you add too much water, your dough will be a sticky mess that’s impossible to shape.
- If you don’t have a bread machine, you can absolutely knead this by hand! It’ll take about 15 minutes of kneading on a floured surface, just keep going until you get that windowpane effect I mentioned earlier.
- If you don’t have a mini linked bread pan, you can use a regular muffin tin, just make sure to grease it well first. The loaves will be a little rounder, but they’ll still taste just as good.
- Want a richer flavor? Swap the corn oil for melted unsalted butter, and add a teaspoon of vanilla extract to the dough. It’s chef’s kiss, I do this for special occasions.
That’s it! This recipe is so foolproof, even if you’re a total beginner at baking bread, you can nail these condensed milk mini toasts on your first try. Let me know in the comments if you make them, I’d love to see how they turn out!