
Homemade Strawberry Canned Treats for Picky Kids: No Additives, Just Love!
Okay, let’s be real—if you’ve got a toddler or kid who’s reluctant to eat strawberries, you’re in the same boat as me. My little guy used to turn his nose up at fresh strawberries, saying they were “too tart.” But then I stumbled on this simple strawberry canning trick that turned him into a total strawberry fanatic! No joke—now he begs for “strawberry magic jars” every afternoon. And the best part? No weird chemicals, no artificial colors, just fresh strawberries and a little sugar. Let’s dive into how to make this kid-approved recipe yourself!
Why This Recipe Works for Picky Eaters
Store-bought fruit cans? Yuck—they’re full of preservatives, high fructose corn syrup, and weird additives. But when you make it at home, you control every ingredient. Plus, the slow cooking in sugar syrup turns tart strawberries into sweet, juicy little bites that even the pickiest kid will devour. Trust me, once you see your kid’s eyes light up at the first spoonful, you’ll never go back to store-bought!
Ingredients (Kid-Friendly & No-Fuss!)
You only need a handful of simple ingredients—most likely already in your pantry!
- 500g fresh strawberries (aim for bright red, plump ones—avoid mushy or moldy spots!)
- 25g old-fashioned rock sugar (or regular white sugar works too! Rock sugar gives a richer, slightly caramel-y flavor, but sugar is totally fine if you don’t have it)
- 2g fine salt (don’t skip this—salt cleans the strawberries and makes them extra crisp!)
- A few drops of lemon juice (adds zing, keeps strawberries bright red, and boosts shelf life—win-win!)
- 2–3 sterilized glass jars (I use old mason jars or even repurposed pasta sauce jars—just boil them first to kill germs!)
Step-by-Step: Make ‘Em Love It in 30 Minutes
This is so easy, even my husband (who claims “I don’t cook!”) nails it. Let’s go step by step!

Step 1: Prep the Jars for Storage
First, sterilize your jars! Wash them with soap and water, then boil them in a pot of water for 5–10 minutes. Let them air-dry completely. This keeps the strawberry goodness fresh for months (no mold here!). Once they’re cool, set them aside—we’ll fill them later.

Step 2: Choose the Freshest Strawberries
This is the most important step! Grab your strawberries and give ’em a good visual check. Look for:
- Bright red color (no dull spots)
- Plump, not squishy (softness = overripe or moldy inside!)
- Green leaves that aren’t wilted (wilted leaves = old berries).
I swear by small, heart-shaped strawberries—they’re perfect for tiny hands and don’t make a mess on clothes. My kid calls them “magic heart berries” now!

Step 3: Remove the Stems (Toddler-Proof Hands!)
Hold the strawberry by the green stem and twist gently to pop it off. If it’s stubborn, use a small knife to cut the stem (but twisting is faster!). For kids, this is a fun “detangling” activity—let them help if they want! Toss any stems or bad strawberries in the compost.

Step 4: Clean the Strawberries with Salt
Here’s the secret: Add 2g of salt to a big bowl of cold water. Gently swish the strawberries around for 10 minutes. The salt helps wash away any bugs, dirt, or pesticides. It also makes the strawberries taste clean and sweet, not salty (promise!).

Step 5: Rinse & Drain
After soaking, drain the strawberries and rinse them with fresh water to remove the salt. Pat them dry with a paper towel (or just let them air-dry—no need to rub hard!). While they’re drying, grab your sugar and water.

Step 6: Make the Sugar Syrup
In a small pot, add 25g sugar + 2 cups of water. Bring to a boil over medium heat, stirring until the sugar dissolves. (It should look clear, not cloudy—sugar’s fully melted when you stir and it dissolves instantly!)

Step 7: Cook the Sugar Until It’s Thick
Let the sugar water boil for 5 minutes—this makes the syrup thick enough to coat the strawberries. You’ll see tiny bubbles forming, and the sugar will dissolve completely. Keep the heat on low to prevent burning (sugar burns fast!).

Step 8: Add the Strawberries & Cook
Drop the drained strawberries into the syrup. Stir gently, then turn up the heat to high and let it boil for 2 minutes. The strawberries will start to soften a bit, but we want them to stay “alive”—not mushy!

Step 9: Add Lemon Juice for Flavor & Freshness
Squeeze in a few drops of lemon juice (about 1–2 drops, just a tiny bit!) and stir. The lemon juice adds a subtle tang that balances the sweetness. Let it boil for another 1 minute, then turn off the heat.

Step 10: Fill the Jars!
Quickly pour the strawberry-syrup mixture into the sterilized jars—leave about ½ inch of space at the top (this prevents overflow when sealed). Wipe the jar rims with a clean cloth to remove any syrup, then screw on the lids tightly. Let them cool to room temperature, then refrigerate for at least 2 hours (or overnight for extra flavor!).

Step 11: Enjoy Cold & Crisp!
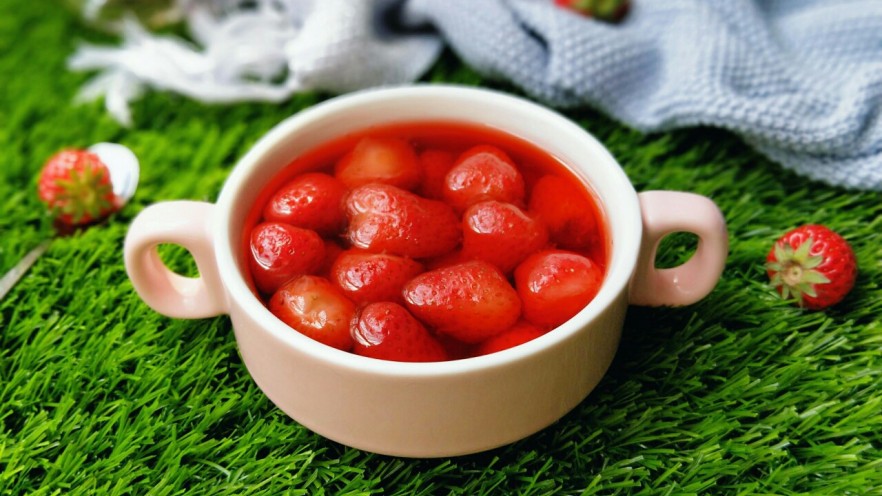
When you’re ready to eat, take a jar out of the fridge and let it sit for 30 minutes (or pop it in the microwave for 10 seconds if you’re in a hurry!). The strawberries will be so juicy and sweet—way better than store-bought! My kid eats 2 jars a week now—total success!
Pro Tips: Make It Even Better
- Strawberry Size Matters: Smaller strawberries (like the ones I use) are easier for kids to eat without choking risks.
- Sugar Swap: If you want a healthier twist, use honey instead of sugar for kids over 1, but note that honey shouldn’t go in jars for long-term storage (raw honey’s fine if you use it fresh!).
- Extra Freshness: For a summery vibe, freeze the strawberries first! Frozen strawberries in the syrup taste like a “strawberry slushie” in a jar.
- Avoid Overcooking: Boiling the strawberries for too long makes them mushy—2 minutes max!
Why This Works for Busy Parents
No preservatives, no hidden sugars, and no tears when your kid asks for seconds. This is the ultimate “I need something quick and healthy” snack—just pop open a jar and watch them smile. Plus, you’ll save money by making it at home instead of buying fancy “organic” store cans that cost $5+ a jar.
So there you have it—homemade strawberry canned treats that make kids beg for more, and parents sigh with relief (finally, a healthy snack!). Let me know in the comments if your kid loved it too! Happy canning!