


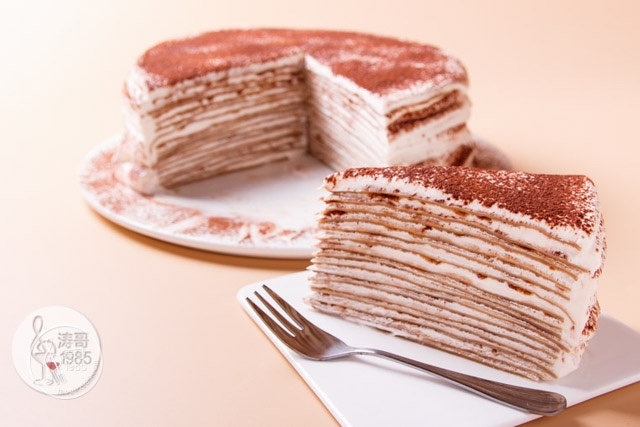
Okay, let’s be real—who doesn’t love a dessert that’s both fancy AND comforting? This Tiramisu Mille-Feuille is like a hug in cake form: fluffy coffee-soaked crepes layered with creamy mascarpone (okay, wait, no mascarpone here, but trust me, it’s still just as good!). No, seriously, it’s a mashup of two classics—tiramisu and mille-feuille—and it’s the ultimate pick-me-up dessert. No more bitter coffee alone; this cake brings the coffee flavor front and center, plus a smooth, dreamy texture that’ll make you want to dive in every morning (or midnight… no judgment). Let’s get started!
First Things First: What You’ll Need
Let’s gather all the ingredients first. I promise, it looks like a lot, but most are pantry staples, and everything works together to balance the flavors.
- Coffee Soak & Batter: 20g instant coffee (plain, no sugar!), 600ml warm water (for cooling the coffee), 90g granulated sugar, 80g neutral oil (sunflower or canola works best), 380ml whole milk, 6 large eggs (room temp!), 2 tsp pure vanilla extract (not that fake stuff—we’re going natural!), 1 tiny pinch of salt, 440g all-purpose flour (low-gluten, so it’s tender).
- Cream Filling: 1L heavy whipping cream (chilled!), 100g powdered sugar, 2 tsp pure vanilla extract (again, the good stuff), a pinch of salt (to enhance sweetness).
- Finishing Touch: 10g unsweetened cocoa powder (for dusting).
Okay, now that you’ve got the goods, let’s roll up our sleeves!
Step-by-Step: Making the Tiramisu Mille-Feuille (With Pro Tips!)
Let’s start with the coffee soak because this is where the “tiramisu” magic happens. Skip the instant coffee packets and go for plain instant—we need pure coffee flavor here, not sweetened. Trust me, the sugar in the filling will balance it out!
Prep 1: The Coffee Soak (The Base That Makes It Tiramisu)

First, grab a heat-safe bowl and pour in the 20g of instant coffee. Now, add just enough warm water to dissolve it—maybe 3-4 tbsp? Just enough to make it a strong, dark solution. Stir well until the coffee is fully dissolved. Then, top it up with the remaining 600ml of warm water (total 600ml water + coffee) to cool it down quickly. Pop this in the fridge to chill while we prep the rest. Cool coffee = less soggy crepes later! Win-win.

Next, the batter. Grab a big mixing bowl (the bigger, the better to avoid spills!). Add the 90g sugar—don’t skimp, this is where the sweetness balances the cream. Then pour in the 80g of neutral oil (I swear by sunflower oil here—it’s flavorless and won’t overpower the vanilla). Mix that together with a fork or whisk until the sugar starts to dissolve a bit.

Now, add the 380ml whole milk—you want it at room temp, not cold, so the eggs don’t scramble when mixed. Stir that in. Then crack in the 6 eggs one by one—room temp eggs mix better, so if they’re straight from the fridge, let them sit out for 30 mins first. Trust me, I’ve tried cold eggs; the batter gets weird lumps.

Add the 2 tsp vanilla extract—this is your secret weapon! Real vanilla makes all the difference. Skip the imitation stuff; it tastes like chemicals. Also, a tiny pinch of salt—like, just a pinch (I’m talking 1/16 tsp, don’t go crazy)—it brings out the vanilla and cuts the sweetness. Mix all these together with a hand whisk until everything is smooth. No lumps, okay? If you see tiny bits of egg, that’s fine; we’ll fix it later.

Now, sift the 440g flour into the batter. Sifting is super important—no lumps, no tough crepes! If you don’t have a sieve, put the flour in a bowl and whisk it gently with a fork to break up clumps. Add the flour to the wet ingredients, then whisk slowly—start with low speed, then pick up a bit. Don’t overmix; we want a slightly thick but smooth batter, not glue.

Wait, hold on—did we forget the coffee? Oh right! We need to mix the coffee into the batter too. The coffee soak (the 600ml water + coffee) should be at room temp now, so pour it into the batter slowly while whisking. Now the batter should be a smooth, light brown liquid—if it’s too thick, add a splash more milk; if too thin, sift a bit more flour. Perfect consistency is key here!

Now, we’re ready to fry the crepes! These are the “mille-feuille” layers—thin, delicate, and slightly crispy. You’ll need a non-stick 24cm crepe pan. If you don’t have one, use a regular non-stick pan, but you might get slightly uneven crepes. Heat the pan over medium-low heat. Lightly grease the pan with a bit of oil, then wipe off the excess with a paper towel (you don’t want the crepe to stick!).

Using a ladle or big spoon, pour about 1/3 cup of batter into the center of the pan. Tilt the pan in a circular motion to spread the batter evenly into a thin circle—start from the center and spin the pan until the batter reaches the edges. If there’s a gap, use the back of the spoon to spread it. Keep the heat low here; high heat = burnt edges and thick crepes. We want thin, golden layers!

Cook for about 1-2 minutes until the edges start to turn golden and the top looks dry. You can gently lift the edge with a spatula to check—if it’s set, flip it! Flip it carefully (it might wobble, but you’ll get the hang of it). Cook the other side for 15-20 seconds—no longer, or it’ll harden. Slide it onto a plate or cooling rack. Repeat this until you’ve made 16 crepes (I know, 16 sounds like a lot, but trust me, they’ll stack nicely). Let them cool completely before stacking—warm crepes make the cream melt, and we don’t want that.

Once all 16 crepes are fried, stack them with a flat plate on top (to keep them even). Use a sharp knife to trim the edges—this makes the final cake look neat. The trimmed edges? Eat them! They’re crispy, sweet, and perfect for a snack. Now, set the crepes aside to cool while we make the cream—this is where the “creamy” part comes in!

For the cream: Grab a large mixing bowl (and make sure it’s completely clean—no oil, no water, or the cream won’t fluff!). Add the 1L heavy cream, 100g powdered sugar, 2 tsp vanilla extract, and a pinch of salt. Beat this with a hand mixer on low speed first—start slow, then crank it up to medium-high. Whip for 5-7 minutes? Wait, no—wait, the pro tip here is: the slower you start, the creamier and less likely to melt later. So start at low, then medium, and stop when the cream holds soft peaks. If you see it turning grainy, you’ve overwhipped—oops! I’ve done that before. Not fun.

Once the cream is smooth and fluffy (but still pourable, not rock-hard), you’re good to go. Now, time to assemble! Grab a cake turntable (or a lazy Susan—anything to spin while you work). Place the first crepe on the turntable, then spread a generous layer of cream on top with a spatula—about 1/4 inch thick. Sprinkle a tiny bit of cocoa powder over the cream—just enough to see a light dusting. Then place the next crepe on top, and repeat: cream, cocoa, crepe, until all 16 are stacked. Wait, 16 layers? That’s a lot of cream! You can adjust the number of layers based on your pan size—if you have smaller crepes, maybe 12-14? But trust me, 16 is just right for a 8-inch cake.

Top the last crepe with a thick layer of cream, then dust generously with cocoa powder. Use a small sieve for even dusting—you can even make a pattern if you’re feeling fancy! Now, cover the entire stack with plastic wrap and refrigerate for at least 2 hours (preferably overnight, if you can wait) to let the layers soak and the cream set. When you cut it, it should slice cleanly, with no crumbs or runny cream.

Once it’s chilled, slice and serve! If you want that professional look, use a sharp knife (heat it under hot water between cuts to prevent the cream from sticking). Serve with a dollop of extra whipped cream and a dusting of cocoa on top. Perfect for coffee lovers, dessert fans, or anyone who wants to feel fancy without the fancy tools.
Pro Tips & Tools to Avoid Failures
Essential Tools (No Cutting Corners!)
- Non-stick crepe pan: This is non-negotiable! Without it, your crepes will stick and break, and no one wants a crumbly base.
- Fine-mesh sieve: For sifting flour and keeping the batter smooth. Lumps in the crepes = uneven layers.
- Electric hand mixer: Or a stand mixer, if you’re serious. Slow, steady whipping makes the cream fluffy and stable.
- Cake turntable: Makes spreading cream and stacking a breeze—no more lopsided cakes!
- Sharp paring knife: To trim the crepes neatly (and eat the edges, duh).
My Personal “Oops” Mistakes to Avoid
1. Overheating the pan: If your crepe pan is too hot, the edges burn before the middle cooks. Keep heat low-medium, and test with a tiny bit of batter first.
2. Using cold eggs: Room temp eggs mix better with the batter, so let them sit out for 30 minutes before using.
3. Overwhipping the cream: Stop when it just holds a peak. If it’s too stiff, add a splash of milk and fold gently—save the overwhipped cream for ice cream toppings, maybe.
4. Forgetting to cool crepes: Warm crepes melt the cream instantly. Patience here pays off!
Final Thoughts
Okay, so you’ve made it! This Tiramisu Mille-Feuille is equal parts coffee kick and creamy comfort. No fancy restaurant needed—just your kitchen, a few tools, and 2-3 hours of love. Serve it at brunch, with coffee, or as a midnight snack (I won’t tell!). Tag me in your photos—I’d love to see how yours turns out! And if you have questions, drop a comment—I’m here to help. Happy baking!