

Why I Created This Matcha Muffin Red Bean Zongzi
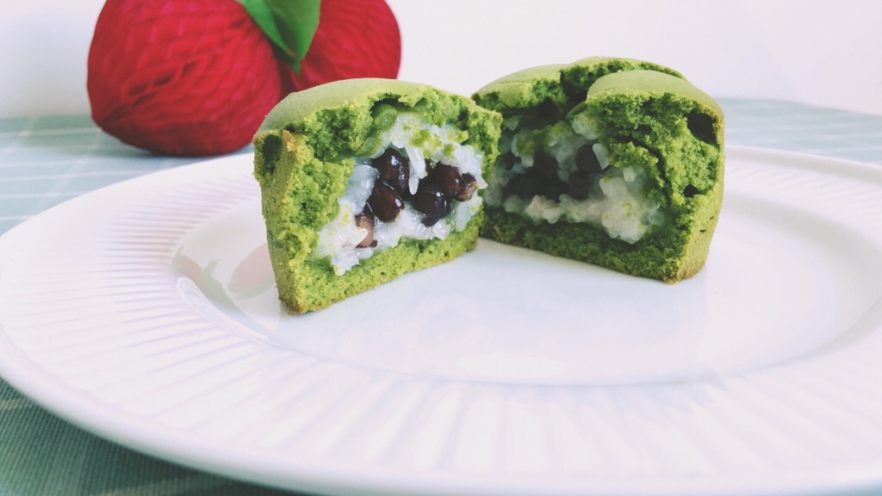
Dragon Boat Festival is right around the corner, and let’s be real—traditional zongzi are great, but sometimes you just want to mix things up! This year, I decided to combine two of my favorite treats: soft, buttery matcha muffins and sweet red bean sticky rice zongzi. The result? A total game-changer. Imagine biting into a moist matcha muffin with a chewy, sweet red bean rice center—trust me, your taste buds will thank you.
Ingredients You’ll Need
First things first, let’s gather all the stuff. I’ve listed everything clearly so you don’t miss a thing:
- 55g unsalted butter (room temperature is key—don’t skip this!)
- 95g all-purpose flour
- 50g powdered sugar
- 1 large egg (about 50g, also room temperature)
- 40ml milk
- 5g matcha powder (I used Qingxing brand—more on this later!)
- 3g baking powder
- 100g glutinous rice
- Red bean paste (or sweetened red beans—whatever you prefer!)
Step-by-Step Instructions
Prep the Sticky Rice Filling

Let’s start with the filling because it needs a bit of time. Here’s what to do:
Soak the glutinous rice in water for 30 minutes. Make sure the rice is fully submerged—this helps it get nice and chewy later.
After soaking, drain the rice and put it in a steamer. Add just enough water to cover the rice (like, a thin layer on top). Steam on high heat for 30 minutes. Once it’s done, let it cool down to room temperature—you don’t want to burn your fingers later!
Take some red bean paste (or sweetened red beans) and wrap it into the steamed rice. I made about 5 small rice balls—each one should be big enough to fit in the center of a muffin, but not too huge. Set these aside.
Make the Matcha Muffin Batter

Now for the fun part—the matcha muffin batter! Let’s get mixing:
First, soften your butter. It should be soft enough that you can poke it with your finger easily. If it’s too hard, you’ll have a tough time mixing. Trust me, I’ve been there!
Add the powdered sugar to the butter. Use a spoon to mix it first—this prevents the sugar from flying everywhere when you use the mixer. Pro tip: cover the bowl with a towel if you’re worried about a sugar storm!
Beat the butter and sugar with an electric mixer until it’s light and fluffy—like, pale yellow and creamy. This usually takes a few minutes. Don’t rush this step; it makes the muffins super soft.
Add the egg in 3 parts. Mix well after each addition. If you add it all at once, the batter might curdle. Nobody wants curdled batter—yuck!
Sift the flour, matcha powder, and baking powder together. Sifting is important here—it gets rid of lumps and makes the matcha distribute evenly. No one wants a muffin with a big clump of matcha!
Add the dry ingredients to the butter mixture. Mix until just combined—don’t overmix! Overmixing makes muffins tough. We want soft, tender muffins, right?
Add the milk in 3 parts, mixing well after each. Again, don’t overmix. The batter should be smooth but not runny.
Assemble and Bake

Now it’s time to put it all together. This is where the magic happens:
Put the muffin batter into a piping bag (or a plastic bag with the corner cut off—cheaper option!). This makes it easier to fill the cups neatly.
Take a muffin cup and pipe a layer of batter at the bottom—about 1/3 full.
Place one of the sticky rice balls in the center of the batter.
Pipe more batter around the rice ball to fill the gaps. Then cover the top with batter until the cup is about 70-80% full. Don’t fill it too much—muffins expand when baking!
Preheat your oven to 180°C (350°F). Bake the muffins for 20-25 minutes. About 7-8 minutes in, check if they’re browning too much. If yes, cover them with aluminum foil—this keeps the matcha color nice and green.
Once they’re done, take them out of the oven and let them cool on a wire rack. I know it’s hard to wait, but trust me—they taste better when they’re not scalding hot!
Tips for Success
Here are a few things I learned while making these—save yourself some mistakes!
- Use good quality matcha powder. Cheap matcha can taste bitter, and the color won’t be as vibrant. I used Qingxing, which worked great.
- Adjust the baking time and temperature based on your oven. Every oven is different—mine runs hot, so I baked them for 22 minutes. Check them at 20 minutes to be safe.
- Don’t skip the soaking step for the rice. It makes the rice chewy and delicious. If you skip it, the rice might be hard in the center.
- Let the butter and egg come to room temperature. Cold ingredients can make the batter lumpy, and the muffins won’t rise as well.
Final Thoughts
These matcha muffin red bean zongzi are perfect for Dragon Boat Festival, or any day you want a fun, sweet treat. They’re easy to make, and the combination of matcha, muffin, and sticky rice is so unique. I made 5-6 muffins with this recipe—perfect for sharing with family or friends.
So go ahead, give this recipe a try! Let me know in the comments how it turns out. Happy baking, and happy Dragon Boat Festival!