
")


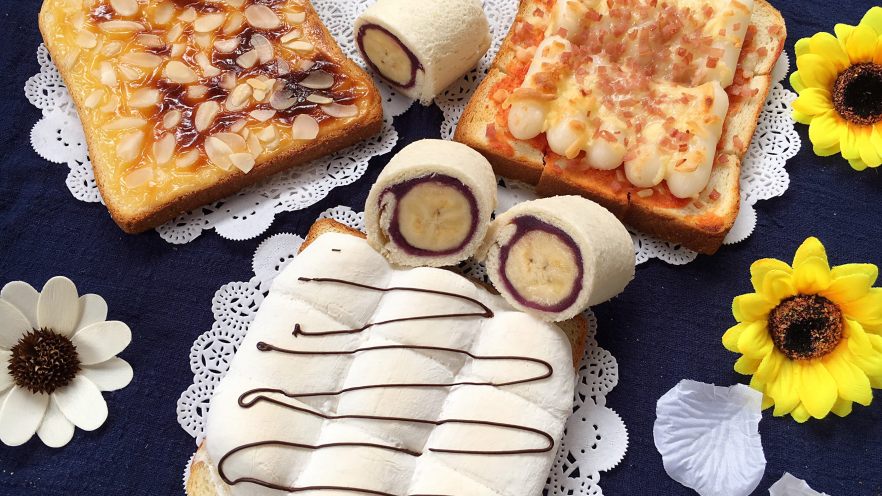
Let’s be real: most of us reach for a basic slice of toast when we’re in a hurry, or just want something quick and comforting. But what if I told you you can turn that same boring slice of bread into four totally different, mouthwatering meals? I recently baked up a big loaf of homemade sourdough toast, and I decided to get creative to make every slice count—no wasted food, no boring meals, just four fun, flavor-packed ways to enjoy toast. Whether you’re feeding yourself, a picky kid, or a crowd, these recipes are so easy even a total beginner can pull them off. Let’s dive in!
What You’ll Need for All 4 Toast Recipes
First things first: you don’t need a million fancy ingredients for any of these. I used basic store-bought or homemade sliced white toast for all of these, but you can swap in whole grain, sourdough, or whatever kind you love. Here’s the full list of ingredients I used across all four recipes, so you can grab everything ahead of time:
- 12 slices of thick-cut toast (3 per recipe, perfect for sharing or meal prepping)
- 1 tbsp honey
- 5g unsalted butter
- 15ml heavy cream
- 1 slice of American or cheddar cheese
- 1 small banana
- 1/2 cup prepared purple sweet potato mash (or plain vanilla yogurt if you don’t have mash!)
- 1 tbsp tomato sauce (ketchup works too, no judgment)
- 1 thin slice of deli ham
- 10 small pre-made cheese rice cakes (or store-bought mozzarella sticks cut into pieces)
- 1/4 cup shredded mozzarella cheese
- 9 mini marshmallows
- Optional: chocolate sauce for drizzling, sliced almonds for topping
Recipe 1: Creamy Broiled Rock Roast Toast (The Ultimate Sweet Indulgence)
This is my go-to lazy weekend treat. It’s like a fancy café-style rock toast, but way cheaper to make at home. I swear this stuff smells like a bakery the second it goes under the broiler, and the combination of sweet, creamy, and nutty is so addictive. Pro tip: don’t walk away from the oven while this bakes— it can burn super fast!
- Start by grabbing a small heatproof bowl. Add your 5g of butter and 15ml of heavy cream, then set the bowl over a small pot of simmering water. Wait till the butter melts completely, stirring every 30 seconds or so.


- Once the butter is fully melted, take the bowl off the heat and stir everything together until it’s smooth and creamy.

- Toss in your single slice of cheese— I used a mild cheddar for extra depth, but American works way better for melting smoothly.

- Stir the cheese in the warm cream mixture until it melts completely into a silky sauce. Don’t worry if it looks a little thick at first, it will smooth out as it cools!

- Let the sauce cool for a minute or two, then stir in the 1 tbsp of honey. This adds the perfect touch of sweetness without making the toast too sickly.

- Now take your slice of toast and spread the sauce thickly over the top. Don’t skimp here— this is the best part!

- Sprinkle a handful of sliced almonds over the top for a crunchy, nutty contrast to the soft sauce. I usually use about a tablespoon’s worth, but feel free to add more if you love almonds!

- Pop the toast under a broiler (set to high!) for 2-3 minutes, just until the top starts to bubble and turn golden brown. Keep a close eye on it— I’ve had mine burn in 90 seconds before when I got distracted scrolling on my phone.

Recipe 2: Stuffed Banana Purple Sweet Potato Toast Roll Ups (Perfect for On-the-Go Snacks)
My partner hates crusts on their bread, so this recipe is perfect for us— we cut the crusts off right away, and the end result is a cute, portable roll that’s great for packing in lunchboxes or grabbing on your way out the door. The sweet potato mash adds a warm, earthy flavor, and the banana adds a natural sweetness that pairs so well. Pro tip: wrap the rolls in plastic wrap and chill them overnight if you want to prep breakfast ahead of time!
- Take your slice of toast and use a sharp knife to cut off all the hard, crusty edges. I know some people love crusts, but for this roll, they just get in the way of a smooth roll.

- Now use a rolling pin to flatten the toast into a thin, even sheet. If you don’t have a rolling pin, no big deal— just use the flat side of a can of soup or your hand to press it flat. I even do this with my bare hands sometimes when I’m feeling lazy!

- Spread the purple sweet potato mash over the flattened toast, leaving a small border around the edges so the filling doesn’t squeeze out when you roll it. If you want a extra filling, go for it— no one will judge you!

- Place the banana along the bottom edge of the toast. I like to slice the banana into thin pieces first, but you can just lay a whole strip down if you want.

- Start rolling the toast up tightly from the bottom edge, just like you’re rolling a burrito. Try to keep it as tight as possible so the roll doesn’t fall apart later.

- Wrap the roll tightly in plastic wrap and set it aside for at least 30 minutes (or up to overnight!) to let it set. This makes cutting it cleanly way easier.

- Once the roll has set, unwrap the plastic wrap and use a sharp knife to cut it into 1-inch thick slices. You’ll get 4-5 cute little roll ups per slice of toast!

Recipe 3: Cheesy Ham & Rice Cake Toast Bake (Savory Comfort Food at Its Best)
This is my go-to weeknight dinner when I don’t have a lot of time to cook. It’s savory, cheesy, and has that perfect chewy texture from the rice cake cheese sticks. My kids go crazy for this one, and I usually make a double batch so we have leftovers for lunch the next day. Pro tip: you can swap the ham for bacon, turkey, or even leave it out entirely for a vegetarian version!
- Start by prepping your cheese rice cakes. Grab your 10 small rice cake sticks and hold them up to your slice of toast to see how many you’ll need. I usually fit 4-5 per slice, so cut off any excess rice cake if you need to.

- Bring a small pot of water to a boil, then add the rice cake sticks. Let them boil for 2-3 minutes, or until they float to the top— that means they’re soft and cooked through!

- Once the rice cakes float to the top, use a slotted spoon to scoop them out of the water and drain them on a paper towel. Don’t skip this step— wet rice cakes will make your toast soggy!

- Take your slice of toast and cut it into 4 small square pieces. This makes it way easier to eat with a fork later, and it fits more rice cakes on each piece!

- Spread a thin layer of tomato sauce over each square of toast. I use plain ketchup, but you can use marinara sauce or even pesto if you want to switch up the flavor.

- Arrange the drained rice cake sticks on top of the tomato sauce. Try to space them out evenly so every bite has some cheese rice cake.

- Sprinkle a generous handful of shredded mozzarella cheese over the top of the rice cakes. The more cheese, the better, in my opinion!

- Chop up the slice of deli ham into small pieces and sprinkle them over the top of the cheese. If you don’t like ham, feel free to skip it or swap in some diced bell peppers or mushrooms.

- Pop the toast into a preheated 375°F (190°C) oven for 10-12 minutes, or until the cheese is bubbly and golden brown.

Recipe 4: Gooey Marshmallow Toast (The Ultimate Kid-Friendly Treat)
If you have a sweet tooth and love things that are extra, this recipe is for you. The marshmallows melt into a sticky, gooey mess that’s perfect for dipping or eating straight out of the oven. My niece begs for this every time she comes over, and we always end up with marshmallow fluff stuck to our fingers and faces. Pro tip: drizzle some chocolate sauce on top after baking for an extra indulgent treat!
- Take your slice of toast and arrange it on a baking sheet. You can use any kind of toast here, but thick-cut bread works best so it doesn’t get soggy under the marshmallows.

- Arrange the 9 mini marshmallows in a single layer in the center of the toast. I like to make a little circle with them, but you can arrange them however you want!

- Preheat your oven to 350°F (175°C) and let it warm up for 5 minutes. Then pop the toast into the oven for 5-7 minutes, or until the marshmallows are fully melted and puffy.
- While the toast is baking, rotate the baking sheet halfway through so the marshmallows melt evenly. I always forget this step, but it makes a big difference in how evenly the toast cooks!

- Once the marshmallows are melted and golden brown, take the toast out of the oven. If you want, drizzle some chocolate sauce over the top for an extra sweet touch.

- Let the toast cool for a minute or two before eating— the marshmallow will be super hot! I like to wait 30 seconds so I don’t burn my tongue, but who am I kidding, I always burn my tongue anyway.

- Take a bite and enjoy the sticky, gooey goodness! I promise you’ll get marshmallow fluff on your lips and fingers, and that’s half the fun.

Pro Tips for Making These Toast Recipes Even Better
- Adjust the oven temperature based on your oven! Every oven runs hot or cold, so keep an eye on your toast the first time you make any of these recipes to avoid burning it.
- Swap ingredients to fit your tastes! If you don’t like almonds, use walnuts or pecans instead. If you’re allergic to dairy, use vegan butter and vegan cheese instead of regular dairy products.
- Prep ahead of time! You can cut the crusts off the toast, make the sweet potato mash, and boil the rice cakes the night before to save time in the morning.
- These recipes work great with leftover toast! If you have a loaf of bread that’s starting to get stale, don’t throw it away— turn it into one of these delicious meals instead.
At the end of the day, toast doesn’t have to be boring. With just a few simple ingredients and 10 minutes of prep time, you can turn a basic slice of bread into four totally different meals that everyone in your family will love. Whether you’re craving something sweet, savory, or portable, there’s a recipe here for you. I hope you give these a try— and don’t forget to take a photo of your finished toast to show off your hard work!

")


