
")


Introduction: Why This No-Bake Mango Mousse Cake is a Game-Changer
Ugh, who needs an oven anyway? When it’s sweltering outside, standing in front of a hot oven to make a cake sounds like a nightmare. But guess what? You don’t need one! This no-bake mango mousse cake is here to save the day—and your sanity. Picture this: a silky-smooth mousse loaded with fresh mango chunks, a buttery cookie crust, and absolutely zero oven time. Perfect for summer BBQs, lazy afternoons, or even last-minute “I need dessert now” emergencies.
Let me tell you, this recipe is zero fail. I’ve tested it with friends who swear they “can’t cook,” and even they ended up with a showstopping dessert. No fancy tools, no burnt edges, just pure mango-y goodness. Let’s dive in!
Ingredients You’ll Need: Simple, No-Waste List
First, let’s gather the essentials. Most ingredients are pantry staples, so you won’t have to run to the store. Here’s what you need:
Crust Ingredients
- 150g (1 cup) digestive biscuits (or graham crackers if you’re in the US)
- 60g (½ stick) unsalted butter, melted (you can use salted if you don’t have unsalted, just adjust later)
Mousse Layer Ingredients
- 500g (2 cups) heavy whipping cream (the thicker, the better—don’t use low-fat, it won’t whip right!)
- 20g (2 tbsp) unflavored gelatin powder (this is key for the mousse to hold shape—don’t skip it!)
- 50g (¼ cup) granulated sugar (add more if you want sweeter mango, or leave less for a tangier taste)
- 400g (about 3 medium) ripe mangoes (divided: 200g for puree, 200g for chunks)
Pro tip: Use super ripe mangoes! The riper they are, the sweeter and creamier your mousse will be. If your mangoes are firm, let them sit on the counter for 1-2 days until they’re soft to the touch. Trust me, it’s worth the wait!
Step-by-Step: Making It Without an Oven (It’s Easier Than You Think)
This is where the magic happens! Let’s break it down—no jargon, just easy steps you can follow in your PJs (yes, really).
Step 1: Prep the Crust (The Crunchy Base)
 First, grab your digestive biscuits. You can crush them in a food processor, but if you’re old-school like me, use a plastic bag and a rolling pin! Just bash the biscuits until they’re fine crumbs—no big chunks, please!
- Melt the butter in the microwave for 30 seconds (check it every 15 seconds to avoid burning!). Let it cool for 5 minutes so it’s not scalding.

 Mix the crushed biscuits with the melted butter. Stir until every crumb is coated—like wet sand, not dry crumbs.
- Press this mixture firmly into the bottom of an 8-inch cake pan. Use the back of a spoon to smooth it out and pack it tight. Any loose edges will crumble later, so press hard!
- Chill the crust in the fridge for at least 15 minutes. This sets it so it doesn’t fall apart when we add the mousse.
Step 2: Make the Mango Puree (The Sweet, Silky Middle)
 Now, let’s turn those mangoes into magic. Peel the mangoes, remove the pits, and chop the flesh into chunks. If you have a food processor, blend them until smooth. If not, use a blender or even a potato masher (just be patient—it’ll take longer!).
 In a small saucepan, heat the mango puree over low heat (no boiling!). Add 20g gelatin powder and stir constantly—this prevents lumps! Keep stirring until the gelatin dissolves (about 2-3 minutes). The temperature should be around 50°C (12o°F)—if it boils, your mousse will turn grainy. Oops!
- Let the mango-gelatin mixture cool for 5 minutes before adding to the cream. If you add it too hot, you’ll melt the cream into butter—yikes!
Step 3: Whip the Cream (The Fluffy, Smooth Top Layer)
 Pour the 500g heavy cream into a clean bowl. Add the 50g sugar. Use an electric mixer on high speed for 3-5 minutes until it forms soft peaks. Soft peaks mean the cream holds a slight curve when you lift the whisk—like a gentle wave, not a straight line.
 Pro tip: Don’t overwhip the cream! If it turns into butter, you’re done for—start over with fresh cream. Aim for a “pourable but thick” texture, like thick Greek yogurt.
- Once the cream is ready, gently fold in the cooled mango-gelatin mixture. Use a spatula and cut through the cream in a zigzag—don’t stir in circles, that’ll deflate the air!
Step 4: Assemble & Chill (The Final Cool-Down)
 Now, chop the remaining 200g mangoes into small cubes (about 1cm each). Fold these into the mousse mixture—they’ll add bursts of flavor and texture!
 Pour the mousse into the chilled crust. Tap the pan gently on the counter to release air bubbles. Smooth the top with a spatula—this makes slicing easier later!
- Cover the pan with plastic wrap (or a plate) and chill in the fridge for at least 4 hours. Overnight is even better—it firms up the mousse and makes it slice cleanly.
Step 5: Demold & Serve (The Showstopper!)
 When it’s time to serve, your cake should be rock-solid. To demold, run a thin knife around the edge (I use a bench scraper, but a butter knife works too). Then, place a plate on top of the pan and flip it over—your cake should slide right out! If it sticks, tap the pan bottom gently or use a hot towel wrapped around the edges to loosen it.
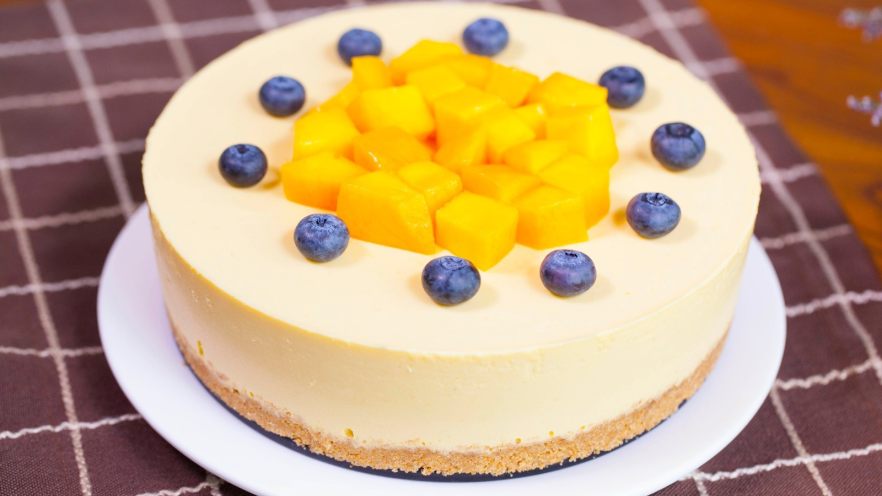
Slice it with a sharp knife (wipe the blade between cuts for clean edges) and garnish with extra mango chunks or a dusting of powdered sugar. Serve with a dollop of whipped cream or a mint leaf for that Instagram-worthy look!
Pro Tips: Make It Perfect Every Time
Even if you’re a beginner, these tips will take your cake to the next level. Let’s make sure you don’t make any mistakes!
Demolding Hacks
Use a hot towel: Dip a clean towel in hot water, squeeze out excess moisture, and wrap it around the pan’s outside for 10 seconds. This softens the crust edges, making the cake pop out easily. Then, flip it onto a plate and gently tap the bottom if needed.
Ingredient Tweaks
- More mango flavor? Add a splash of mango juice or 1 tsp mango extract to the puree.
- Thicker crust? Add 10g more butter to the biscuit mixture.
- Less sugar? Reduce the sugar to 40g—ripe mangoes are sweet enough!
Storage & Leftovers
Keep the cake in an airtight container in the fridge for up to 5 days. If you want to save some for later, wrap slices in plastic wrap and freeze them for up to 2 months. Defrost in the fridge overnight before serving!
: Authentic Cantonese Recipe for Home Cooking")

")


 – A Refreshing Summer Seafood Recipe")
")


 with Colorful Veggies | A Simple, Flavor-Packed Recipe")