
")


Why You’ll Obsess Over These Cat Paw Cookies
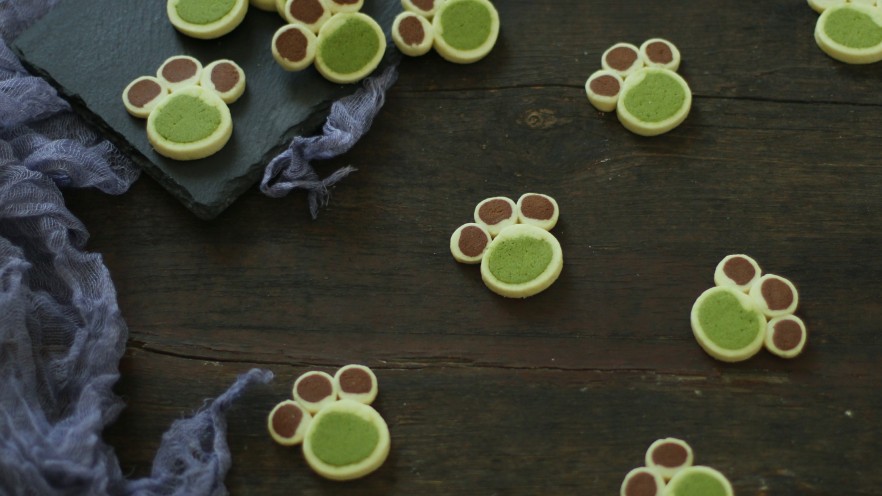
Let’s be real—regular round cookies are great, but have you ever seen a cookie so cute it makes you go “aww” before you even take a bite? These cat paw cookies are exactly that! Imagine little cocoa “pads” and soft green tea “toes” on a buttery base—they’re like edible tiny cat paws, and trust me, kids (and let’s be honest, adults too) will lose their minds over them. Plus, they’re easier to make than they look—no fancy tools required, just some patience and a love for all things cute. Let’s dive in!
Ingredients You’ll Need
First things first: gather your stuff. You don’t need anything super fancy—most of these are pantry staples. Here’s the full list:
- 120g cake flour (low-gluten flour works too)
- 60g unsalted butter (no need to soften—wait, really? Yep, just cut it up!)
- 40g powdered sugar (for that melt-in-your-mouth sweetness)
- 30g egg liquid (about half a large egg—save the rest for later!)
- 2g matcha powder (for the green “toes”)
- 2g cocoa powder (for the dark “pads”)
- 8g extra cake flour (to stiffen one part of the dough)
- A little extra egg liquid (to glue the cookie parts together)
Step-by-Step Guide to Making Cat Paw Cookies
Okay, let’s get baking! I’ll walk you through each step with pics—no confusion, promise.
Step 1: Prep All Your Ingredients

First rule of baking: don’t be scrambling for flour mid-step. Lay out all your ingredients on the counter—cake flour, butter, powdered sugar, eggs, matcha, cocoa… everything. This saves so much time later, trust me.
Step 2: Cut Butter Into Small Chunks (No Softening Needed!)

Wait, no softening? That’s right! Just grab your cold butter and chop it into 1cm chunks. Pop them into a big mixing bowl—this is where the magic starts.
Step 3: Sift Flour + Powdered Sugar Over Butter

Take your 120g cake flour and 40g powdered sugar, mix ’em, then sift them right over the butter chunks. Sifting makes the cookies lighter—don’t skip this!
Step 4: Rub Into “Coarse Sand”

Now for the fun (and slightly messy) part: use your hands to rub the flour-sugar mix into the butter. Keep going until it looks like coarse beach sand—no big butter lumps left. It’s like playing with kinetic sand, but for baking!
Step 5: Add Egg Liquid & Mix

Pour in the 30g egg liquid (make sure it’s room temp, not cold!). Use a spatula to fold everything together—don’t overmix, just until it’s combined.
Step 6: Knead Dough & Split Into 3 Parts

Now knead the mix into a smooth dough (it won’t be sticky, don’t worry!). Then split it into three weights: 120g, 80g, and 55g. Pro tip: use a kitchen scale for this—eyeballing might lead to lopsided paws!
Step 7: Add Flavors (Matcha & Cocoa Time!)

Here’s where we get the colors:
- Take the 120g plain dough and knead in the 8g extra cake flour (this makes it stiffer for the base).
- Knead the 80g dough with 2g matcha powder (hello, green “toes!”).
- Knead the 55g dough with 2g cocoa powder (dark “pads” FTW!).
Make sure each dough is evenly colored—no streaks!
Step 8: Roll Plain Dough for Matcha Toes

Take 60g of the stiff plain dough (half the 120g batch) and roll it into a long, thin rectangle—about 0.3cm thick. This is the “blanket” for the matcha toes.
Step 9: Place Matcha Dough on Plain Sheet

Roll the entire 80g matcha dough into a long cylinder—same length as your plain sheet. Lay it right in the middle of the plain rectangle.
Step 10: Wrap Plain Dough Around Matcha

Gently fold the plain dough over the matcha cylinder, pinching the edges to seal. It should look like a green log wrapped in white—cute already!
Step 11: Split Remaining Doughs for Cocoa Pads

Take the leftover 60g plain dough and the 55g cocoa dough—split both into 3 equal small pieces. So 20g plain + ~18g cocoa per pad.
Step 12: Wrap Cocoa Dough in Plain Dough

For each cocoa piece: roll the small plain dough into a tiny rectangle, wrap it around the cocoa cylinder (just like you did with the matcha!). Do this 3 times—you’ll have 3 small cocoa logs wrapped in white.
Step 13: Freeze Dough Logs (Critical Step!)

Wrap all your logs (1 matcha log + 3 cocoa logs) in plastic wrap and pop them in the freezer for 30 minutes. They need to be hard enough to slice—if you skip this, they’ll squish when you cut them. Patience, young grasshopper!
Step 14: Slice the Logs

Take the logs out of the freezer (they should be firm, not rock hard). Slice the matcha log into 6mm-thick rounds (these are the “toes”). Slice each cocoa log into 6mm rounds too (these are the “pads”). Try to make slices even—this makes the paws look neat!
Step 15: Assemble the Cat Paws

Line a baking sheet with parchment paper. Now, arrange the slices: take 1 cocoa pad slice, then put 3 matcha toe slices above it (like a real cat paw!). To make them stick, brush a tiny bit of extra egg liquid on the back of the toes before placing them on the pad. So cute!
Step 16: Bake Them to Perfection

Preheat your oven to 160°C (320°F) (upper and lower heat). Pop the baking sheet in the middle rack and bake for 12 minutes. Pro tip: set a timer for 10 minutes first—every oven is different! You don’t want them to burn.
Step 17: Cool & Enjoy!

Take the cookies out and let them cool on the baking sheet for 5 minutes (they’re soft right now!). Then move them to a wire rack to cool completely. Once cool, they’re crunchy on the outside and soft inside—perfect!
My Top Tips for Perfect Cat Paw Cookies
- Oven temp is key: Every oven has a “personality!” If yours runs hot, lower the temp by 10°C. Check the cookies at 10 minutes—they’re done when the edges are slightly golden.
- Don’t overknead: Overkneading makes cookies tough. Knead just until the dough is smooth.
- Freeze longer if needed: If the logs are still squishy after 30 minutes, freeze for 10 more—slicing firm logs is way easier.
- Store properly: Keep cooled cookies in an airtight container for up to 3 days. They stay crunchy and delicious!
Final Thoughts
These cat paw cookies are more than just treats—they’re a fun activity to do with kids, a cute snack for parties, or even a sweet gift for cat lovers. The matcha adds a subtle earthy flavor, the cocoa is rich, and the plain base is buttery perfection. Every bite is a little burst of cuteness and yum. So grab your ingredients, roll up your sleeves, and let’s make some paw-some cookies!


")
 at Home – Easy Recipe with Step-by-Step Photos")
")
")
")
