
")


Let’s talk about Paris-Brest—those round, swirly puff pastries that look fancy but are actually doable at home. This recipe is from a Japanese pastry school, and the filling uses Nutella (yep, the hazelnut chocolate spread we all love). If you’re not a huge chocolate fan, just cut the Nutella in half—no judgment here. This makes two 12cm ones or one big 18cm showstopper. Let’s dive in!
Ingredients
Puff Pastry Shells
- 100g milk
- 45g butter
- A pinch of salt
- 60g low-gluten flour
- 2 eggs (large ones—60g+ with shell)
Custard Cream
- 3 egg yolks
- 50g granulated sugar
- 25g low-gluten flour
- 250g milk
- A dash of vanilla paste
Filling & Decoration
- 80g Nutella (or 40g if you want less chocolate)
- Your favorite fruits (strawberries, blueberries, etc.)
- Almond slices
- Powdered sugar
Step-by-Step Instructions
1. Make the Puff Pastry Shells

First up, the shells! Grab a small saucepan and pour in the milk.

Add the butter—unsalted is fine, but salted works too (just skip the extra salt later).

Toss in a tiny pinch of salt. Trust me, it makes the sweetness pop.

Heat until it boils, then turn off the heat right away. Don’t let it boil over—messy!

Sift the low-gluten flour into the pan. Sifting keeps the batter smooth—no lumps allowed.

Mix it into a dough. If it’s sticky, turn the heat back to low and stir until a thin film forms on the bottom of the pan. That means it’s ready.

Move the dough to a mixing bowl. Crack two eggs into another bowl—make sure they’re big! Small eggs might not give enough moisture.

Whisk the eggs a little, then add them to the dough one spoonful at a time. Wait for the dough to absorb each spoon before adding more—this is key to the shells rising.

The final batter should hang off the spatula in a thick, triangular drip. If it’s too runny, add a bit more flour; if too thick, a splash more egg.

Put the batter into a piping bag and pipe two 12cm circles on a baking sheet (lined with parchment paper). For extra flair, pipe a second circle on top of the first—like a target.

Brush the tops with a little beaten egg (save some from the two you used) and sprinkle almond slices all over. They add crunch!

Bake at 185°C for 45 minutes. Don’t open the oven door early—they’ll deflate! Let them cool completely on a wire rack.
2. Make the Custard Cream

While the shells bake, make the custard. In a bowl, mix the egg yolks and sugar until pale and creamy.

Sift in the low-gluten flour and mix until smooth—no lumps here either!

In another saucepan, heat the milk and vanilla paste until it’s just about to boil (small bubbles around the edge).

Slowly pour the hot milk into the egg mixture, stirring constantly. You don’t want scrambled eggs!

Pour everything back into the saucepan and cook over low heat, stirring nonstop. It’ll thicken into a smooth custard—keep going until it’s thick enough to hold its shape.

Cover the custard with plastic wrap (touching the surface to prevent a skin) and chill in the fridge for at least 30 minutes.
3. Assemble the Paris-Brest

Take the cooled custard out of the fridge and whisk it until it’s smooth again. Then add the Nutella and mix until combined—this is the best part!

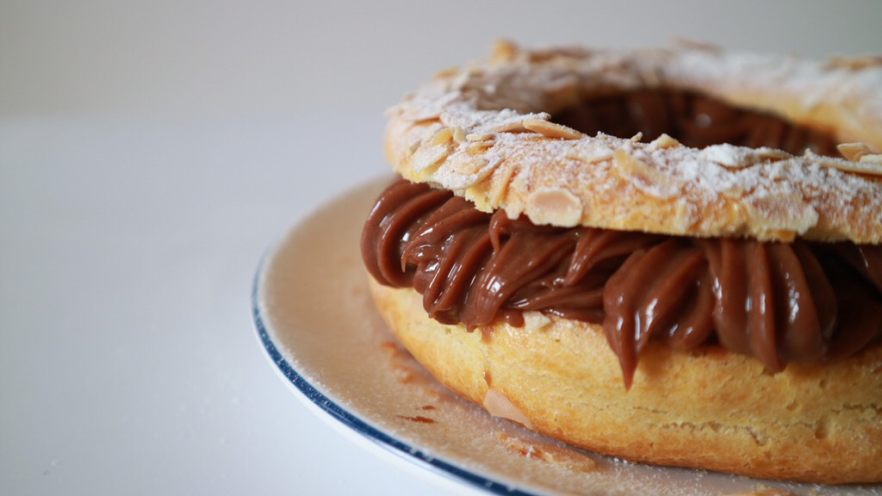
Cut the cooled puff shells in half horizontally. Pipe the Nutella custard onto the bottom half, then add your favorite fruits—strawberries, raspberries, or even kiwi work great.

Pipe a little more custard on top of the fruits, then put the top half of the shell on. Dust with powdered sugar for that fancy bakery look.

And there you have it—your very own Paris-Brest! It’s best eaten the same day, but you can store the filled pastries in the fridge for up to 24 hours.

Pro tip: If you’re making mini ones, just pipe smaller circles—they’re perfect for parties! And don’t stress if your first try isn’t perfect—practice makes perfect, and even messy ones taste amazing.

Enjoy your homemade Paris-Brest—you deserve it!


")


 Recipe")