


My First Shot at Yellow Peach Crumb Bread (And It Won My Family’s Heart!)
Let me set the scene: It was a lazy Sunday afternoon, and I was scrolling through baking reels, craving something sweet but not too heavy. That’s when I stumbled on a yellow peach crumb bread recipe—golden crumbs, oozing custard, and juicy peaches? Sign me up! I’d never made anything like this before, but I figured, why not? Spoiler: It was a hit. My 10-year-old took one bite, looked up, and said, “Mom, this has everything—crunchy top, soft bread, sweet peaches—and it’s not sticky or gross.” High praise from a kid who judges desserts like a food critic! My husband even went back for a second slice (and he’s not a big sweet tooth). That’s the magic of baking, right? When something you whip up in your kitchen makes your people smile. This bread’s got that cozy, homemade vibe—rich flavor but light enough to eat for breakfast or a snack. Let’s dive into how I made it!
What You’ll Need (No Fancy Tools Required!)
First, let’s round up the ingredients. I split them into three parts: the bread dough, the vanilla custard filling, and the crunchy crumble topping. Pro tip: Measure everything out first—this recipe has a few moving parts, and prepping ahead saves chaos later!
Bread Dough Ingredients
- 250g high-gluten flour (this is key for that soft, chewy bread texture—don’t use all-purpose if you can avoid it!)
- 120ml water (room temp is best—cold water can slow down yeast)
- 10g milk powder (adds a subtle creaminess)
- 40g egg liquid (about 1 large egg—save a little for brushing the top later!)
- 2g salt (balances the sweetness—trust me, you need this)
- 40g granulated sugar (not too much—we’ve got other sweet elements)
- 3g active dry yeast (make sure it’s fresh! Expired yeast = flat bread)
- 20g unsalted butter (softened but not melted—cut into small cubes)
Vanilla Custard Filling Ingredients
- 90ml milk (whole milk for extra richness)
- 20g granulated sugar
- 8g cake flour (low-gluten flour works too—keeps the custard smooth)
- 1 egg yolk (save the white for another recipe, like meringues!)
- 5g unsalted butter
Crunchy Crumble Topping Ingredients
- 20g unsalted butter (cold, cut into small cubes—this is how you get crumbly bits!)
- 20g cake flour
- 15g powdered sugar (confectioners’ sugar—adds a delicate sweetness)
- 20g almond flour (this gives the crumble a nutty kick—yum!)
For the Filling
- 1 can yellow peaches (or fresh peaches if they’re in season! I used canned because it’s winter, and they’re already soft and sweet. Just drain them well and pat dry—wet peaches make the bread soggy!)
Step-by-Step Instructions (With My Hacks!)
Okay, let’s get baking! I used my Donlim 1352 bread machine for the dough because kneading by hand is a workout, but you can totally knead manually if you don’t have one. Let’s go step by step.
Step 1: Make the Bread Dough (Gluten Magic Happens Here)

First, add all the dough ingredients to your bread machine bucket—except the butter! I put the wet ingredients first (water, egg liquid) then the dry ones (flour, milk powder, sugar, salt, yeast). That way, the yeast doesn’t touch the salt directly (salt kills yeast, oops!). Set the machine to knead for 10 minutes. After 10 minutes, let the dough rest for 5 minutes—this relaxes the gluten so it’s easier to knead next. Then add the butter cubes and knead for another 15 minutes.
Step 2: Check for the “Window Pane” (The Dough Test)

After kneading, you need to test if the dough is ready. Take a small piece, stretch it gently. If you can pull it thin enough to see light through it without tearing (that’s the window pane!), you’re good. If it tears easily, knead for 5 more minutes. This step is non-negotiable—it’s what makes the bread soft and elastic instead of dense.
Step 3: First Rise (Let the Yeast Do Its Thing)

Shape the dough into a smooth ball and put it back in the bread machine. Set the machine to the “ferment” program—mine took 35 minutes. You want the dough to double in size. How to check? Poke it with a floured finger—if the indentation stays, it’s ready. If it springs back, let it rise a little longer. Pro tip: Keep the machine in a warm spot (no drafts!)—yeast loves warmth.
Step 4: Make the Crumble Topping & Custard While Dough Rises

While the dough is rising, let’s make the two star toppings: the crumble and the custard. Multi-tasking win!
First: Crunchy Crumble Topping

This is so easy—even my kid could help with this! Grab a small bowl and add the cold butter cubes, cake flour, powdered sugar, and almond flour. Use your fingers to rub everything together until it looks like coarse crumbs. Don’t overmix—you want some bigger chunks for crunch! Pop it in the fridge to chill while you make the custard.
Next: Creamy Vanilla Custard
This custard is the secret weapon—it adds a creamy, sweet layer that ties everything together. Here’s how to make it without lumps (trust me, I’ve had lumpy custard fails before!):

- 1. In a small saucepan, mix 10g sugar with 45ml milk. Heat it over medium heat until it just starts to bubble (don’t let it boil! That’s how you get scalded milk). Take it off the heat.

- 2. In a separate bowl, mix the remaining 10g sugar with the egg yolk. Whisk it until the sugar dissolves and the mixture turns pale yellow—this takes about 1 minute.

- 3. Add the cake flour to the egg yolk mixture and whisk until smooth (no lumps allowed!). Then stir in the remaining 45ml milk.

- 4. Now, slowly pour this egg mixture into the warm milk saucepan, whisking the whole time. This prevents the egg from curdling (scary, but avoidable!).

- 5. Put the saucepan back on low heat. Stir constantly with a spatula (I use a silicone one to scrape the bottom) until the custard thickens—this takes 2-3 minutes. It should be thick enough to coat the back of your spatula.

- 6. Take it off the heat and stir in the butter until it melts. Let it cool for a minute, then transfer it to a piping bag (or a plastic bag with the corner cut off). If it gets too thick when cooling, pop it in the microwave for 5 seconds—just don’t overheat it!

Step 5: Shape the Dough & Second Rise

Once the dough has doubled in size, take it out of the machine and punch it down to release all the air (satisfying!). Divide it into 5 equal pieces—use a kitchen scale if you want them perfect, but eyeballing works too. Shape each piece into a smooth ball, cover them with plastic wrap, and let them rest for 15 minutes. This relaxes the gluten again, so it’s easier to roll out.
Step 6: Assemble the Bread
Now the fun part—putting it all together! Grab your dough balls:

- 1. Take one dough ball and roll it into a long rectangle (about 10x15cm). Fold the top third down, then the bottom third up—like folding a letter. Flip it over and roll it a little more to seal.

- 2. Place the folded dough into a loaf pan (or a round cake pan—whatever fits!). Repeat with all 5 dough balls, placing them side by side in the pan.

- 3. Now, let’s do the second rise. I used my Donlim oven’s proofing function, but you can also put the pan in a warm oven (turn it on for 1 minute, then turn it off) with a bowl of hot water to keep it humid. Let it rise for 30 minutes until the dough is 3 times its original size—yes, 3 times! That’s how you get fluffy bread.
Step 7: Top It Off & Bake
Once the dough is puffy and tall, it’s time to make it pretty (and tasty!):

- 1. Brush the top of the dough with a little leftover egg liquid—this gives it a golden color when baking.

- 2. Take the custard out of the fridge and pipe it in a diamond pattern on top of the dough. If the custard is too thick, dip the piping bag in warm water for 10 seconds—works like a charm!

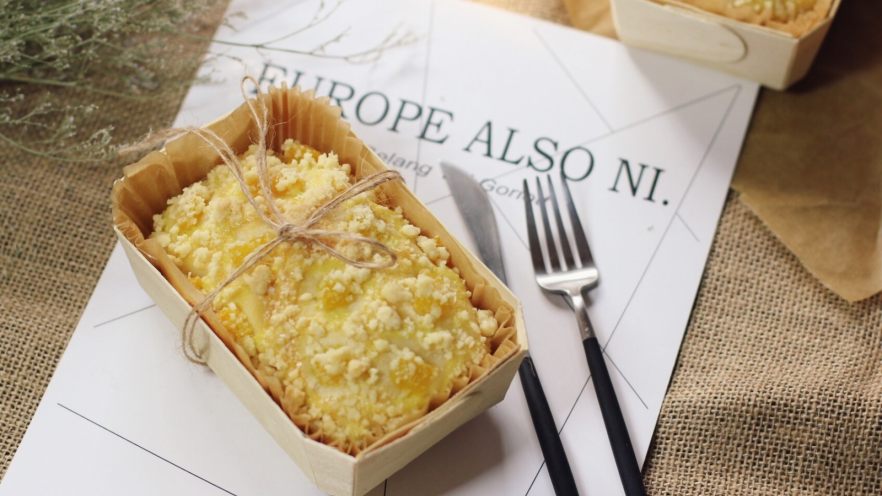
- 3. Add the yellow peach chunks to the center of each diamond. Remember to pat the peaches dry first—wet peaches make the bread soggy (I learned this the hard way with blueberry muffins).

- 4. Finally, sprinkle the cold crumble topping all over the bread. Don’t be shy—more crumble = more crunch!

- 5. Bake it in a preheated oven at 160°C (top heat) and 150°C (bottom heat) for 25 minutes. Every oven is different, so check it at 20 minutes—if the top is getting too dark, cover it with aluminum foil.
Step 8: Enjoy the Fruits of Your Labor!

When the bread is done, it’ll be golden brown, the crumble will be crunchy, and your kitchen will smell like heaven. Let it cool in the pan for 10 minutes, then transfer it to a wire rack to cool completely (or at least until it’s warm—no one can wait for cold bread!). Slice it up and serve—my family loves it with a cup of milk or tea.
My Pro Tips for Baking Success
I made a few small mistakes when I first tried this, so here’s what I learned to make it perfect every time:
- Pat the yellow peaches dry! This is the most important tip—wet peaches make the bread dough soggy and prevent it from rising properly.
- If your custard is too thick after cooling, warm it up slightly with a splash of milk and stir—this makes it pipeable again.
- Oven temperatures vary! My oven runs hot, so I lowered the temperature by 10°C. Use an oven thermometer if you’re unsure—they’re cheap and game-changing.
- Don’t skip the window pane test! I know it’s extra work, but it’s the difference between dense bread and soft, chewy bread.
Final Thoughts
This yellow peach crumb bread is now a staple in my baking rotation. It’s not too hard (even for beginners!), and the payoff is huge—happy family, delicious snacks, and that warm, fuzzy feeling of making something from scratch. Whether you’re baking for a weekend brunch, a potluck, or just because, this bread will be a hit. Give it a try, and let me know how it turns out—tag me on Instagram if you make it! Happy baking!


")


