


The Secret to the Most Authentic Homemade Chili Oil
Let’s be real—store-bought chili oil is fine, but there’s something magic about making your own. It’s like unlocking a flavor bomb that turns every dish from “meh” to “WHOA, this is amazing.” I’ve tinkered with so many recipes over the years, and let me tell you, this one’s the winner. I swear, once you make this, you’ll never go back to the jarred stuff. It’s spicy, aromatic, and has that perfect depth of flavor that makes everything taste better—noodles, dumplings, stir-fries, even eggs! Let’s dive in.
Ingredients You’ll Need
First, let’s round up all the good stuff. Don’t skip any ingredients—each one plays a role in making this chili oil unforgettable. Here’s what you’ll need:
- 60g white sesame seeds (toasted if you want extra nuttiness—trust me, it’s worth it)
- 1000g rapeseed oil (or canola oil, but rapeseed gives a better flavor)
- 25g onion (yellow or white, doesn’t matter—just something to add sweetness)
- 25g green onion (the white parts are key for flavor, but keep some green for color too)
- 25g celery (yep, celery! It adds a subtle earthy note you won’t notice until it’s missing)
- 120g chili powder (use a mix of mild and spicy if you want balance—like 80g mild + 40g spicy)
- 8g star anise (those little star-shaped things—they smell like Christmas and flavor)
- 5g bay leaves (dried is fine, just make sure they’re not crumbly)
- 5g fennel seeds (tiny but mighty—adds a sweet, licorice-like kick)
- 8g cinnamon stick (break it into small pieces so it releases flavor faster)
- 10g tsaoko (that’s the big, brown, wrinkly spice—soak it well because it’s tough)
- 5g amomum villosum (another aromatic spice—don’t skip it, it ties everything together)
- 10g red Sichuan peppercorns (for that tingly, numbing “ma” flavor—optional but highly recommended)
- 5g lithospermum (zicao in Chinese—this is the secret for that vibrant red color! Don’t worry, it doesn’t add flavor)
- 10g salt (to bring out all the flavors—don’t be shy)
- 10g ginger slices (fresh, not dried—adds warmth)
Pro tip: Double-check your spices—old ones won’t give you that bold flavor. If your star anise doesn’t smell strong when you crush it, replace it!
Step-by-Step Instructions
Okay, let’s get cooking. This isn’t hard, but you need to pay attention to the oil temperature—too hot and you’ll burn the chili powder; too cold and it won’t infuse properly. Let’s go step by step:
1. Prep All Ingredients

First things first: gather everything. Chop the onion, green onion, and celery. Measure out all the spices. This is called “mise en place” and it’ll save you from scrambling later. Trust me, there’s nothing worse than fumbling for a spice while the oil is smoking!
2. Soak Lithospermum (For Color)

Take the 5g lithospermum and soak it in warm water for 30 minutes. This softens it so it releases color better. Drain it well when you’re done—we don’t want water in the hot oil (that’s a splatter disaster).
3. Soak the Spices

Put the star anise, bay leaves, fennel seeds, cinnamon stick, tsaoko, amomum villosum, and Sichuan peppercorns in a bowl. Cover them with warm water and let them soak for 30 minutes too. Soaking spices helps them release flavor slower, so you don’t burn them when frying.
4. Drain Everything

After soaking, drain the lithospermum and spices really well. Pat them with a paper towel if you have to—water + hot oil = big splashes. Safety first, people!
5. Chop the Aromatics

Cut the green onion into 2-inch sections, the onion into small chunks, and the celery into 1-inch pieces. The ginger can just be sliced thin—no need to mince.
6. Heat the Oil

Pour the rapeseed oil into a large pot (I use a Dutch oven because it’s deep and prevents splatters). Turn the heat to medium-high and let it heat up until all the bubbles are gone. You’ll know it’s ready when a wooden spoon dipped in the oil has small bubbles around it—don’t let it smoke! Once it’s ready, turn off the heat.
7. Add Lithospermum

Carefully add the drained lithospermum to the hot oil. Stand back a little—there might be a few splashes. The oil will start turning red almost immediately.
8. Fry Lithospermum for Color

Let the lithospermum sit in the oil for about 1-2 minutes, stirring gently. You want the oil to be a deep, rich red. Don’t leave it too long—if the lithospermum turns brown, it’ll make the oil taste bitter.
9. Remove Lithospermum

Use a slotted spoon to take out the lithospermum. We don’t need it anymore—it did its color job. Discard it or save it for… well, I don’t know, but you don’t need it in the oil.
10. Fry the Aromatics and Spices

Turn the heat back to low. Add the ginger slices, green onion, onion, celery, and all the soaked spices. Stir them around and let them fry slowly. This is where the magic happens—all those flavors infuse into the oil. Fry until the green onion is slightly crispy and the aromatics are golden brown (about 10-15 minutes). Don’t let them burn—burnt aromatics = bitter oil!
11. Remove All Aromatics and Spices

Use a slotted spoon to scoop out all the solids. You want just the infused oil left. Let the oil cool for 2-3 minutes—we don’t want to burn the chili powder!
12. Mix Chili Powder, Salt, and Sesame Seeds

In a heatproof bowl (ceramic or glass—metal might get too hot), mix the chili powder, salt, and white sesame seeds. Stir them well so everything is evenly distributed.
13. Pour the First Batch of Oil

Slowly pour about 1/3 of the hot oil over the chili powder mixture. The oil should just cover the powder. This initial pour toasts the chili powder slightly, bringing out its flavor.
14. Stir As You Pour

Stir the mixture constantly as you pour the oil. This prevents the chili powder from clumping or burning. You’ll see the powder bubble and smell that amazing aroma—yum!
15. Add the Rest of the Oil

After the first pour, let the mixture sit for 1 minute, then pour the remaining oil into the bowl. Keep stirring as you pour—this ensures everything is well mixed.
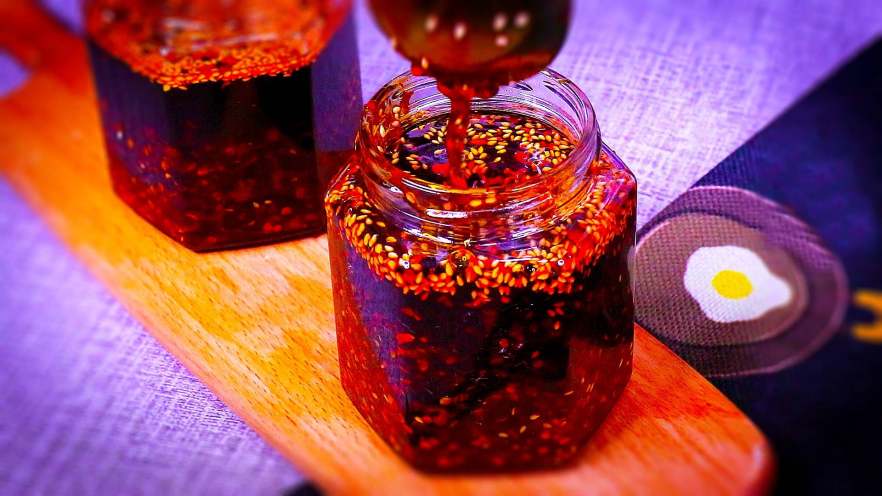
16. Stir Well

Give the chili oil a good stir one last time. You’ll have a thick, fragrant, red oil that looks absolutely delicious.
17. Cool and Store

Let the chili oil cool completely (this takes about 1-2 hours). Once it’s cool, transfer it to a clean, airtight jar. Store it in the fridge—it’ll last for up to 3 months (but let’s be real, it’ll be gone way before that).
Pro Tips for the Best Chili Oil
Want to make this chili oil even better? Here are my top tips:
- Toast the sesame seeds first: Pop them in a dry pan over low heat for 2-3 minutes until they’re golden and fragrant. This adds a nutty depth you can’t get from raw seeds.
- Adjust the spiciness: If you love heat, add more spicy chili powder or a pinch of cayenne. If you prefer milder, use all mild chili powder.
- Add garlic (optional): Toss a few minced garlic cloves into the aromatics when frying—just don’t let them burn!
- Use it on everything: Drizzle it over noodles, dumplings, fried rice, roasted veggies, or even avocado toast. It makes every meal better.
Final Thoughts
Making your own chili oil is so worth the effort. It’s cheaper than store-bought, tastes way better, and you can customize it to your liking. I’ve made this recipe for friends and family, and everyone always asks for the recipe. Now it’s your turn to try it—let me know how it turns out in the comments! Happy cooking (and eating).


")


 at Home")


 at Home Easily")