

 & Red Dates Pork Bone Soup Recipe | Nourishing Chinese Wellness Dish")


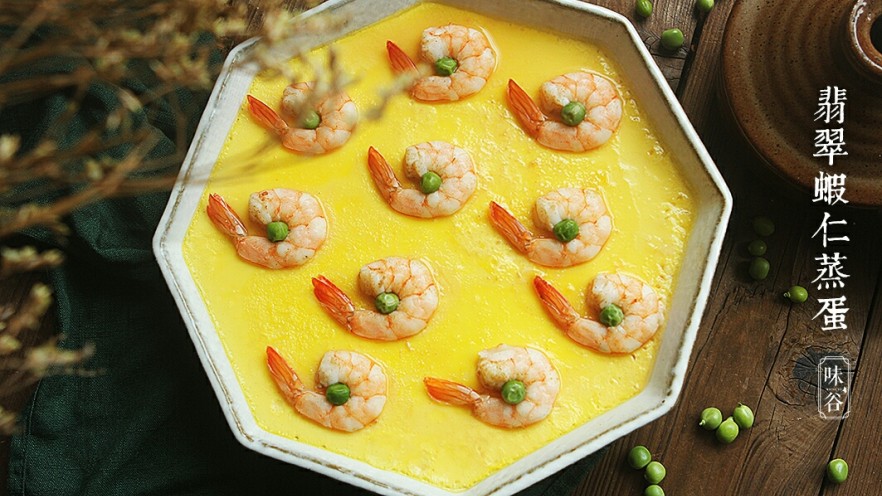
Steamed Egg with Shrimps: A Perfect Comfort Dish!
Okay, let’s be real—who doesn’t love a creamy, protein-packed dish that’s both easy to make and kid-approved? That’s exactly what this Steamed Egg with Shrimps is all about! It’s like a warm hug in a bowl, with soft, silky eggs that melt in your mouth and sweet, tender shrimps hiding inside. Plus, it’s so versatile: you can serve it as a main course, a fancy side, or even a light breakfast for busy mornings. I’ve made this for my little niece before, and she devoured it like there was no tomorrow—so trust me, it’s a hit with kids (and picky adults, let’s be honest). No fancy tools needed, just a few basic ingredients and a pot. Let’s dive into how to make this magic happen!
Ingredients You’ll Need
First, let’s gather all the essentials. You don’t need anything too exotic—just common kitchen staples. Here’s what you’ll need:
- 10 medium shrimps (fresh is best, but frozen works too! Make sure they’re peeled and deveined if you didn’t get them prepped)
- 3 large eggs (room temperature is optional but helps with even mixing—cold eggs work too, though)
- a handful of green peas (about ½ cup, fresh or frozen—they add a pop of color and sweetness)
- 1 tablespoon cooking wine (Shaoxing does the trick, but dry sherry or white wine work if you don’t have it—this is optional but helps remove any “fishy” smell)
- 1 teaspoon salt (adjust to taste—we’ll add more to the egg mixture later, so be gentle)
- 1 teaspoon black pepper (freshly ground is better, but pre-ground is fine)
- 400ml (1.5 cups) of water (this is key for that silky texture!)
Step-by-Step Instructions: From Prep to Perfect
Let’s get cooking! Follow these steps, and you’ll have restaurant-quality steamed eggs in no time. I’ll even share some pro tips along the way to avoid common mistakes.

Step 1: Gather & Prep All Ingredients
First things first—gather all your ingredients and lay them out on the counter. You don’t want to be scrambling around halfway through! Check that your shrimps are clean, eggs are at room temp, and peas are ready to go. This is the calm before the cooking storm—enjoy it!

Step 2: Clean & Prep the Shrimps
Rinse the shrimps under cold water to get rid of any grit. Then, snip off the heads (optional, but it makes them easier to handle). Use a small knife to carefully cut open the back of each shrimp and remove the dark vein—this is the shrimp’s digestive tract, and you definitely don’t want that in your dish! Pat the shrimps dry with a paper towel once you’re done.

Step 3: Shell the Shrimps (Keep the Tails!)
Peel off the shells, but leave the tails on for that cute, professional look! It’s optional, but it makes the dish look more appealing. If you’re short on time, pre-peeled shrimps work, but fresh ones taste way better. Trust me, a little extra effort here = big flavor payoff later.

Step 4: Season the Shrimps
Sprinkle ½ teaspoon of salt over the shrimps. Why half? Because we’ll add more salt to the egg mixture, so we don’t over-salt the shrimps. Then, add ½ teaspoon of black pepper—this will enhance their natural sweetness. Toss them gently with your hands to coat evenly.

Step 5: Marinate the Shrimps
Drizzle 1 tablespoon of cooking wine over the shrimps. This isn’t just for taste—it tenderizes the shrimps and removes any fishiness. Let them marinate for 20 minutes while we prep the eggs. Patience is key here! The longer they marinate, the more flavorful they’ll be.

Step 6: Cook the Green Peas
While the shrimps marinate, cook the peas. Bring a small pot of water to a boil, add the peas, and cook for 5 minutes until bright green and tender. Drain and set aside. If using frozen peas, thaw them first—fresh is best, but frozen works too!

Step 7: Beat the Eggs
Crack the eggs into a large bowl. Whisk them with a fork or whisk until smooth—no lumps allowed! The more air you get in, the fluffier the eggs will be. Don’t be shy—whisk away!

Step 8: Pour Eggs into a Dish
Transfer the beaten eggs to a heat-safe dish. A deep, wide plate works great for even steaming. If you use a bowl, make sure it’s oven-safe or suitable for steaming—whatever you’ve got!

Step 9: Add Water to the Eggs
Here’s the secret to silky eggs: the water-to-egg ratio! Aim for 2-2.5 times the volume of your eggs. For 3 eggs, that’s 400ml (1.5 cups) of water. Pour the water slowly into the eggs while whisking gently. The water should be warm, not boiling—too hot will scramble the eggs immediately.

Step 10: Season the Egg Mixture
Add ½ teaspoon of salt to the egg-water mixture. Whisk again to dissolve the salt. Taste it a little—you can adjust later, but this ensures the eggs are well-seasoned.

Step 11: Remove Bubbles
Those bubbles on top are your enemies! Use a spoon or a small sieve to gently scoop them off. Bubbles cause air pockets, which lead to a bumpy texture. Take your time here—this step is worth it for that perfect, smooth finish!

Step 12: Steam the Eggs (With a Cover!)
Fill a pot with water until it’s about ½ inch deep. Place the egg dish in the pot, then cover tightly with a plate (or a lid) to prevent condensation. Cover the pot with its own lid and steam on medium heat for 25 minutes. Set a timer—you don’t want to oversteamer!

Step 13: Add the Shrimps & Peas
After 25 minutes, carefully remove the plate cover. The eggs should be set on the edges but still jiggly in the center. Now, evenly place the marinated shrimps on top. Scatter the green peas around them for color and crunch. Make sure the shrimps are spread out so they cook evenly!

Step 14: Final Steam for Shrimps
Cover the dish again and steam on high heat for 7-8 minutes. This quick steam cooks the shrimps without overcooking them. You’ll know they’re done when they turn bright pink and opaque. If you wait too long, they’ll get rubbery—so watch carefully!

Step 15: Serve & Enjoy!
Turn off the heat and let it rest for 1 minute. Gently lift the plate off the pot. Look at that—creamy, picture-perfect eggs with plump shrimps on top! Serve hot and watch everyone go crazy. It’s even better when you take a photo first—trust me, your Instagram followers will thank you.
Pro Tips for Flawless Steamed Eggs Every Time
Here are my top secrets to avoid common mistakes and get the silkiest, most perfect steamed eggs ever:
- Water Ratio – 2-2.5 times the egg volume = silky smoothness. For 3 eggs, 400ml of water works. Less water = thicker, more “eggy” texture (not bad, just different!).
- Covering the Dish – Always cover with a plate to prevent condensation! No cover = bumpy, holey eggs. It’s a tiny step, but it makes a huge difference.
- Skim Bubbles – Those bubbles are sneaky! Take the time to remove them before steaming. A spoon works, or even a paper towel to blot them.
- Room-Temp Eggs – Let eggs sit out for 30 minutes first. Cold eggs cool the water too quickly, leading to uneven mixing. Room temp = smoother result.
- Shrimp Timing – Don’t overcook shrimps! 7-8 minutes on top of the eggs is perfect. If they’re large, add 1 minute, but start with 7.
So there you have it! This Steamed Egg with Shrimps is a game-changer. It’s easy, healthy, and tastes amazing—plus, it’s kid-approved. Whether you’re cooking for your family, hosting friends, or just treating yourself, this dish delivers every time. Let me know how it turns out—I’d love to hear your thoughts!


: Easy, Crispy, and Irresistibly Delicious Stir-Fry")


