

 & Red Dates Pork Bone Soup Recipe | Nourishing Chinese Wellness Dish")

Introduction: Why You Need This Cranberry Yogurt Small Loaf Bread in Your Life
Whoa, let me tell you about this game-changing bread recipe I stumbled upon! I’m not even exaggerating when I say it’s become my go-to snack lately. Picture this: soft, pillowy bread that’s slightly tangy from yogurt, packed with sweet-tart cranberries, and topped with a glossy honey glaze—oh, and it’s all wrapped up in a cute little loaf. Perfect for breakfast with coffee, a midday snack, or even as a dessert with tea. Trust me, once you make this, you’ll be wondering why you didn’t try it sooner! 😋
Let’s be real: most bread recipes can be dry or dense, but this one? It’s like eating a cloud with a cranberry surprise inside. The secret? Using yogurt instead of extra milk. It keeps the bread moist for days (yes, days!) and gives it that signature soft texture. And those dried cranberries? They’re not just for show—they add bursts of flavor that cut through the sweetness. Plus, the honey glaze makes the top shine and adds a subtle sweetness. It’s a win-win-win situation!
Ingredients: Let’s Gather the Magic Mix
Before we dive into the steps, let’s list out what you’ll need. Don’t panic—all these ingredients are probably in your pantry! I’ll break down why each one matters, so you’ll know exactly what’s going on (and no, I won’t lecture you about measuring cups—just keep it simple, okay?):
- High-gluten flour (200g): This is like the “backbone” of your bread. It has lots of gluten, which helps the dough stretch and hold its shape. If you don’t have high-gluten, you can mix all-purpose flour with a bit more bread flour, but trust me, high-gluten is key for that soft yet chewy texture.
- Low-gluten flour (30g): This adds a little “fluff” without making the bread tough. Think of it as the secret to keeping the crumb light and airy. If you don’t have low-gluten, just use a bit less high-gluten flour (230g total), but keep the ratio close—too much high-gluten can make it dense!
- Sugar (40g): Yeast needs sugar to grow, and it gives the bread a nice subtle sweetness. If you’re not a sugar fan, you can reduce it to 30g, but I’d stick with 40g for that perfect balance with the cranberries.
- Egg (35g, ~1 whole egg): Binds everything together and adds richness. Just crack an egg, measure out 35g—no need for fancy tools, a small measuring cup works!
- Plain yogurt (40g): This is the secret ingredient! It keeps the bread insanely soft and moist. Use plain yogurt (not flavored, like strawberry—we want that tangy base!). If you’re lactose intolerant, coconut yogurt works too, but adjust the quantity a bit if it’s thicker.
- Milk (85g): Adds moisture and helps the dough come together smoothly. Whole milk is best for creaminess, but skim or even plant-based milk (soy, oat) works too. Just make sure it’s room temperature if you’re using active dry yeast—cold milk can shock the yeast and slow fermentation!
- Yeast (3g): The bread’s “heartbeat”! I use active dry yeast here, which is more forgiving than instant. If you’re using instant, you can add it directly, but active dry needs to be dissolved first. Pro tip: If your yeast doesn’t bubble after 5 minutes, it’s dead—so check the expiration date!
- Salt (3g): Enhances all the flavors! A little salt makes the sweetness of the sugar and tartness of the cranberries pop. Don’t overdo it, though—just 3g is perfect.
- Butter (20g): Adds buttery richness and a beautiful golden crust. Let it soften to room temperature (about 15-20 minutes) so it mixes into the dough smoothly. Cold butter would make the dough tough, so patience here!
- Dried cranberries (30g): These are the star! Chopped into small bits, they burst with sweet-tart flavor. If you can’t find dried cranberries, use fresh ones (chopped small), but you might need to add a splash more milk since fresh cranberries have extra moisture. Trust me, dried is easier for this recipe!
Optional add-ons? Maybe a pinch of orange zest for extra citrus, or a dash of cinnamon for warmth. But stick to the basics first—they’re that good! Now, let’s get to mixing!
Step 1: Preparing the Dough (Mixing & Kneading)
Okay, let’s start with the wet ingredients. Grab a large bowl or your stand mixer (I use a stand mixer because it’s faster, but a hand mixer works too). First, pour in the milk, yogurt, egg, sugar, yeast, and salt. Stir it all together until the sugar and yeast start to dissolve—this might take 1-2 minutes. If using a stand mixer, use the dough hook attachment on low speed for this part.

Next, add the high-gluten and low-gluten flour. Stir slowly with a spoon first to avoid flour flying everywhere, then switch to the dough hook (or use your hands if you’re old-school). Mix until a shaggy dough forms—you’ll know it’s ready when it starts to pull away from the sides of the bowl. This is the first “kneading stage.”

Now, the fun part: kneading to get the “windowpane test” done! The goal is to develop gluten so the bread stretches without tearing. If you’re using a stand mixer, let it knead on medium speed for 5-7 minutes. If you’re doing it by hand, knead for 10-12 minutes. Here’s the trick: pinch off a small piece of dough and try to stretch it. If it forms a thin, translucent “window” (like tracing paper) without tearing, you’re done with this stage!

Add the softened butter now. If using a stand mixer, switch to low speed and let the butter mix in for 2-3 minutes. If by hand, work the butter into the dough by pressing and folding until it’s fully incorporated. The dough will feel smoother now!

Now, knead again until you get the “gloves” test! Wait, no—the windowpane test again, but this time it should be stretchier. Once the dough is elastic, you can stretch a piece into a thin sheet that’s almost transparent. If you can do that, you’re ready for the first fermentation!
Pro tip: If you’re new to kneading, this can be frustrating. Just keep going—you’ll feel the dough transform from sticky to smooth. Think of it like a workout for your arms… but with bread! 💪
Step 2: First Fermentation (Let the Dough Rise!)
Now, we need to let the dough rise. To do this, first, shape it into a smooth ball. Pull the dough from the bowl, and gently tuck the edges under to form a tight ball. If it sticks to your hands, dust a little flour on your counter.

Place the dough in a clean, oiled bowl (or a bowl lined with plastic wrap). Cover it with a clean kitchen towel or plastic wrap—this keeps moisture in and dust out. Let it rise in a warm place (not too hot, like near a heater, because that’ll kill the yeast!). A warm kitchen, near a sunny window, or even on top of your fridge works great.

Check after about 1-2 hours: the dough should have doubled in size. How to check? Gently press a finger into the dough. If it leaves a small indent and doesn’t spring back, it’s ready! If it springs back quickly, let it rise a bit longer. If it sinks, it overproofed—don’t panic, just start over (but we’ll cross that bridge if we get there!).
Pro tip: I once left my dough to rise for 3 hours and it turned out fine, but if you’re short on time, place the bowl in a bowl of warm water (100°F/38°C) for 20-30 minutes to speed it up. Just make sure the water isn’t too hot!
Step 3: Shaping the Dough with Cranberries
<pOkay, now we’re shaping the dough with cranberries! First, we need to deflate the dough—this means releasing the air bubbles so the bread doesn’t collapse later. Gently press the dough with your fists, folding it in half and pushing down. Do this for about 1 minute until the dough feels flat and deflated.

Next, roll the dough into a rough circle with your hands. Use a rolling pin to flatten it into a 12-inch (30cm) circle. The goal is to get it even in thickness so the bread bakes uniformly.

Cover the dough with plastic wrap or a kitchen towel and let it rest for 10 minutes. This “resting” period is called “panning” in some recipes, and it helps the dough relax so it’s easier to shape without tearing. Patience, my friend—this step is crucial!

While the dough rests, prep the cranberries. Grab a cutting board and a sharp knife, then chop the dried cranberries into small pieces (about 1cm each). If you use whole cranberries, they’ll be too big and might make the bread uneven—chopping them is key for that even burst of flavor.

Now, take the rested dough and place it on a lightly floured surface. Using a brush, gently spread a thin layer of honey water (equal parts honey and water, mixed) over the top. This helps the cranberries stick and gives the final crust a glossy finish. If you don’t have honey, use maple syrup or agave—any sweetener works!

Sprinkle the chopped cranberries in the center of the dough circle. Try to distribute them evenly so every bite has a cranberry. If you’re a cranberry lover, you can add more—just don’t go overboard, or the dough might not hold together.

Now, fold the bottom half of the dough up over the cranberries, then fold the top half down over that. This stacks the dough layers with cranberries in the middle—like a little pocket of goodness! Press the edges together to seal.

Using a rolling pin, roll the dough into a long rectangle (about 20cm by 10cm). Make sure it’s even in thickness—aim for 1cm thick (not too thick, not too thin!). If it’s too thick, it’ll collapse in the oven; too thin, it’ll be crispy and not fluffy. Balance is key!

Fold the bottom third of the rectangle up over the top third, then fold the top third down over the bottom. This is called “book folding” and helps create the signature layers in the loaf. Pinch the edges to seal again so the dough stays together during baking.

Now, roll the dough into a long log (about 20cm long). Use a sharp knife to cut it into 4-5 small pieces (each about 5cm long)—these will be our small loaves! If you want uniform sizes, measure each piece with a ruler, but freehand works too.
Pro tip: I usually cut with a serrated knife to make clean cuts. Just dip the knife in flour first to prevent sticking—no messy dough tears here!
Step 4: Second Fermentation & Baking
Okay, we’re almost to the oven! Now, arrange the small dough pieces into a greased or lined baking tray. Leave 2-3cm between each piece so they have room to rise again.

Cover the tray with a kitchen towel or plastic wrap and let it rest for 30-40 minutes (this is the second fermentation!). The goal is for the dough to rise a bit more—when you press it gently, it should spring back slowly. If you skip this step, the bread will be dense and flat, so don’t rush!

Meanwhile, preheat your oven to 190°C (375°F). For extra moisture during baking, place a small bowl of hot water on the oven rack below the tray—this creates a steamy environment, which helps the bread crust expand nicely.

After the second fermentation, remove the towel. Use a brush to gently spread a thin layer of egg wash over the top of each loaf—this gives a golden, shiny crust. If you’re vegan, skip the egg and use a plant-based milk wash instead (almond milk works great!).

Now, slide the tray into the preheated oven. Bake for 10-15 minutes. Check after 10 minutes: the crust should be golden brown, and the bread should sound hollow when you tap the bottom. If it’s pale, bake another 2-3 minutes.
Pro tip: I always keep an eye on the oven temp—if your oven runs hot, reduce by 10°C (18°F). Every oven is different, so adjust as needed!
Final Step: Cooling & Enjoying Your Cranberry Yogurt Bread
After baking, carefully remove the tray from the oven. Let the bread cool on a wire rack for 10 minutes—this stops the crumbs from getting soggy. If you try to eat it hot, it’ll be mushy inside and burn your tongue! Trust me, I’ve learned that the hard way.

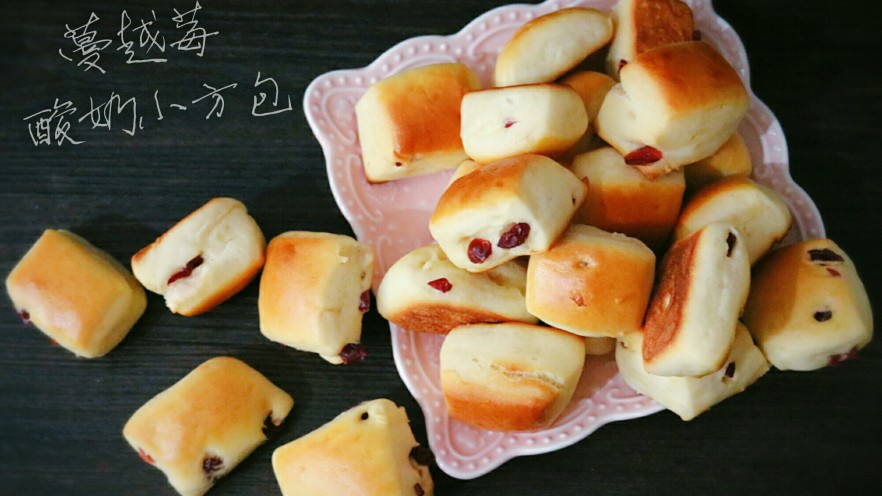
Look at that beautiful loaf! The cranberries are nestled inside, and the crust is a perfect golden-brown. Let it cool completely (about 30 minutes) before slicing. The longer it cools, the more the flavors meld together.

Now, slice it up! The inside should be soft, fluffy, and dotted with cranberry bits. Each bite is a mix of sweet, tangy, and buttery—pure heaven. I like to eat this fresh with a cup of coffee, or toast it lightly for a crunchy crust.
Pro tip: If you have leftovers, store them in an airtight container at room temperature for 2-3 days, or freeze them for up to a month. Thaw overnight in the fridge, then toast for that fresh-from-the-oven taste!
Final Thoughts: Why This Recipe Works
Okay, let’s recap why this cranberry yogurt small loaf bread is a game-changer. First, the yogurt keeps it insanely soft—you won’t find a drier bread here! Second, the cranberries add that tart-sweet contrast that makes every bite exciting. And the honey glaze? It’s the cherry on top (literally!).
This recipe is beginner-friendly but still produces professional results. Whether you’re an experienced baker or new to bread-making, you’ll love how forgiving the dough is. So grab your ingredients, follow the steps, and let me know how it turns out! Tag me in your photos—I’d love to see your version. Happy baking, and enjoy every crumb! 🥖✨
")

")


 at Home")


 at Home Easily")