

 & Red Dates Pork Bone Soup Recipe | Nourishing Chinese Wellness Dish")


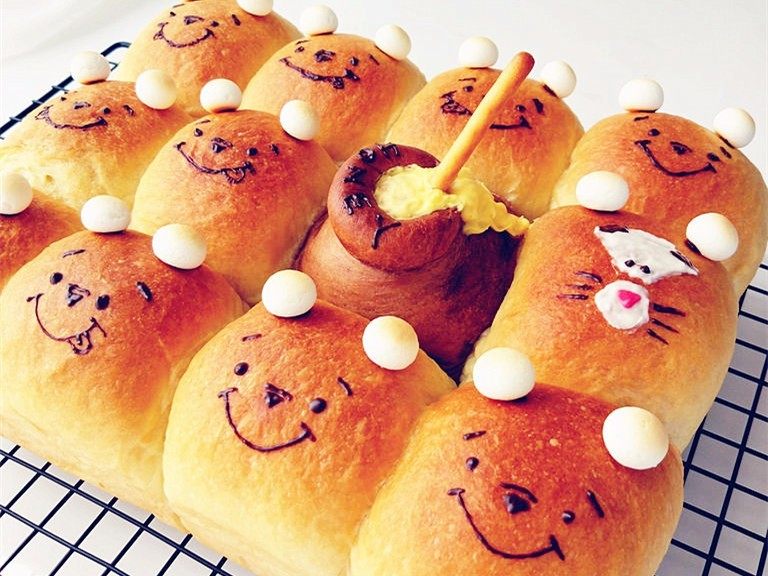
Why You’ll Obsess Over These Pooh & Tigger Squishy Buns
Let’s be real—baking can feel like a chore sometimes, right? Kneading for hours to get that “gluten film” (ugh, who has time for that?) or worrying if your dough will rise properly. But guess what? These Pooh Bear and Tigger squishy buns are here to save your day (and your sanity). They’re soft, pull-apart, and so cute you’ll almost feel bad eating them… almost. Plus, no fancy techniques required—even if you’re a baking newbie, you’ve got this.
Imagine biting into a warm, fluffy bun with a hint of sweetness, then spotting a tiny Tigger hiding among the Poohs. It’s like a fun little treasure hunt for your taste buds! And the best part? You don’t need a fancy stand mixer or years of baking experience. Let’s dive in.
What You’ll Need (Ingredients List)
First, let’s round up all the stuff you’ll need. Don’t worry—most of these are pantry staples, so you probably already have half of them!
- 90g milk (any kind works—dairy or plant-based, but I love whole milk for extra richness)
- 90g heavy cream (this is what makes the buns super soft—trust me, don’t skip it!)
- 5g yeast (instant or active dry—just make sure it’s not expired, or your dough won’t rise)
- 390g high-gluten flour (or bread flour—all-purpose works too, but high-gluten gives better pull-apart texture)
- 50g granulated sugar (not too sweet, since yeast eats some of it—perfect for kids and adults)
- 5g salt (to balance the sweetness—every good recipe needs a pinch!)
- 80g whole egg (about 1.5 large eggs—save the extra for egg wash if you want, but we don’t need it here)
- 30g corn oil (or any neutral oil like canola—avoid olive oil, it has a strong flavor)
- A little bit of chocolate (dark or milk—for drawing faces and details)
- Several Wangzai small steamed buns (or any small round cookies/candies for ears—get creative!)
- 1 finger biscuit (for the honey pot handle—so cute, right?)
- A dash of cocoa powder (for the honey pot dough)
Step-by-Step: How to Make Pooh & Tigger Squishy Buns
Okay, let’s get baking! I’ll walk you through each step with photos—no confusion, promise.
Step 1: Mix & Knead the Dough (No Hand-Cramping Required!)

First, grab your bread machine (if you have one—if not, don’t panic, we’ll talk about hand-kneading later). Toss in the milk, heavy cream, yeast, high-gluten flour, sugar, salt, whole egg, and corn oil—in that order. Why? Because wet ingredients first help the yeast dissolve evenly. Then, start the “sweet bread” program on your machine. Sit back, relax, and let it do the work! The machine will knead the dough for about 15-20 minutes—no messy hands, no sore arms. Win-win.
Step 2: First Fermentation (Let the Dough Grow!)

Once the kneading is done, leave the dough in the bread machine (or transfer it to a greased bowl) for the first rise. It needs to double in size—this usually takes about 1 hour, but it depends on how warm your kitchen is. Pro tip: If your kitchen is cold, pop the bowl in the oven with the light on (no heat!)—it’s a perfect warm spot for fermentation.
How do you know it’s ready? Poke it with your finger—if the indentation stays, it’s good to go. If it springs back immediately, give it a little more time.
Step 3: Punch Down & Rest the Dough

Take the dough out of the bowl and give it a gentle punch—this gets rid of all the big air bubbles. Then, knead it a few times to smooth it out, and let it rest for 20 minutes. This is called “proofing” and it makes the dough easier to shape later. Don’t skip this step—trust me, your hands will thank you.
Step 4: Divide the Dough into Balls

Now, grab a kitchen scale (this is key for even-sized buns—no one wants a giant Pooh and a tiny Tigger!). Divide the dough into 12 equal pieces—each should be around 60-65g. Roll each piece into a smooth ball. Set them aside—these will be your main buns.
Step 5: Make the Honey Pot (Pooh’s Favorite!)

Take one of the 12 dough balls and add a tiny bit of cocoa powder (like 1-2 teaspoons). Knead it until the cocoa is evenly mixed—you’ll get a light brown dough. Split this cocoa dough into two parts: one smaller ball (for the pot lid) and one larger piece (for the pot itself).
Roll the larger cocoa piece into a thin, long sheet. Then, roll the edge of the sheet to make a “rim” (like a pot’s edge). This will make the honey pot look more realistic.
Step 6: Assemble the Honey Pot & Arrange Buns

Take the thin cocoa sheet and wrap it around the small cocoa ball (the lid) to make the honey pot shape. Then, place all the dough balls (including the honey pot) into your 11-inch silicone deep pan (I use a Yangchen one—super non-stick!). Arrange them so they’re touching each other—this is what makes them pull-apart later!
Note: If you’re using a different size pan, adjust the number of dough balls. Just make sure they’re snug—no gaps!
Step 7: Second Fermentation (Let Them Puff Up)

Put the pan in the oven (again, with the light on—no heat) for the second rise. This takes about 50 minutes. The buns should grow to 1.5 times their original size. They’ll look soft and pillowy—you’ll want to squish them, but resist! Wait until after baking.
Step 8: Bake the Buns (Smell the Magic!)

Preheat your oven to 135°C (275°F) while the buns are fermenting. Once they’re puffed up, pop the pan into the middle rack. Bake for 15 minutes—keep an eye on them! You want them to be golden brown on top, but not too dark.
Pro tip: If the tops start browning too fast, cover the pan with aluminum foil for the last 5 minutes.
Step 9: Decorate the Honey Pot

Take the buns out of the oven and let them cool for a few minutes (don’t burn your fingers!). Melt some lemon chocolate (or regular chocolate) in a small bowl (use the double boiler method—boil water in a pot, then put the bowl on top, no direct heat). Dip one end of the finger biscuit into the melted chocolate and stick it to the honey pot—this is the handle! So cute, right?
Step 10: Draw Pooh Bear’s Face

While the buns are cooling, melt some dark chocolate (again, double boiler). Use a small piping bag (or a plastic bag with the corner cut off) to draw Pooh’s eyes, nose, and mouth on one of the buns. Then, put a tiny dot of melted chocolate on the top of Pooh’s head and stick two Wangzai small steamed buns—those are his ears! Adorable.
Step 11: Draw Tigger’s Face (The Hidden Cutie!)

Now for the fun part—hiding Tigger! Take another bun and draw his eyes, nose, and that iconic smile with melted chocolate. Let the chocolate dry for a few minutes so it doesn’t smudge. Then, tuck him somewhere among the Pooh buns—let your family or friends find him! It’s a fun little surprise.
Step 12: Enjoy the Pull-Apart Goodness!

Wait, did I mention? You didn’t have to knead for hours to get that “gluten film”! The combination of heavy cream and proper fermentation makes these buns super soft and pull-apart. Just grab one and pull—you’ll see the fluffy, stringy texture. Yum!
Pro Tips for Success
Even if you’re a beginner, these tips will make sure your buns turn out perfect:
- No bread machine? No problem! Mix the ingredients by hand in a bowl until a dough forms, then knead on a floured surface for 10-15 minutes. It’s a little work, but totally doable.
- The sugar is not too sweet—remember, yeast eats some of it during fermentation. If you want extra sweetness, add 10g more sugar (but I think it’s perfect as is).
- Don’t overbake! 15 minutes at 135°C is just right—overbaking will make the buns dry.
- Get creative with decorations! If you don’t have Wangzai buns, use mini marshmallows or chocolate chips for ears. For Tigger, you could add a little orange food coloring to the dough (but I like keeping it simple with chocolate).
Final Thoughts
These Pooh Bear and Tigger squishy buns are more than just a recipe—they’re a fun activity for the whole family. Kids will love helping shape the dough and decorating the faces, and adults will love how easy they are to make. Plus, the pull-apart texture is addictive—you’ll find yourself grabbing one (or three) before dinner.
So next time you’re craving something sweet and cute, give this recipe a try. No fancy skills, no gluten film, just fluffy, delicious buns that will make everyone smile. And don’t forget to find Tigger—he’s hiding somewhere, waiting to be eaten!

 at Home: Easy Summer Recipe")

")

")


 at Home")