


Japanese Teriyaki Chicken Rice Bowl Recipe | Easy & Flavorful Homemade Version
Alright, foodies! Let me kick things off by saying: if you’ve been craving that perfect sweet-and-savory teriyaki chicken but don’t want to shell out for takeout, today’s your lucky day. I’m about to spill the tea on how to make a restaurant-worthy Japanese Teriyaki Chicken Rice Bowl right at home. This recipe is crispy, sticky, and so satisfying, you’ll wonder why you didn’t try it sooner. Trust me, once you nail the teriyaki sauce and that perfectly seared chicken thigh, you’ll be making this weekly!
What Makes Teriyaki Chicken So Special?
First, let’s talk about the star of the show: teriyaki sauce. Originating from Japan, it’s basically a magical blend of soy sauce, mirin, and a little sweetness that gives everything that glossy, caramelized look and taste. The name “teriyaki” actually comes from “teri” (shine) and “yaki” (grilled), which makes total sense because that sauce glazes the chicken to a beautiful, sunlit sheen—no, that’s not a bad description! Think of it like a warm hug for your taste buds.
Ingredients You’ll Need
Let’s gather up the goods! Here’s what you’ll need to make this bowl of joy:
- 1 large chicken thigh (bone-in, skin-on is chef’s kiss for crispy texture; boneless works too but you lose that crunch)
- 1 cup cooked rice (short-grain Japanese rice is traditional, but any rice you love works—just make sure it’s fluffy!)
- 1 small broccoli head (cut into bite-sized florets, no weird stalks)
- 1 medium carrot (peeled and cut into thick rounds, about ½ inch thick)
- 60g mirin (the sweet rice wine that makes teriyaki sauce sing—more on substitutes later!)
- 1 tbsp vegetable oil (or sesame oil for extra umami, if you’re fancy)
- 1 tsp salt (to season the chicken, not too much though)
- 1 tbsp cooking wine (or dry sherry/sake—adds depth, but if you don’t have it, skip it)
- 1 tbsp sugar (brown sugar is better for color, but white sugar works too)
- Pinch of white pepper (optional, but it elevates the flavor!)
- 1 tbsp honey (for that sticky, sweet finish)
- 25g dashi stock (or chicken broth—adds richness; no dashi? Use 25g water + 1 tsp soy sauce)
- 2 tbsp soy sauce (dark soy is great for color; regular soy works too, just watch the salt)
Step-by-Step: Making the Perfect Teriyaki Chicken
Let’s roll up those sleeves! This is where the magic happens. I promise, even if you’re not a pro cook, these steps are easy to follow. Let’s go kitchen by kitchen.
Step 1: Prep Your Chicken Thigh
First, take that chicken thigh out of the fridge and pat it DRY with paper towels. Moisture? Not our friend here—it’ll make the chicken steam instead of sear. Trust me, crispy skin is key! Now, using a sharp kitchen scissors, carefully cut along the bone to remove it. It’s like a little surgery, but with scissors! Just snip around the bone until it separates, leaving you with a flat, bone-free thigh. Pro tip: Save the bone for making chicken stock later! 
Step 2: Marinate the Chicken (This is Non-Negotiable!)
Now, in a bowl, mix the cooking wine, soy sauce, white pepper, sugar, and salt. Whisk until the sugar and salt dissolve—no lumps, we’re professional chefs over here! Add the chicken thigh and make sure every inch is coated. Cover the bowl and stick it in the fridge for at least 3 hours. Overnight is ideal for maximum flavor (I usually do this before bed, wake up to chicken that’s begging to be cooked). If you’re in a rush, 3-4 hours works, but don’t skimp on marinating time—it’s what makes the chicken juicy and packed with flavor! 
Step 3: Craft the Teriyaki Sauce (The Heart of the Dish)
While the chicken is busy marinating, let’s make the sauce! In a small saucepan, combine mirin, soy sauce, dashi stock, honey, and a pinch of white pepper. Bring to a gentle boil over medium heat, then reduce to low and simmer for 5-7 minutes. Stir occasionally—you want to reduce it a bit so it’s thick and glossy. Pro move: Strain the sauce through a sieve to remove any sediment, so it’s smooth as butter. If you don’t have mirin, no worries! Substitute with 60ml rice vinegar + 1 tbsp brown sugar (just heat them together first to dissolve the sugar). 
Step 4: Prep the Veggies (Quick & Easy)
Time to get those veggies ready! Rinse the broccoli and cut into small florets. Peel the carrot and slice into thick rounds. Bring a pot of water to a boil, add the broccoli and carrot, and blanch for 2-3 minutes until they’re bright green and tender-crisp (not mushy!). Drain and set aside—they’ll add a nice crunch to your bowl. 
Step 5: Sear the Chicken for Crispy Goodness
Okay, the moment we’ve all been waiting for: searing the chicken! Heat the vegetable oil in a non-stick pan over medium-low heat. Once the oil is shimmering, add the marinated chicken, skin-side down. Let it cook undisturbed for 5-7 minutes—this is when the magic happens! The skin will turn golden and crispy. Don’t touch it! Patience, grasshopper. After 5-7 minutes, flip it over and cook the other side for another 5 minutes. Now you’ve got a perfectly seared, golden-brown chicken! 
Step 6: Glaze & Cook Until Done
Now, brush that teriyaki sauce generously on both sides of the chicken. Let it cook for 2 minutes, then brush more sauce on. Repeat this for about 2-3 minutes per side until the chicken is cooked through (internal temperature of 165°F/74°C is safe). The sauce will caramelize, giving it that sticky, glossy sheen—hello, Instagram food goals! 
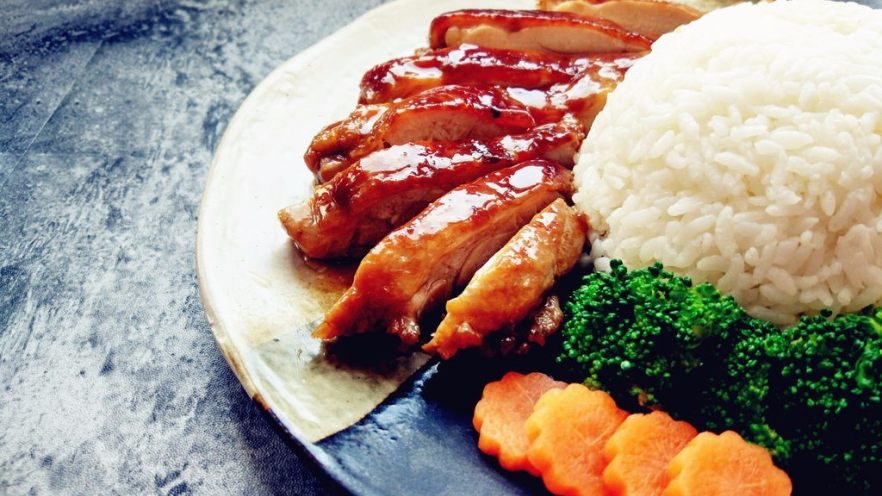
Step 7: Assemble the Rice Bowl
Now, let’s build our masterpiece! Start with a bowl of fluffy rice in the center. Slice the chicken into strips (or leave it as a thigh piece, no judgment!). Arrange the chicken on top of the rice, then add the blanched broccoli and carrot around the sides for color and crunch. 
Step 8: Douse in Extra Sauce & Serve!
Pour the remaining teriyaki sauce over the chicken and veggies for that extra flavor boost. Drizzle a little honey on top for a final sweet kick. Serve immediately—there’s nothing like a warm, crispy teriyaki chicken bowl on a rainy day or when you’re craving comfort food. Enjoy! 
Pro Tips for Maximum Teriyaki Success
Let me share my top secrets to make this recipe chef’s kiss perfect:
- Mirin Substitute Alert! If you’re in a pinch, use 60ml rice vinegar + 1 tbsp brown sugar (heat first to dissolve sugar). Works like a charm!
- Marinate Overnight! I swear by marinating the chicken overnight for the deepest flavor. But if you’re short on time, 3-4 hours in the fridge still works.
- Patience = Crispy Skin! Pat the chicken dry before cooking, and don’t flip it until the skin is golden (about 5-7 minutes per side). Moisture = soggy chicken.
- Adjust the Sauce to Your Taste! Love sweet? Add more honey. Hate too sweet? Use less. It’s your bowl, your rules!
- Blanch Veggies Properly! Blanch broccoli and carrots just until tender-crisp (not mushy!). They’ll stay bright green and add crunch.
Teriyaki chicken is all about that balance of sweet, savory, and a little sticky. This rice bowl is easy enough for a weeknight dinner and fancy enough for guests. Plus, you can meal prep the chicken and sauce ahead of time, so you’re never left scrambling for takeout. I’ve made this recipe so many times, and each time, it’s a hit. Your taste buds will thank you, I promise!
So there you have it—an easy, delicious Japanese Teriyaki Chicken Rice Bowl that you can make at home. No more spending $15 on takeout; this recipe is budget-friendly, flavorful, and so much fun to cook. Tag me if you make it—I’d love to see your version! Happy cooking, and enjoy every bite!
")
")


 with Direct Dough Method")

 – Crispy, Juicy, No Oven Required!")


