


")
Introduction: My “Tiramisu Substitute” Cheesecake Hack That Won Me Over
Hey there, dessert lovers! 👋 Let me tell you about this little kitchen hack I stumbled upon last week—total game-changer for when my kiddo was begging for tiramisu but we were so short on mascarpone cheese. You know that feeling? You want to make something special for your child’s lunchbox or a weekend picnic, but life (and your pantry) throws a curveball.
Instead of stressing, I dug into our cake molds and realized we had a tiramisu-shaped pan sitting there. That’s when the lightbulb went off: Why not make a cheesecake that looks like tiramisu but is actually easier, fluffier, and way less rich? (Spoiler: It worked. My kidgo ate the whole slice in seconds and now asks for “the spring picnic cake” every day!)
This isn’t just any cheesecake—it’s a light cheesecake. No heavy cream, no complicated techniques, and the texture? Oh my gosh, it’s like biting into a cloud. Soft, creamy, and perfectly sweet without being overwhelming. Perfect for beginners (no burnt bottoms, I promise!) and kids who want something fun to take to school or a picnic. Let’s get baking!
Perfect for Kids & Beginners: No-Fuss, No-Fail Results
Let’s be real—baking can feel intimidating, especially if you’re new to it. But this light cheesecake recipe? It’s designed to be foolproof. Here’s why it’s a top pick:
- Kid-Approved Flavor: Sweet, creamy, and not too tangy (no weird “cheese” aftertaste kids hate!).
- Easy Ingredients: Most items are in your pantry right now—no fancy imported mascarpone or obscure flours.
- Visible Progress: The layers of egg whites and cheese batter make it super satisfying to watch go from lumpy to smooth.
- Spring Picnic Ready: Once baked, it cools nicely and holds up well in a lunchbox or picnic basket (no melty mess!).
Plus, using a 6-inch mold means you can make a single-serve cake (or two small ones!) without leftovers. My kid took one to school last week, and the teacher even asked for the recipe. Win-win!
Ingredients You’ll Need for a 6-Inch Light Cheesecake
Let’s grab everything we need. Pro tip: Use room-temperature ingredients! This makes mixing easier and prevents lumps. Here’s the list:
- Eggs: 3 large (room temperature works best—let them sit out 30 minutes before starting)
- Cream Cheese: 100g (softened to room temp; I leave mine out overnight to soften completely)
- Low-Gluten Flour: 30g (sifted to avoid clumps—regular all-purpose flour works too if you don’t have low-gluten)
- Milk: 50g (whole milk is fine, but skim works if you want a lighter version)
- Butter: 30g (unsalted, melted—microwave for 30 seconds or melt over a pot of hot water)
- Powdered Sugar: 35g (or regular sugar, but powdered dissolves better—adjust if you want less sweet)
That’s it! No complicated stuff. If you’re missing something, check your fridge or swap (e.g., Greek yogurt instead of milk if you want tangier flavor, but stick to milk for classic smoothness).
Step-by-Step Guide to Baking Your Fluffy Cheesecake
Now let’s get to the fun part—baking! Follow these steps, and you’ll have a picture-perfect light cheesecake in no time. Remember: Patience is key, especially with the egg whites and folding in the batter!

Step 1: Separate the Eggs
First, crack your eggs and separate the yolks from the whites. Put the yolks in one bowl and the whites in a clean, dry bowl (no water or yolk in the whites, or they won’t whip!).
Pro tip: If you’re using a hand mixer, let the bowl for whites sit in the fridge for 5 minutes first—it helps the whites whip faster and fluffier!

Step 2: Mix Cheese & Egg Yolks
Take the softened cream cheese and beat it with a hand mixer (or a whisk if you’re old-school) until it’s smooth and creamy—no lumps! Then, add the egg yolks one at a time, mixing on low speed for about 30 seconds after each addition.
Why low speed? To prevent the cheese from curdling—trust me, curdled cheese is not a good look. Slow and steady wins the race here!

Step 3: Add Milk to the Yolk-Cheese Mix
Next, pour in the milk and mix until everything is fully combined. The batter should be smooth and slightly thick—like a pudding consistency. If it’s too runny, add a tiny bit more flour (but not too much, or it’ll get dense!).

Step 4: Melt Butter & Mix In
Melt the butter either in the microwave (30 seconds, stir halfway) or in a double boiler. Once melted and cool (don’t burn it!), pour it into the cheese-yolk mix and stir gently until everything is smooth. Butter adds richness without weighing down the cake, so don’t skip this step!

Step 5: Sift in the Flour
Sift the low-gluten flour into the batter. Sifting removes any clumps and helps the flour mix evenly—no more gritty bits in your cheesecake! Use a spatula to gently “cut and fold” the flour into the batter (don’t stir—cutting keeps the air in the batter, which makes it fluffy).
Pro move: Use a whisk to sift the flour if you have one—speeds things up and ensures no lumps!

Step 6: Whip the Egg Whites (The Secret to Fluffiness!)
Now, let’s tackle the egg whites. In a clean bowl, add the powdered sugar and start beating the egg whites on low speed. Gradually increase to medium speed, and beat until the whites are thick and form a small, soft peak when you lift the whisk. It should look like a glossy, creamy meringue.
How to tell it’s ready? Stop the mixer and lift the whisk—when you pull it out, the tip should curl into a tiny hook, not a straight peak. That’s the “soft peak” stage, which is perfect for folding into the batter without deflating it!

Step 7: Fold the Egg Whites into the Cheese Batter
Now, it’s time to combine the two parts! Take about 1/3 of the egg whites and gently fold them into the cheese batter with a spatula. This “lightens” the batter and makes it easier to mix the rest in without deflating. Then add the remaining egg whites in two more batches, folding each time until just combined.
Do NOT overmix! Overmixing will make the cake dense and flat. You want a smooth batter with some lightness—see the air bubbles? Perfect!

Step 8: Pour the Batter into the Mold
Take your 6-inch cake mold (the tiramisu one, if you’re doing the same trick!) and lightly grease it with butter. I like to line the bottom with parchment paper too, just to make sure it doesn’t stick. Then pour the batter into the mold, and tap the mold gently on the counter a few times to release any big air bubbles.
Pro tip: If you don’t have a tiramisu mold, any round or springform pan works! Just make sure it’s well-greased to prevent sticking.

Step 9: Water Bath for Even Baking
Preheat your oven to 145°C (293°F). Then, fill a large baking pan with hot water (about halfway up the sides of your cheesecake mold) to create a water bath. This helps the cheesecake bake evenly and prevents the top from cracking.
Place the mold in the water bath and bake for 60 minutes. The key here is a low temperature—145°C is slow and steady, which gives the cake time to set without cracking. If you bake it too hot, the top will brown too quickly while the middle is still runny!

Step 10: Cool & Let It Rest
When the timer goes off, turn off the oven and leave the cheesecake inside with the door closed for 30 minutes. Then, take it out and let it cool completely on a wire rack. Important: Don’t rush this step! If you take it out too early, it’ll sink in the middle. Letting it cool slowly helps the structure set.

Step 11: Decorate & Enjoy!
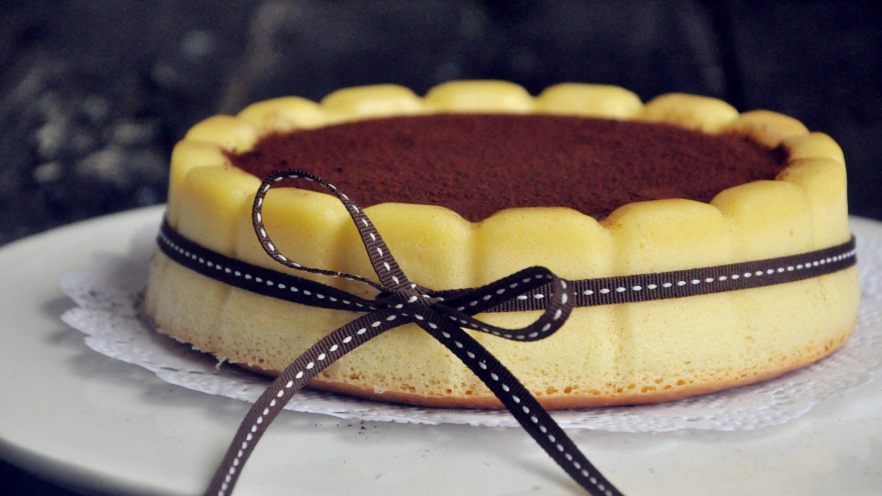
Once cooled, the cheesecake will naturally pull away from the sides of the mold—no need to force it out! Gently tap the bottom of the mold to release it, then transfer to a plate. For that “tiramisu look” (if you’re using the same mold), sprinkle a light dusting of cocoa powder in the center.
Slice it up and dig in! The texture is so light and creamy—you’ll be surprised it’s not heavy like traditional cheesecake. My kidgo says it’s “like a cloud with sugar,” which is the best compliment ever. 😊
Pro Tips for the Best Light Cheesecake Ever
Want to take your cheesecake to the next level? Here are my personal hacks:
- Room Temp Ingredients: Letting eggs, cheese, and butter sit out overnight makes mixing 10x easier—no lumps, smooth batter every time!
- Low Oven Temp: 145°C is the sweet spot—too hot, and the top cracks; too cool, and it takes forever to set. Stick to this temp!
- Don’t Overbeat Egg Whites: Overbeating makes them dry and grainy. Stop at the soft peak stage (tiny hook when lifted) for the fluffiest texture.
- Water Bath is Your Friend: Even if you’re short on time, a water bath ensures even baking and a crack-free top. Trust me, it’s worth the extra step!
- Adjust Sweetness: If you want less sugar, reduce the powdered sugar to 25g. If you love sweet, bump it to 40g—this recipe is flexible!
So, there you have it! A kid-approved, beginner-friendly light cheesecake that’s perfect for spring picnics, after-school snacks, or even a cozy night in. No more complicated desserts—just fluffy, creamy happiness. Let me know how it turns out in the comments below—I’d love to see your tiramisu-mold hacks! 🍰✨

 and Rock Sugar Wine: A Refreshing Homemade Brew")

")

")

")
