


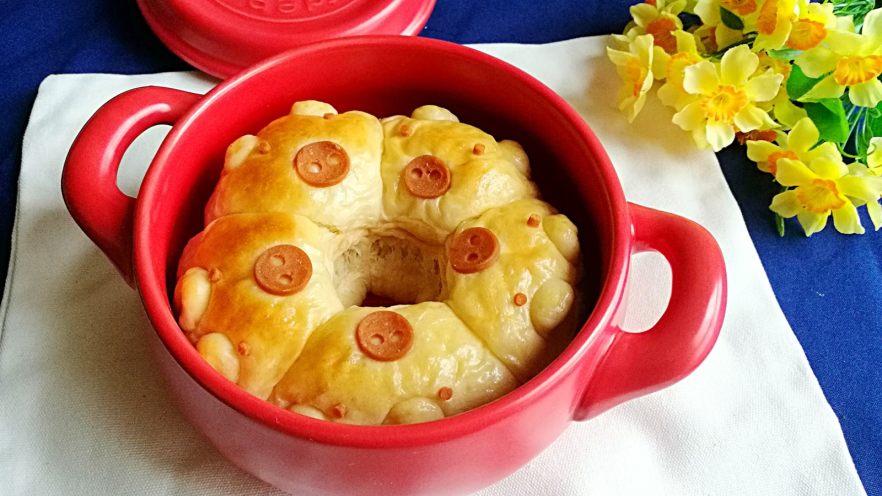
Adorable Pig Head Buns Made in a Casserole – Easy Homemade Recipe
Let me start by sharing a fun kitchen adventure! I’m a total foodie who loves experimenting with new recipes, and last week, I hit the jackpot in a red envelope grab in the “Kunbo Casserole Food Benefits Group.” The prize? An 18cm Kaydebao small red casserole from their export surplus! Never used a casserole for baking before, but I thought, “Why not try making buns with it?” And let me tell you, these pig head buns turned out SO cute and fluffy—they’re now my new go-to snack! Keep reading to learn how I made them, or skip straight to the recipe if you’re impatient like me.
Ingredients You’ll Need
First, gather these simple ingredients. I’ve measured everything out so you don’t have to guess:
- 260g all-purpose flour (or bread flour for extra softness)
- 1 large egg (room temperature, helps the dough bind better)
- 2g fine salt (enhances flavor and keeps the dough elastic)
- 3g active dry yeast (or instant yeast—same amount works)
- 100ml milk (whole milk is richer, but any milk will do!)
- 30ml cooking oil (vegetable or canola oil, for softness)
- 30g granulated sugar (feeds the yeast and sweetens the buns)
- 9 portions red bean paste (about 30g each; adjust if you like more filling)
- Optional: 2 hot dogs (for the pig snouts—so easy and cute!)
How to Make the Pig Head Buns (Step-by-Step)
Let’s get your hands a little messy—these buns are worth it! Follow along with the steps below, and don’t forget to check the images for visual help!
Step 1: Mix the Dough (No Bread Machine? No Problem!)

Pull out all your ingredients except the red bean paste. Pop them into your bread machine—if you don’t have one, just mix by hand! The goal is to get a smooth dough that’s not too sticky. I use my bread machine’s kneading cycle for 10-15 minutes, but hand-kneading works too—just keep at it until the dough becomes stretchy!
Step 2: Knead Until You Get a “Windowpane” Film

Once the dough is kneaded, it should pass the “windowpane test”: stretch a small piece—if it’s thin and doesn’t tear easily, you’re good! This means the gluten is properly developed, which makes the buns fluffy. If not, knead a bit longer (about 5 more minutes by hand if needed).
Step 3: First Fermentation (Dough Rises Like a Cloud!)

Place the dough in a warm, draft-free spot. I put mine in the oven with the light on (no heat!) for 1-2 hours. It’s ready when it’s doubled in size and feels soft when you press it gently. Pro move: Use a lightly oiled bowl to prevent sticking, and cover with a damp cloth.
Step 4: Divide the Dough into Small Balls

Punch the dough gently to release air, then divide it into 10 small portions (about 30g each). I use a kitchen scale for evenness, but you can just eyeball it—they don’t need to be perfect! Let them rest for five minutes to relax the gluten.
Step 5: Prepare the Red Bean Paste Filling

Weigh out 9 portions of red bean paste (about 30g each). Set them aside—these will be the “pig brains” (don’t worry, they’re sweet!). If you’re making more than one batch, double it up, but the original recipe was for 9 portions.
Step 6: Shape the Dough into Filled Balls

Take one dough ball, flatten it with your palm, and place a red bean paste portion in the center. Pinch the edges closed, twist the top to seal, and flip it so the seam is on the bottom. Now it looks like a tiny round bun—adorable!
Step 7: Prep Your Casserole (Important: Don’t Wash It!)

Take your small casserole out! Do NOT wash it with water before using it—the leftover residue helps with the first rise! Just let it air dry. The key is a clean, dry surface so your buns don’t get soggy bottoms.
Step 8: Arrange Buns in the Casserole

Line the casserole with parchment paper (no mess later!). Place 5 buns per casserole (my 18cm one fits 5). I made two batches, so two casseroles—no overcrowding, they need space to rise!
Step 9: Second Fermentation (Double the Size!)

Cover the casserole with its lid and let the buns ferment again. This time, it’ll take 45-60 minutes. The buns should puff up like little balloons—so satisfying to watch! If it’s cold, put the casserole in a warm oven (30°C, no heat) to speed things up.
Step 10: Make Pig Noses with Hot Dogs

While the buns rise, prep the pig snouts! Cut a hot dog into small 1cm thick pieces, then slice a tiny “V” shape for nostrils. If you want ears, cut small triangles—optional, but they add extra cuteness! I kept it simple with just the snouts, and they still look like pigs!
Step 11: Check Second Fermentation Completion

After 45-60 minutes, check the buns: they should be soft, puffy, and double in size. If not quite there, let them ferment 10 more minutes. Good fermentation = perfect fluffiness!
Step 12: Add the Piggy Details (Egg Wash + Snouts)

Brush the tops with a light egg wash (1 egg + 1 tsp water, whisked). Then, place the hot dog snouts on top—they instantly look like pig noses! If you have extra dough, you can even shape tiny ears, but I left it as snouts for simplicity.
Step 13: Bake the Buns in the Oven

Preheat the oven to 170°C (top) and 150°C (bottom). Put the covered casserole inside and set a timer for 15 minutes. Watch carefully—if they brown too fast, lower the temp to 160°C. Every oven is different, so use your best judgment!
Step 14: Cool the Buns to Perfection

Once done, take the casserole out carefully (it’s hot!) and set it on a heatproof surface. Let the buns cool for 10-15 minutes before removing them—this keeps them soft and prevents collapse.
Pro Tips for Flawless Buns
Here’s what I learned the hard way—save these tips to avoid mistakes!
- Fermentation Hack: The casserole + lid is a DIY proofing box! No need for fancy equipment—just use it for both first and second rises. I’ve even used it on sunny windowsills!
- Liquid Adjustments: Milk or water shouldn’t be poured all at once. If dough is too dry, add 1 tbsp milk; if sticky, add 1 tbsp flour. Every flour absorbs moisture differently!
- Oven Safety: Ovens vary! Use an oven thermometer to match temps. Open the door briefly to check color—don’t overbake, or they’ll be dry.
- Unwashed Casserole Magic: Skip washing the casserole before use! The leftover residue helps the first rise, and the oil cleans it later.
- Cooling Smartly: Letting the buns cool in the casserole until room temp keeps them soft. Rushing causes collapse—worth the wait!
Final Verdict: These Buns Are a Win!
These pig head buns are not just cute—they’re fluffy, sweet, and so fun to make! The casserole adds a unique twist, and the pig snouts make them perfect for kids’ lunches or breakfast. Even if you don’t have a “special casserole,” any small baking dish works. Give it a try, and tag me in your creations—I’d love to see your adorable pigs!
Got questions? Drop them in the comments—I’m here to help! Happy baking!


")

 | Step-by-Step Guide")