


Introduction: Why This Barbie Doll Cake is a Game-Changer for Newbies
Let me tell you, baking a Barbie doll cake used to scare me half to death—until I found this insanely easy recipe! It’s like if baking and cute dolls had a baby, and that baby grew up to be the perfect project for anyone who’s ever burned toast (no judgment, we’ve all been there). This 8-inch chiffon cake base is fluffy AF, and the red cream frosting gives it that iconic Barbie pink vibe. Plus, even if you’re a total decorator newbie, you’ll nail it with the tips below. Trust me, I’m proof: I made this on a Sunday morning with zero prior cake experience, and it looked like I’d been doing this for years. Let’s dive in!
Ingredients: What You’ll Actually Need (No Fancy Stuff!)
First, gather these basics—you probably already have most in your pantry! No need to splurge on special tools; we’re keeping it budget-friendly and beginner-friendly.
- For the Chiffon Cake Base:
- 5 large eggs (room temperature is key! Cold eggs = weird batter consistency)
- 40g water (or milk if you want a richer taste—go for it!)
- 40g vegetable oil (canola works too; skip olive oil unless you want a savory cake… which is not what we want here)
- 85g low-gluten flour (this is NON-negotiable for a fluffy chiffon cake! Regular flour = dense mess)
- 80g sugar (split between egg whites and yolks—don’t mix them up!)
- For the Frosting:
- 800g heavy cream (whipping cream—don’t skimp here; cheap cream = runny disaster)
- A few drops of red food coloring (start with 1-2 drops, you can always add more!)
Step-by-Step: Making the Cake (It’s Easier Than You Think!)
Let’s break this into two parts: the chiffon cake base (the backbone!) and the frosting/decoration (the fun, sparkly part). Let’s go!
Part 1: The Chiffon Cake Base (It’s All About the Fluff!)
First, preheat your oven to 160°C (320°F). Pro tip: Grab an oven thermometer! My oven runs hot, so I actually use 150°C to avoid burning. You’ll thank me later.
Step 1: Prep Your Tools (No Grease, No Mess!)
Get out all your ingredients and tools: mixing bowls, whisk, spatula, sieve, and your Barbie-shaped cake mold (I used a silicone one, but any non-stick mold works). Make sure everything is clean and dry—grease or oil in the wrong place = cake collapse. Ugh, I’ve cried over that mistake.

Step 2: Separate Eggs Like a Pro (No Yolk in the Whites!)
Crack the eggs carefully into two separate bowls. The key here: no yolk in the whites! If even a tiny yolk gets in, your meringue will be flat and sad. I use a spoon to separate—slow and steady wins the race. Keep the yolks bowl aside for now.

Step 3: Mix Yolks + Water + Oil (Smooth as Butter!)
Add the 40g water and 40g oil to the yolks. Whisk like you’re trying to wake up a sleepy cat—until it’s creamy and no oil blobs are left. Trust me, this step is simple, but messy if you’re clumsy. I once spilled oil on my shirt… not fun. Learn from my mistakes!

Step 4: Sift Flour (No Lumps Allowed!)
Sift the 85g low-gluten flour into the yolk mixture. Sifting is your best friend here—imagine biting into a cake with a rock in it? No thanks! Sift 2-3 times to make sure the flour is airy. Then gently fold it in with a spatula until everything is smooth. Not too runny, not too thick—just perfect.

Step 5: Whip the Egg Whites (Hard Peaks Required!)
Now, the egg whites! Add the 80g sugar in three parts (first third when frothy, second when soft peaks, third when stiff). Beat with an electric mixer (or hand whisk if you’re strong!) until they form hard peaks—the kind that stand straight up when you lift the whisk. If they’re too soft, your cake will sink. If too stiff, it’ll be dry. Balance is key!

Step 6: Fold the Batter (Don’t Stir—Cut and Gently Fold!)
Take 1/3 of the meringue and fold it into the yolk batter. Use a spatula to cut through the center, scrape the bottom, and fold over. Do this 10 times until it’s almost combined. Then pour the rest of the meringue in and fold again—slowly! You don’t want to deflate all that air.

Step 7: Bake Time! (Patience = Perfect Cake)
Pour the batter into your Barbie mold. Tap the mold on the counter a few times to release big air bubbles—no one likes a lumpy cake! Then slide it into the preheated oven on the lower rack. Set the timer for 90 minutes. But wait—every oven is different! If your cake is done earlier (toothpick comes out clean), take it out. If not, add 5-10 minutes. No peeking! Opening the oven = deflation.


Step 8: Cool & Demold (Upside Down = No Collapse!)
When the timer goes off, take the cake out and immediately flip it upside down on a cooling rack. Let it cool COMPLETELY—at least 1 hour. If you rush, it’ll sink like a rock. Once cool, gently pop it out of the mold. You’re done with the base! High-five yourself.


Part 2: Decorating the Cake (Make It Look Like a Princess!)
Now, the fun part: turning that plain chiffon cake into a Barbie-worthy masterpiece. Let’s make the red cream frosting!
Step 1: Whip the Cream (Pink Magic!)
Pour the 800g heavy cream into a chilled bowl (chill it for 10 minutes first—cold = better cream!). Add 2-3 drops of red food coloring. Beat with an electric mixer until it’s thick and holds peaks. Stop when it’s still a little soft—overbeating = butter. Not what we want here!

Step 2: Frosting Like a Pro (Even If You Suck at It!)
Now, the tricky part: the curved surface. Use a plastic scraper (I got mine for $3 on Amazon, but a credit card works too!). Hold it at a 45° angle and smooth the cream over the cake. Start from the top and work down—no stress if it’s not perfect! The goal is to cover the cake, not win a baking award. If you’re worried, chill the cake for 15 minutes first—this firms up the cream.

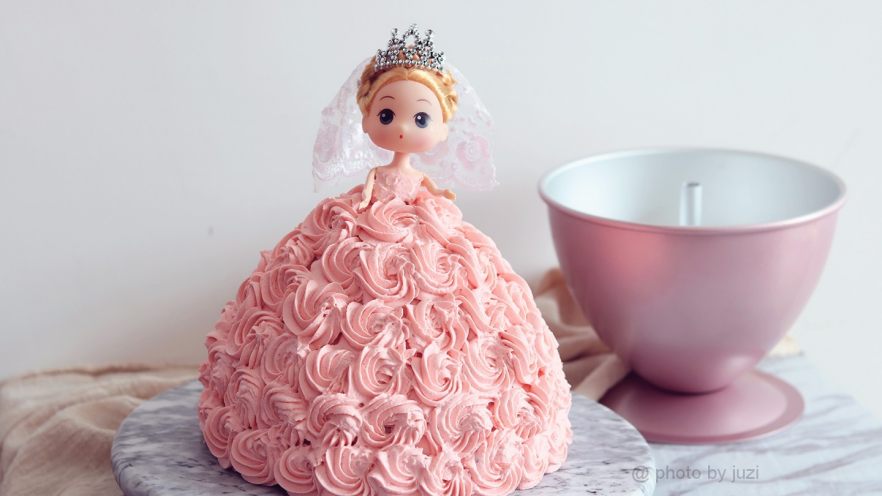
Step 3: Final Touches (Add the “Wow” Factor!)
Use a spoon to add dollops of cream on top and spread. For extra flair, pipe some cream with a star tip (or a Ziploc bag with a corner cut off) to make little swirls. The red cream already screams “Barbie,” so you’re golden! Even if it’s not Instagram-perfect, it’ll taste amazing and make someone’s day.

Pro Tips for First-Timers (Save Yourself the Tears!)
Here’s what I wish I knew before I messed up my first Barbie cake:
- Oven Temp: Use an oven thermometer! My friend’s oven lied and said 160°C but was 180°C—her cake burned. Ouch.
- Cooling Time: Never rush cooling! Let the cake sit upside down for at least 1 hour. If you take it out early, it’ll crumble like wet paper.
- Cream Consistency: If your cream won’t whip, check if it’s too warm. Chilled cream = happy peaks. Also, don’t overbeat!
- Plastic Scraper Hack: If you don’t have a scraper, use a plastic butter knife or even a spoon. The goal is to make the cake look smooth, not perfect.
- Flour Sifting: Skip the sieve at your own risk! Lumps = texture nightmares. Trust me, I’ve had a cake with a flour rock in it… not cute.
Final Thoughts: You Can Do This!
So there you have it—an easy, beginner-friendly Barbie doll cake that’s actually fun to make! Whether you’re surprising a kid, impressing friends, or just treating yourself, this cake is a win. It’s not about being perfect; it’s about making something cute and delicious. And hey, if you mess up? No biggie—just eat the leftover batter. It’s way too good to waste!
Tag me in your creations @YourBakingName—I’d love to see your pink masterpiece! Happy baking, and remember: even if you’re a total newbie, you’ve got this. 🎂✨


")


 at Home")

