




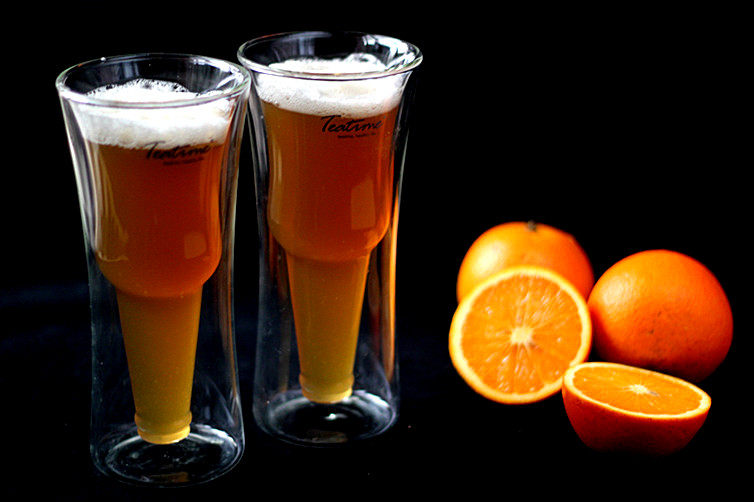

Wait, Orange “Beer”? Is This a Trick?
Let’s cut to the chase: this isn’t actual beer. Nope, not even a little bit. I’m a sneaky little imposter—an orange juice-based jelly that looks just like a frosty pint of beer. Tricked you, didn’t I? But here’s the thing: once you taste that bright, tangy-sweet flavor, you won’t even care it’s not the real deal. It’s fun, it’s refreshing, and honestly? It’s way easier to make than you’d think. Let’s dive in!
What You’ll Need (The Simple Stuff)
First off, no fancy equipment here—just basic kitchen stuff and a few ingredients you probably already have (or can grab at the grocery store in 5 minutes). Let’s list ’em out:
- 60ml freshly squeezed orange juice (pro tip: use ripe, juicy oranges—no bottled stuff, please! The fresh zing makes all the difference)
- 250ml lemon tea (I use store-bought unsweetened, but sweetened works too—just adjust the sugar later)
- 2.5 gelatin sheets (yes, sheets—they’re easier to dissolve than powder, trust me)
- 20g granulated sugar (tweak this if your lemon tea is already sweet! No one wants a sugar bomb)
Let’s Make This Orange “Beer” Jelly (Step-by-Step, No Stress)
Okay, let’s get cooking—wait, no, actually, there’s barely any cooking here. Perfect for lazy afternoons or last-minute party treats.
Step 1: Squeeze That Orange!

First up: get your orange juice. Grab a ripe orange (or two, if one’s not juicy enough), squeeze it until you have 60ml. If you’re feeling fancy, you can strain out the pulp—but I like a little texture, so I skip that. Freshly squeezed is key here; bottled juice just doesn’t have that bright, citrusy kick.
Step 2: Soften the Gelatin (Don’t Rush This!)

Take your 2.5 gelatin sheets and pop them into a bowl of cold water. Let ’em sit for about 5 minutes—they’ll get all squishy and translucent. Don’t use hot water, okay? That’ll make the gelatin clump up, and no one wants lumpy jelly. Patience, grasshopper!
Step 3: Warm Up a Tiny Bit of Juice (No Boiling!)

Now, mix your fresh orange juice and lemon tea in a big bowl. Then, scoop out a small portion (like 1/4 of the mix) into a tiny saucepan. Turn the heat to low—we just want it slightly warm, not hot. If it starts to steam, turn it off! We’re not making tea here; we’re just melting the gelatin.
Step 4: Add the Gelatin & Sugar

Take those softened gelatin sheets (squeeze out any extra water first!) and drop ’em into the warm juice. Stir gently—they’ll dissolve in seconds. Then add the 20g of sugar. Keep stirring until it’s all gone—no grainy bits allowed!
Step 5: Mix It All Together

Pour that warm gelatin-sugar mix back into the big bowl with the rest of the orange-lemon tea. Stir it well—make sure everything’s combined. No streaks, no clumps—just a smooth, sunny liquid.
Step 6: Pour Into Glasses (Save Some for Foam!)

Grab your favorite beer mugs (or any tall glasses—mugs just make it look more authentic!). Pour most of the liquid into the glasses, but leave a little bit in the bowl—we need that for the “beer foam” on top. Don’t fill ’em all the way up, okay? Leave some room for the foam to float.
Step 7: Make the Foam (The Fun Part!)

Take the leftover liquid in the bowl and grab a hand mixer (or a whisk, if you’re feeling strong). Whisk it like crazy! You want it to get all frothy and bubbly—just like beer foam. This might take a minute or two, but it’s worth it for that realistic look.
Step 8: Add the Foam & Chill

Gently spoon that frothy foam on top of the liquid in the glasses. Try to make it look like a real beer head—puffy and white! Then pop the glasses into the fridge. Let ’em chill for at least 2 hours, or until the jelly is totally set. Pro tip: don’t peek too early—patience pays off!
Step 9: Enjoy Your “Beer” (No Hangover Guaranteed!)

Once it’s set, take it out of the fridge. Look at that—bright orange jelly with a fluffy white foam on top. It looks exactly like a pint of craft beer! Take a bite (or a spoonful)—the tang of the orange, the subtle sweetness of the lemon tea, and that jiggly jelly texture? Chef’s kiss. It’s perfect for summer, kids’ parties, or even as a fun non-alcoholic option at adult gatherings.
Pro Tips & Oops Moments (I’ve Been There!)
Let’s be real—no recipe is perfect on the first try. Here are some little tricks I learned along the way:
- Don’t overheat the gelatin mix! If it gets too hot, the gelatin won’t set properly, and you’ll end up with a runny mess. Slightly warm is all you need.
- Adjust the sugar: if your lemon tea is already sweet, cut the sugar to 10g or skip it entirely. You don’t want it to be cloying.
- Foam troubles? If your foam isn’t holding, try whisking it a little longer, or add a tiny bit more sugar to the leftover liquid. Sugar helps stabilize the bubbles.
- What if it spills? Like the pic below—no big deal! Just laugh it off and make another batch. Mistakes happen, right?

See? Even I mess up sometimes. But that’s part of the fun!
Why This Orange “Beer” Jelly Is a Hit
Let’s be honest—this treat is all about the vibe. It looks cool, it tastes amazing, and it’s a great conversation starter. Whether you’re making it for a kids’ birthday party (they’ll go crazy for the “beer” look!) or a casual get-together with friends (adults love the non-alcoholic twist), it’s sure to be a hit. Plus, it’s so easy to make—you don’t need any fancy skills, just a little time and some fresh ingredients.
Final Thoughts
So there you have it—your very own orange “beer” jelly. It’s tangy, sweet, jiggly, and totally fun. Next time you want a unique treat that’s sure to impress, give this a try. And don’t forget to take a pic—your friends will be asking, “Is that beer?!” before they even take a bite. Enjoy!


