
🥞 Honey Corn Egg Pancakes: The Breakfast Treat You’ll Want to Make Every Weekend!
Okay, let me start by saying… these honey corn egg pancakes are total game-changers. I mean, have you ever bitten into something that’s fluffy, sweet, and just makes you go “Oh my goodness, why didn’t I invent this earlier?!” That’s exactly how I felt the first time I made these. They’re like little golden clouds with a hint of sweet corn and a drizzle of honey magic. Plus, they’re super easy to make—even if you’re not a pro in the kitchen, you can nail this recipe. Let’s dive in!
First, let’s talk about the vibe. Imagine waking up on a lazy Sunday morning, the sun streaming through the window, and the smell of fresh corn and honey filling your kitchen. You flip the pancakes, and they’re golden-brown on the outside, soft and slightly puffed on the inside. That’s the moment you’ll want to Instagram immediately—trust me, your followers will be jealous. These pancakes aren’t just food; they’re a mood. Perfect for weekend breakfasts, quick workday lunches, or even a cozy snack with tea in the afternoon. Let’s not waste any time—let’s get to the good stuff: ingredients and steps!
Ingredients You’ll Need (No Fancy Stuff, Promise!)
Before you panic about needing obscure ingredients, let me reassure you: everything here is either in your pantry or super easy to find at the grocery store. Let’s list them out, and I’ll explain why each one matters:
- Low-gluten flour (80g): This is key for the soft, tender texture. Regular all-purpose flour would make the pancakes too dense, so low-gluten is a must. If you can’t find it, substitute with 70g all-purpose flour + 10g cornstarch (but low-gluten is better, trust me).
- Cornmeal (30g): Adds a subtle corn flavor and a tiny bit of crunch without overpowering. It’s like a secret layer of texture that makes these pancakes stand out from plain egg pancakes.
- Sweet corn (150g): Fresh or frozen? Both work! Fresh is better if you can get it, but frozen sweet corn (thawed) is a solid backup. This is where the sweetness and the “corn” in corn pancakes come from.
- Egg (1 large): The binder! It holds everything together and adds that fluffy, airy texture. Don’t skip this—eggs are non-negotiable for that perfect rise.
- Baking powder (4g): This is the “fluffy maker.” It’s what makes the pancakes puff up like little pillows. A pinch of baking powder ensures they’re not flat and sad—you’ll thank me later.
- Milk powder (2 tablespoons): Adds a creamy, milky depth that makes the pancakes taste richer. If you don’t have milk powder, use 1/4 cup of whole milk instead (but skip the milk powder if you’re out—no biggie, just adjust the water to make up for it).
- Water (100g): Adjust this as needed to get the right batter consistency. Too much water = runny batter, too little = thick, dry batter. We’ll fix that in the steps!
- Honey (to taste): The star of the show! Use raw honey if you can—it’s less processed and has more flavor. If you’re out, maple syrup works too, but honey is traditional here and adds a lovely floral sweetness.
- Sugar (25g): Just a touch to balance the honey’s sweetness. If you don’t like sweet things, you can reduce this to 15g, but I’d suggest keeping it at 25g for that perfect harmony.
Okay, that’s all the ingredients—super simple, right? Now let’s get cooking! The hardest part is waiting for the pancakes to cook, but it’s worth it. Let’s go step by step, like we’re making this together.
How to Make the Honey Corn Egg Pancakes (Let’s Go!)
Let’s break this down into easy, manageable steps. I’ll explain each part so you know exactly what to do—no guesswork, just foolproof instructions!
Step 1: Prep the Corn Puree (This Step Makes the Pancakes Shine!)
 First, grab your sweet corn. Take 150g of corn kernels and set aside 25g for later (those will be the little sweet corn bits in the final pancakes). Pop the remaining 125g into a blender or food processor with 100g of cold water. Blend on high speed until it’s smooth and creamy—like a thick corn soup but a bit thicker. If you don’t have a blender, use a potato masher to mash the corn with water, but blending is faster and more efficient. Pro tip: If your blender is old, let the corn sit in the water for 5 minutes to soften first—this makes blending easier!
 Once blended, your corn puree should be smooth, with no big chunks. Pour it into a bowl and set it aside. This puree is what gives the pancakes that fresh corn flavor and smooth texture. You’ll be amazed at how much better the pancakes taste with this step—no more dry, tasteless corn in the batter!
Step 2: Mix the Dry Ingredients (Sifting = Smooth Batter)
 Now, take a large mixing bowl and sift all the dry ingredients: low-gluten flour, cornmeal, milk powder, baking powder, and sugar. Sifting is crucial here because it removes any lumps, so your batter won’t have gritty spots. If you don’t have a sieve, use a fine-mesh strainer or even a fork to break up the flour as you mix. Trust me, sifting takes 2 extra minutes but makes a world of difference.
 After sifting, add the egg to the dry ingredients. Use a spatula to gently mix the egg into the dry mix. The goal is to combine everything without overmixing—just enough so the egg is evenly distributed. This helps the batter hold together when you pour it onto the pan.
Step 3: Combine Wet and Dry (The Corn Puree Enters!)
 Slowly pour the corn puree into the dry ingredient bowl. Use a spatula to stir the batter gently—start with slow, circular motions. Mix until just combined, but don’t overmix! Overmixing creates tough pancakes, so we want to keep it smooth but not dense. The batter should be thick but pourable—like a thick milkshake consistency. If it’s too thick, add a splash more water; if too thin, add a bit more flour (1 tablespoon at a time).
 Now, fold in the reserved 25g of corn kernels. Gently stir them in with a spatula so they’re evenly distributed. These little corn bits add texture and a burst of sweet corn flavor when you bite into the pancakes. I love seeing them pop out in each bite—it’s like a little party in your mouth!
Step 4: Let the Batter Rest (Patience, Grasshopper!)
 Cover the bowl with a clean kitchen towel or plastic wrap and let the batter rest for 20 minutes. Why 20 minutes? Because the baking powder needs time to activate! During this rest, the batter will slightly thicken and the corn puree will infuse more flavor into the mix. Trust me, this step is non-negotiable—don’t rush it! If you skip the rest, your pancakes will be flat and not as fluffy. I’ve tested both ways, and resting = better pancakes. 20 minutes is the sweet spot—set a timer!
Step 5: Cook the Pancakes (The Best Part!)
 While the batter rests, heat a non-stick pan over medium heat. If you don’t have a non-stick pan, that’s okay—just use a regular pan and add a teaspoon of oil (I use tea oil, which has a high smoke point, but vegetable oil works too). Let the pan heat up for 2-3 minutes, then add a ladle full of batter (about 1/4 cup) to the pan. The batter should spread out into a circle about 4-5 inches wide.
 Cook for 2-3 minutes until the bottom is golden brown and bubbles form on the surface. Flip the pancake with a spatula—be gentle, but firm. Cook the other side for another 2-3 minutes until it’s golden and puffed up. If you’re worried about sticking, check the bottom before flipping—if it’s not golden, let it cook a bit longer. The key is medium heat: too high, and the edges burn before the middle is done; too low, and they take forever to cook.
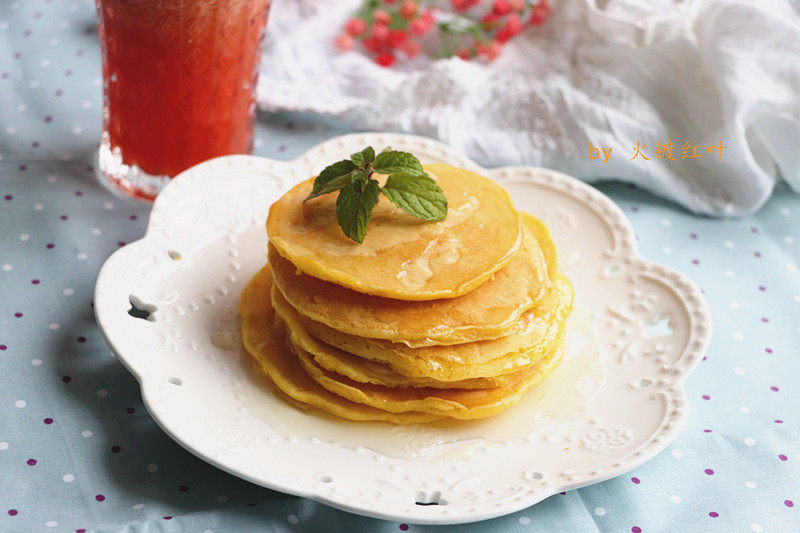
 Once both sides are golden, transfer the pancake to a plate. Repeat with the remaining batter, adding more oil to the pan as needed. You’ll end up with a stack of fluffy, golden pancakes—they’re so beautiful, you might want to take a photo before eating them!
Step 6: Finish with Honey (The Final Touch!)
When all the pancakes are cooked, drizzle them generously with honey. The honey should be warm from the pan (or at room temperature, but warm honey is extra soothing). Let the honey drizzle slowly over the pancakes, and watch as it glazes the golden surface. The first bite? Pure heaven—sweet, soft, and full of corn flavor. It’s like summer in a pancake!
Pro Tips for Perfect Honey Corn Egg Pancakes
Now that you know the basic recipe, let’s share some pro tips to make these pancakes even better. I’ve learned these the hard way, so you don’t have to!
- Adjust the batter consistency: If your batter is too thick, add a splash of water (1-2 tablespoons at a time) until it’s pourable but not runny. If too thin, add a tablespoon of flour at a time until it’s the right consistency.
- Prep ahead: Make the batter the night before, refrigerate it, and cook in the morning. The resting time will still work, and you’ll have fresh pancakes in minutes!
- Freeze leftovers: If you make extra, stack them with parchment paper between layers and freeze. Then, reheat in the microwave for 30 seconds for a quick, warm breakfast later.
- Add chocolate chips: Want a twist? Stir in 30g of chocolate chips for a sweet-savory treat. The chocolate melts into the pancakes and pairs surprisingly well with the corn!
- Use different sweeteners: If you’re allergic to honey, use maple syrup or agave nectar. For a lower-sugar option, reduce the sugar and honey to 15g each—they’ll still be sweet but not overly so.
- Non-stick pan hack: If your pan isn’t non-stick, rub a clove of garlic on the pan before adding oil. It creates a natural non-stick layer that keeps the pancakes from sticking.
These tips will take your pancakes from “good” to “amazing.” Let me know if you try any of them—I’d love to hear your results!
Why These Pancakes Are So Special (Beyond the Taste!)
Let’s recap why these honey corn egg pancakes are worth making again and again. First, they’re super easy—no fancy tools, just a blender, a pan, and basic ingredients. Second, they’re nutritious: corn has fiber and vitamins, eggs have protein, and honey has antioxidants. They’re better than store-bought pancakes (which are full of preservatives and sugar) because you control every ingredient. Plus, they’re versatile—serve them with yogurt for breakfast, with whipped cream for dessert, or even as a side with soup for lunch. The possibilities are endless!
Another big plus? They’re kid-approved. My niece, who’s a picky eater, loves these pancakes. The sweet corn and honey make it feel like a treat, but they’re still healthy enough for a school lunch or breakfast. It’s a win-win!
Final Thoughts: You Can Do This!
Okay, honey corn egg pancakes—soft, sweet, fluffy, and full of flavor. You’ve got the ingredients, you’ve got the steps, and you’ve got the pro tips. There’s no reason you can’t make these today! Whether you’re a kitchen newbie or a seasoned cook, this recipe is foolproof. Just follow the steps, take your time with the resting, and enjoy the process.
I hope you love these pancakes as much as I do. If you do, tag me in your photos or leave a comment with your thoughts—I’d love to see how your version turns out! Remember, the best part is that you can customize them however you want—add chocolate, reduce sugar, or even use frozen corn if fresh isn’t available. The kitchen is your playground, so have fun with it!
Happy cooking, and bon appétit! 🍯🌽🥞
Keyword List
honey corn egg pancakes, easy honey corn egg pancakes recipe, soft honey corn egg pancakes, homemade honey corn egg pancakes, breakfast pancakes recipe, sweet corn egg pancakes, fluffy honey corn pancakes, honey corn egg pancake recipe, easy breakfast ideas, honey corn pancakes recipe