
Introduction: Why I’m Obsessed with Light Cheesecake (and Why It’s a Challenge)
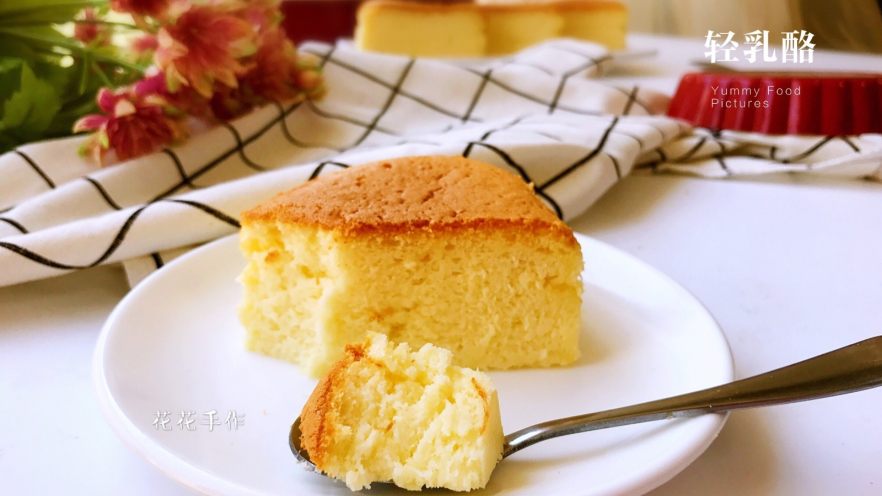
Okay, let’s start with a confession: I’m basically OBSESSED with light cheesecake. Like, it’s not just a dessert—it’s a vibe. The way the creamy, tangy cheese flavor melts in your mouth, paired with that airy, almost sponge-like texture? It’s like biting into a cloud of deliciousness. But don’t let the “light” fool you—this isn’t some half-hearted, watered-down version. It’s still rich, but lighter on the heaviness, so you can have a slice without feeling like you’ve eaten a brick of cream cheese.
But here’s the thing: making a perfect light cheesecake is not easy. I’ve tried so many recipes, and I’ve had my fair share of disasters. Remember those unsightly cracks on top? Or the center sinking like a mini volcano? Ugh, the “pudding layer” disaster where the top turns into a weird runny mess? Total nightmares! But the silver lining? Even if you mess up a little (like I did the first 5 times), the taste is still incredible. The key is to tweak the method to avoid those issues, which is exactly what I did with this recipe.
I got this recipe from a friend, and I’ve been tweaking it ever since—adjusting ingredients and baking times to get that crack-free, smooth-topped, perfectly fluffy result. Today, I’m sharing it with you, no fancy jargon, just straight-up tips and a foolproof method. Let’s dive in!
Ingredients: What You Need (No Mystery Items Here)
First, let’s list the ingredients. They’re all easy to find, and I’ve tested substitutions to make sure you don’t need specialty stuff. Here’s what you’ll need:
- 120g cream cheese – Softened, not melted! Softened means it’s creamy but still solid, so it mixes smoothly. If it’s too cold, you’ll get lumps—yuck.
- 70g heavy cream – Adds richness without density. Full-fat is best for that creamy, melt-in-your-mouth feel.
- 50g plain yogurt – Greek yogurt works too! It adds tang and keeps the cake moist. No weird aftertaste, promise.
- 20g sugar (for the cheese batter) – Sweetens the cheese part without overpowering. Skip this and it’ll taste bland.
- 45g sugar (for the egg whites) – The secret to fluffy peaks! This sugar helps the egg whites whip into airy, stable meringue.
- 25g low-gluten flour – Keeps the cake light and prevents that heavy, gluey texture. Cake flour is a close substitute if you can’t find low-gluten.
- 15g cornstarch – Game-changer alert! Adds structure without making it dense. Prevents cracks and gives that silky finish.
- 3 eggs (2 yolks + 3 whites) – Room temperature only! Cold eggs = lumpy batter. Yolks add richness; whites add fluff.
Step-by-Step: How to Make Your Cheesecake Perfect
Let’s break this down into easy steps. I’ll share pro tips for each part to avoid the common mistakes I made!
 Step 1: Prep Your Mold (Critical for No Stickage)
First, set up your mold. If using a solid-bottomed pan, line the bottom and sides with parchment paper. For a springform pan, wrap the bottom tightly in aluminum foil to prevent water leakage (no soggy bottoms!). Trust me, this takes 2 minutes but saves 30 minutes of panic later.
 Step 2: Water Bath Setup (No Burnt Edges Here)
Light cheesecake needs a water bath for even heat. Fill a roasting pan with hot water until it reaches 2 inches up the mold’s sides. If your mold is solid-bottomed, set it directly in the pan. If it’s springform, nestle the whole pan in the water. The water acts as a buffer, so the cake doesn’t crack from uneven heat.
 Step 3: Melt the Cream Cheese (Smooth = Success)
Take the cream cheese and melt it over a double boiler (or simmering water). Stir constantly until it’s completely smooth—no lumps! If you’re short on time, let it soften at room temp for 1 hour first. Either way, smooth = no gritty cheese in the final cake.
 Step 4: Sugar + Cream Cheese = Silky Base
Add the 20g sugar to the melted cream cheese. Beat with an electric mixer on low until sugar dissolves—about 1-2 minutes. It should be super smooth, almost like pudding. If you’re doing this by hand, use a whisk or spatula until sugar is gone. Lumps here = lumps in the final cake.
 Step 5: Egg Yolks = Richness (Add One at a Time!)
Add the 2 egg yolks, one at a time, mixing on low speed after each. If you dump both in, they’ll curdle. Mix until the batter is pale yellow and creamy—like a smooth milkshake.
 Step 6: Heavy Cream = Airiness
Pour in the 70g heavy cream. Mix on low until everything blends—no streaks left. This adds the “light” texture. The batter will get a bit runny here, but that’s good! It means air can move in later.
 Step 7: Yogurt = Tang & Moisture
Add the 50g yogurt. Stir gently until combined. The yogurt cuts the creaminess and keeps the cake from drying out. Now the batter should smell tangy and look smooth—yum!
 Step 8: Sift Flour & Cornstarch (No Lumps Allowed!)
Sift 25g flour + 15g cornstarch over the batter. Sifting removes clumps and adds air, so the cake stays light. Dump the sifted mix in and fold with a spatula until no white streaks remain. Folding = gentle, up-and-down motions, not stirring in circles!
 Step 9: Check Your Batter (Smooth = Good)
Your batter should be smooth, like thick paint. No gritty bits, no lumps. If it’s still bumpy, sift again or fold more. This is your last chance to fix texture issues!
 Step 10: Whip Egg Whites to Soft Peaks
Separate 3 egg whites (room temp!). Add 45g sugar and beat on medium until soft peaks form (tips curl over). If you go to stiff peaks, the cake will be dense. Stop when you see that “wilted flower” peak—perfection!
 Step 11: Fold Egg Whites Gently (Air is Key!)
Fold egg whites into the batter in 2-3 batches. Use a spatula to cut through the batter, scraping up from the bottom. Rotate the bowl as you fold. Do NOT stir—this deflates the air. Aim for a uniform, pale yellow batter with a glossy sheen.
 Step 12: Preheat Oven & Pour Batter
Preheat oven to 155°C (310°F) for 5 minutes. Pour batter into the mold, then tap the mold on the counter 3-4 times to release air bubbles. This prevents cracks and ensures even baking.
 Step 13: Bake in Water Bath (150°C for 80 Minutes)
Lower oven to 150°C (300°F). Place mold in the water bath. Bake 80 minutes—no shortcuts! Lower heat stops the top from cracking while the center sets. After 80 minutes, turn off the oven and leave the cake inside for 30 minutes with the door closed. Slow cooling = no sinking!
 Step 14: Cool at Room Temp (Patience, Grasshopper)
Take the mold out and set on a rack. Let cool 15 minutes. Don’t rush this—cold air = cracks. Patience here = a stable cake later!
 Step 15: Refrigerate 2+ Hours (Firm It Up!)
Cover the mold with plastic wrap and refrigerate 2+ hours (overnight is even better). Cold air firms up the cream cheese, giving that perfect sliceable texture. If you skip this, it’ll be mushy, not fluffy.
 Step 16: Unmold Gently (No Breaking!)
Run a thin knife around the edges to loosen the cake. If using parchment, lift from the bottom. For springform, release the sides and invert onto a plate. Be careful—don’t shake the mold!
 Step 17: Slice & Enjoy!
Use a sharp knife (wipe between cuts for clean edges). Cut into squares or triangles. Look at that creamy, crack-free top! Take a bite—you’ll feel like a pro. Trust me, it’s worth all the folding and waiting.


Pro Tips: Avoid Common Mistakes
Let me share my hard-earned lessons to save you from frustration:
- Oven Temps Vary! If your oven runs hot, lower temp by 10°C. Use an oven thermometer to check accuracy. If the top browns too fast, cover with foil.
- Overmix = Dense Cake! Fold egg whites just until combined—no more. Overmixing kills air, leading to a sunken center.
- Room Temp = Smooth Mixing! Eggs, cream cheese, and butter (if used) must be room temp. Cold ingredients = lumps.
- Water Bath Depth! Water should reach halfway up the mold sides. Too shallow = uneven baking; too deep = splashing.
- Refrigerate Overnight! For the best texture, chill 12+ hours. The flavors have time to meld, and the cake firms up perfectly.
Okay, that’s all for now! I really hope this recipe works for you. If you try it, tag me—I’d love to see your creation! Happy baking, and enjoy every fluffy, creamy bite. No cracks, no regrets!
light cheesecake recipe, easy light cheesecake, no crack cheesecake, fluffy cheesecake, water bath cheesecake, light cheesecake ingredients, how to make light cheesecake, creamy cheesecake recipe, cheesecake texture, baking tips for light cheesecake