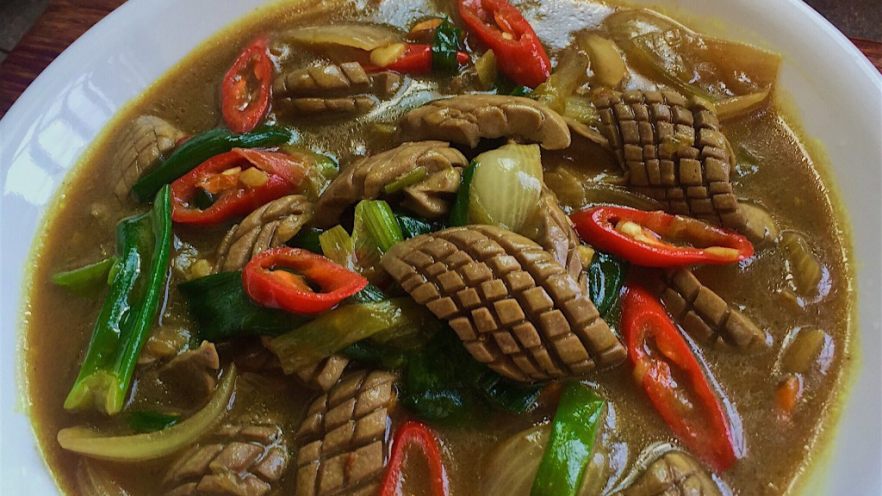

Dad’s Legendary Scallion Stir-Fried Pig Kidney: The Tender, No-Gamey Recipe
Let me start by saying this: I’ve tried scallion stir-fried pig kidney (cong bao yao hua) at a dozen restaurants, and none of them compare to my dad’s version. Why? Because he’s got a decades-old salt-curing trick that turns tough, fishy kidneys into tender, melt-in-your-mouth goodness. Trust me, after this, you’ll never order it out again!
First off, let’s get real: Pig kidneys can be… intense. If you don’t clean them right, they taste like metal with a side of rubber. But with my dad’s method? Zero gaminess, zero chewy texture. It’s all about the soaking and salting—let’s break it down step by step.
Ingredients You’ll Need (No Fancy Stuff!)
Let’s gather the goods. You’ll need:
- Pig kidneys: 2 large ones (~500g total). Look for fresh ones with no grayish spots—quality matters here!
- Garlic: 1 tablespoon of minced garlic (or garlic cloves, peeled and crushed)
- Green onions: Stalks (white parts only) and segments (green parts, chopped—save both!)
- Onion: 2 small onions, sliced into rings (they add sweetness and crunch)
- Red chili pepper: A few slices (optional, for a kick—my dad skips it, but I add a pinch for heat)
- Ginger: Yellow ginger paste (or fresh ginger, grated—about 1 teaspoon)
- Seasonings:
- Salt (lots of it! We’ll use it for salting)
- Light soy sauce: 1 tablespoon
- Oyster sauce: 1 tablespoon (for umami)
- High-proof liquor (like baijiu or vodka, 1 tablespoon—this removes the last traces of gameiness)
- White pepper: A pinch (freshly ground is best)
- Cornstarch water: ½ cup (cornstarch + water mixed to a thin paste)
- Chicken essence: 1 teaspoon (or skip if you’re going low-sodium)
Step 1: Prep the Pig Kidneys (The Make-or-Break Part)
Okay, let’s get those kidneys ready. This is where most people mess up—cutting out the tough parts and not soaking them properly. But with my dad’s method, it’s all about patience.
Step 1: Slice the kidneys in half. Gently cut each kidney down the middle, removing the white core (the ureter part) and any tough membranes.  (See image: The cleaned kidney looks like a smooth piece of meat, right?)
Step 2: Remove all membranes. Use a sharp knife to cut out every bit of that grayish tissue on the surface. This stuff is the worst for gamey taste! Dad says, “If you see any gray, cut it out—no exceptions.”  (Pro tip: If there’s extra fat, trim that too. Clean kidneys = clean flavor.)
Step 3: Score the surface. Now, take the flat side of the kidney and make shallow diagonal cuts (like a grid). Don’t cut all the way through—just enough to make the “flower” shape later.  (Imagine drawing a crisscross pattern with a ruler—these cuts will make the kidney curl up nicely when cooked.)
Step 4: Turn into a “flower” shape. Rotate the kidney 90 degrees and make vertical cuts, spacing them about ¼ inch apart. For every 4 vertical cuts, slice through the bottom to separate the kidney into little petals.  (See? It’ll start to look like a flower! This is key for texture—curly, tender bits.)
Step 5: Rinse until water runs clear. Hold the kidney under cold water and gently squeeze to remove any remaining blood or debris. Keep rinsing until the water’s completely clear.  (No grit left behind means no weird aftertaste.)
Step 2: Soak & Salt-Cure (The Secret to No-Gamey Kidneys)
Here’s where the magic happens. My dad’s salt-curing method is why his kidneys are so tender—no chemicals, just good old salt.
Step 6: Soak for 30 minutes. Place the rinsed kidney in a bowl, cover with cold water, and let it soak in the fridge for 30 minutes. This draws out impurities.  (Pro tip: Soaking = cleaner kidneys. Don’t skip this!)
Step 7: Drain & salt. After soaking, drain the kidney and pat dry with paper towels. Now, the big part: Add 4 tablespoons of salt (that’s a lot!) to the kidney in a clean bowl. Use your hands to massage the salt in—this forces the kidney to release all that yucky gamy liquid.  (Watch: After 15-20 minutes, you’ll see a gross cloudy liquid at the bottom. That’s the bad stuff leaving!)
Step 8: Rinse away the salt & gunk. Drain the salted kidney and rinse under cold water until all the salt is gone. You’ll notice the water turns clear again, and the kidney looks… cleaner.  (Don’t rush this—rinsing removes the salt and the “gunk,” so your final dish is fresh.)
Step 9: Soak again (for an hour!). Put the rinsed kidney in fresh cold water, cover, and soak in the fridge for another hour. Change the water once halfway through.  (Why so long? Because the first soak removes surface gunk, and the second soak + salt removes deep-down impurities. This is non-negotiable for zero gamey flavor!)
Step 3: Cook It Up (Quick Stir-Fry, Hot Pan)
Now we’re ready to cook! A hot pan and quick cooking are key to keeping the kidney tender—don’t overcook, or it’ll turn rubbery.
Step 10: Blanch the kidney. Heat a pot of water until it’s just steaming (not boiling yet). Add the soaked kidney and cook for 30 seconds to 1 minute—until it starts to curl. Immediately drain and set aside.  (Too long = tough. 30 seconds is all it needs!)
Step 11: Heat the pan. In a wok or large skillet, heat 2 tablespoons of oil over high heat. Add minced garlic, ginger paste, and sliced onions. Stir-fry for 10 seconds until fragrant.  (If it’s too hot and burns, turn down the heat—garlic burns fast!)
Step 12: Add the blanched kidney. Toss in the blanched kidney and stir-fry for 10-15 seconds. It’ll start to get a slight golden color.  (You want to cook it just enough to heat through, not brown!)
Step 13: Add seasonings. Pour in 1 tablespoon of light soy sauce, 1 tablespoon of oyster sauce, a splash of high-proof liquor, white pepper, and a pinch of chicken essence. Stir quickly to coat.  (Dad swears by baijiu here—it’s a strong alcohol that cooks off, leaving only flavor.)
Step 14: Thicken with cornstarch water. Mix the starch water (cornstarch + water) and pour it in, stirring constantly for 10 seconds. This adds a glossy finish and tightens the sauce.  (Don’t over-stir—you just want to coat the kidney.)
Step 15: Add green onions & serve. Finally, toss in the green onion segments and red chili pepper. Stir once, then immediately serve hot over rice!  (Look at that beautiful, glossy kidney—you’re going to love this.)

Dad’s Pro Tips (From the Master Himself)
Let me share the wisdom my dad taught me over the years—these are the secrets that make his recipe unbeatable:
- Always trim the membranes. Even if it’s tedious, those white membranes are the main source of gameiness. Use a sharp knife to cut them out completely.
- Two soaks, one salt. The first soak removes surface dirt, the salt draws out deep impurities, and the second soak ensures no salt residue. This is why his kidneys never taste “off.”
- Quick blanch, quick cook. Blanching for 30 seconds + stir-frying for 1 minute is all you need. If you overcook, the kidney becomes chewy and rubbery.
- Use high-quality ingredients. Fresh pig kidneys, aged soy sauce, and good liquor make a world of difference. Cheap substitutes? Don’t bother.
- Chill before soaking. Soaking in the fridge keeps the kidney from spoiling and ensures it’s super clean. Room temp soaking = risky bacteria!
Why This Works (Science of Salt-Curing)
Ever wondered why salt works so well? Salt is a natural preservative and cleanser. It draws water out of the kidney cells through osmosis, which flushes out waste products and gamy compounds. The double soak ensures all impurities are removed, leaving only tender, clean meat.
It’s old-school, but it’s effective. No fancy gadgets or chemicals—just good salt, water, and love.
Final Thoughts: Eat & Enjoy!
So there you have it—my dad’s secret scallion stir-fried pig kidney. If you’re tired of dry, gamey kidneys at restaurants, try this method. It’s not just a recipe; it’s a family tradition that turns ordinary ingredients into something extraordinary.
Tag me if you make it—can’t wait to see your version! And if you have questions, drop a comment—I’ll answer as fast as I can (or ask my dad to help!).
Happy cooking, and remember: The best recipes come from love… and a lot of salt.