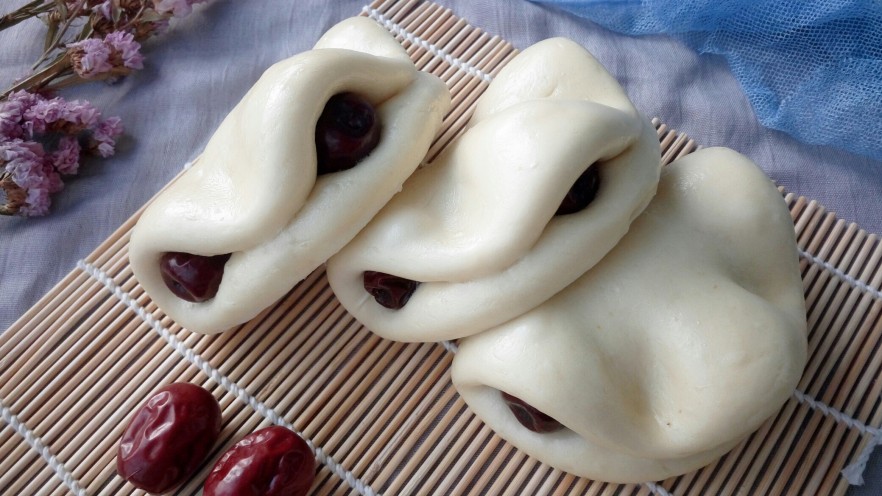
How to Make Authentic Chinese Jujube Flower Steamed Buns: Easy Alkali Water Bun Recipe

Let me start by saying this: nothing beats a good old-fashioned steamed bun made with alkali water, y’all. I’ve tried so many store-bought sweet buns loaded with white sugar, and don’t get me wrong, they’re fine sometimes—but nothing hits like that subtle, earthy alkaline aroma and the slightly chewy, fluffy texture that just tastes like homemade comfort food. Today I’m walking you through my go-to recipe for jujube flower steamed buns, which are the perfect mix of savory (well, savory-adjacent) steamed bun flavor and sweet, chewy red dates. They’re such a classic Chinese dim sum staple, and trust me, once you make them at home, you’ll never buy pre-made buns again.
What You’ll Need for Jujube Flower Steamed Buns
First things first, let’s go over the ingredients. This recipe makes a big batch, so it’s perfect for meal prep or feeding a crowd! Don’t skip the alkali water—trust me, that’s what makes these buns taste different from regular sweet steamed buns.
- 1000 grams all-purpose flour (about 8 cups, if you’re using US measurements)
- ~520 grams warm water (around 105-115°F, just warm enough to activate yeast, not hot!) — I split this into two separate portions for dissolving yeast and alkali
- 5-6 grams active dry yeast (about 2 teaspoons)
- ~5 grams baking soda (that’s the alkali we’re using here! Don’t use too much, though—more on that later)
- Enough red jujubes (Chinese red dates) for filling your buns—usually 3 per bun, so adjust based on how many you make
Pro Tip Before You Start
If you don’t love the alkaline flavor, you can totally swap the baking soda for granulated sugar instead! Just follow the same measurements, or add more sugar if you like your buns extra sweet. I personally prefer the alkali version because it has such a unique, comforting taste that reminds me of the dim sum I ate at my grandma’s house growing up.
Step-by-Step Guide to Making Jujube Flower Steamed Buns
Step 1: Prep Your Jujubes

First up, give your red jujubes a good rinse under cool water to get rid of any dirt or dust. I usually soak them for 10 minutes first to soften them up a little, but you can totally just wash them and use them straight away too. Set them aside on a paper towel to drain while you get your dough ready.
Step 2: Dissolve Your Yeast

Take about half of your warm water (around 260 grams) and pour it into a small bowl. Sprinkle your yeast over the top, then give it a quick stir to mix. Let it sit for 5-10 minutes until it gets foamy—this means your yeast is active and ready to go! If it doesn’t foam up, your yeast is dead, so grab a new package.
Step 3: Dissolve Your Alkali (Baking Soda)

Now take the rest of your warm water and pour it into another small bowl. Add your 5 grams of baking soda and stir until it’s completely dissolved. Be careful not to get this on your skin—it can be a little irritating, so I always use a small spoon to mix it up instead of my bare hands.
Step 4: Mix Your Dough

Pour your all-purpose flour into a large mixing bowl or the bowl of a stand mixer with a dough hook. Now you can alternate pouring in your yeast mixture and your alkali water mixture, stirring as you go. You don’t have to do this strictly, but it helps make sure the yeast and alkali are evenly distributed throughout the dough. Stir everything together until you get a shaggy, rough ball of dough that’s coming away from the sides of the bowl.
Step 5: Knead Your Dough (This Is Key!)

Turn your dough out onto a clean, lightly floured surface. Now you’re going to knead it for 10-15 minutes! I know it sounds like a lot, but this is what gives your buns that perfect fluffy, chewy texture. If you’re using a stand mixer, run the dough hook on medium speed for 5-7 minutes instead. You’ll know the dough is ready when it’s super smooth, elastic, and no longer sticky to your hands.

Grease the inside of your mixing bowl, put the dough back in, and cover it tightly with plastic wrap or a damp kitchen towel. Let it rise in a warm spot for 1-2 hours, or until it’s doubled in size. If your kitchen is cold, you can turn your oven on to 100°F for 2 minutes, then turn it off and put the bowl inside to help it rise faster.
Step 6: Punch Down and Knead Again

Once your dough has doubled in size, take it out of the bowl and punch it down hard to release all the trapped air bubbles. Now you’re going to knead it again for another 5 minutes or so, until all the air is gone and the dough is smooth once more. Pro tip here: if you didn’t mix the alkali evenly earlier, you might see little yellow streaks in your dough—just keep kneading until those streaks go away! If you leave them, parts of your buns will taste bitter, so take the time to knead it well.

You can check if you’ve kneaded it enough by cutting the dough in half with a sharp knife. If the inside has lots of tiny, even air pockets and no big gaps, you’re good to go!
Step 7: Cut Your Dough Into Portions

Divide your large ball of dough into equal-sized small portions. I usually make 12-16 buns, depending on how big I want them. Each portion should be around 60-80 grams, but don’t stress too much about exact measurements—close enough is fine!

Take each portion and roll it into a smooth ball, then flatten it slightly with your palm.
Step 8: Shape Your Jujube Flower Buns

Use a rolling pin to roll each flattened dough ball into an oval shape, about 1/4 inch thick. Try to make one end a little wider than the other—this will help with the flower shape later!

Now take your washed jujubes and place three of them right next to each other on the wider end of the oval dough. Don’t pack them too tight, but make sure they’re sitting securely.


Fold the narrower end of the dough over the jujubes, then use your fingers to press down gently in the gaps between the jujubes to secure everything in place. You’ll end up with a little flower shape! Do this with all of your dough portions and jujubes.
Step 9: Second Proof and Steam Your Buns
Line a steamer basket with parchment paper or cabbage leaves to prevent the buns from sticking. Place your shaped jujube buns on the lined basket, leaving a little space between each one so they don’t stick together as they rise.
Fill a large pot with a few inches of water, and bring it to a gentle simmer—you don’t want it boiling violently yet. Put the steamer basket on top of the pot, cover it, and let the buns do a second proof for 20-30 minutes, until they look puffy and twice as big as they were when you shaped them.
Once the second proof is done, turn the heat up to high and let the buns steam for 25 minutes. If you made smaller buns, you can cut the steaming time down to 18-20 minutes! Once the timer goes off, don’t open the lid right away—let the buns rest in the steamer for 5 minutes first. If you take the lid off too soon, the sudden temperature change will make your buns deflate, and that’s the worst!

Step 10: Enjoy Your Homemade Dim Sum!
Carefully take the buns out of the steamer and let them cool for a minute or two—they’ll be super hot straight out of the steam! I promise you’re going to love the combination of the subtle alkaline flavor of the bun and the sweet, chewy red dates. They’re perfect for breakfast with a cup of hot tea, as a snack during the day, or even as a side dish for a Chinese-style dinner.
My Top Tips for Perfect Jujube Flower Steamed Buns Every Time
- Don’t overdo the baking soda! 5 grams is exactly the right amount for 1000 grams of flour. If you use too much, your buns will turn yellow and taste bitter, which is not what we want.
- Make sure your water is the right temperature for the yeast—too hot will kill the yeast, and your dough won’t rise at all.
- Knead your dough well! This is the most important step for getting fluffy, even buns. I know your arms might get tired, but it’s worth it.
- Let the buns rest for the second proof—don’t skip this step! It helps the buns get nice and fluffy.
- If you don’t have red jujubes, you can also use raisins or dried cranberries as a substitute, but jujubes give that classic Chinese dim sum flavor.
Honestly, these jujube flower steamed buns are such a cozy, classic recipe that everyone in my family goes crazy for. I usually make a big batch on Sundays and freeze the leftovers—just reheat them in the steamer for 5 minutes, and they taste just like fresh! I hope you give this recipe a try, and let me know how they turn out for you. Happy baking (and steaming!) y’all.