
Hey there, fellow sweet tooths! Today I’m super excited to share a recipe that’s equal parts cute, chocolatey, and easy to make: a 6-inch Oreo small cake! Whether you’re hosting a tiny gathering, want a cozy dessert for one, or just need to satisfy your chocolate cravings, this little cake checks all the boxes. It’s not too big, uses simple ingredients, and the Oreo twist makes every bite feel like a hug from your favorite cookie. Let me walk you through how I whipped this up—no fancy skills required!
Ingredients You’ll Need

First things first: gather all your ingredients. These amounts are perfect for a 6-inch non-stick cake mold (I used the “Xuechu Non-Stick Rainbow Cake 5-Piece Set” mold, but any 6-inch non-stick pan works!). Here’s what you’ll need:
- Eggs: 6 large (room temperature works best—they mix smoother!)
- All-Purpose Flour: 100g (sifted to avoid lumps, trust me)
- Milk: 72g (dairy, soy, or oat milk—your call!)
- Cooking Oil: 72g (sunflower or vegetable oil is fine)
- Granulated Sugar (for batter): 55g
- Lemon Juice: 3-5 drops (stabilizes the egg whites—key for fluffy peaks!)
- Cocoa Powder: 5g (unsweetened, like Valrhona or similar)
- Whipping Cream (for filling): 300g (heavy cream, I used Blue Windmill)
- Sugar (for cream): 30g (balances the Oreo’s sweetness)
- Oreo Cookies: 2 packs (classic ones—crush half for filling, keep half whole for decor!)
How to Make the Oreo 6-Inch Cake
Let’s get into the step-by-step magic. This part’s fun and foolproof—just follow along!
Step 1: Emulsify the Oil and Milk

Start by mixing the oil and milk. Grab a bowl, pour in 72g oil and 72g milk, then whisk like crazy until they’re completely smooth—no oil droplets left! This “emulsification” step is crucial for a tender cake base. If you see separation, keep whisking until it’s a uniform, creamy blend.
Step 2: Add Egg Yolks and Mix

Crack in all 6 egg yolks into the oil-milk mixture. Whisk them in gently until everything’s combined—you’ll get a pale yellow, smooth batter. No need to overdo it here; just make sure there are no yellow streaks left.
Step 3: Sift in the Flour

Time to add the dry ingredients! Sift 100g of all-purpose flour directly into the batter. Sifting removes clumps and adds air, which makes the cake fluffy. If you don’t have a sieve, use a fork to break up any lumps first. Gently fold the flour into the batter with a spatula—don’t stir too hard, we want to keep the air!
Step 4: Mix Until Smooth (No Lumps Allowed!)

Fold the flour into the batter until there are no white streaks left. The batter should be thick, smooth, and creamy—like a silky milkshake! If there are tiny lumps, just give it a few more gentle folds. We’re almost done with the base batter!
Step 5: Make the Chocolate Batter

Now, split the batter into two parts. Take 3/5 of the vanilla batter and put it in a separate bowl. Add 5g of sifted cocoa powder (yes, sift it too—no gritty bits!) and mix until the cocoa dissolves completely. You’ll get a rich, dark brown chocolate batter. Set this aside for now.
Step 6: Whip the Egg Whites to Stiff Peaks

In a clean, dry bowl (no grease or moisture!), add the egg whites. If separated eggs before, make sure the whites are grease-free—even a drop of yolk will ruin the meringue! Add the 55g sugar and 3-5 drops of lemon juice. Beat with an electric mixer on medium speed until the mixture becomes thick, then switch to high speed until you get stiff, glossy peaks. How? Lift the whisk—if the peaks stand straight up without bending, you’re golden!
Step 7: Fold Meringue into Both Batters

Now, we’re folding the meringue into both batters. Take 1/3 of the meringue and gently fold it into the vanilla batter—cut through the center, scrape up from the bottom, and fold over. Do this slowly to keep as much air in as possible. Once combined, add the rest of the meringue and fold again. Repeat with the chocolate batter!
Step 8: Layer the Batter in the Mold

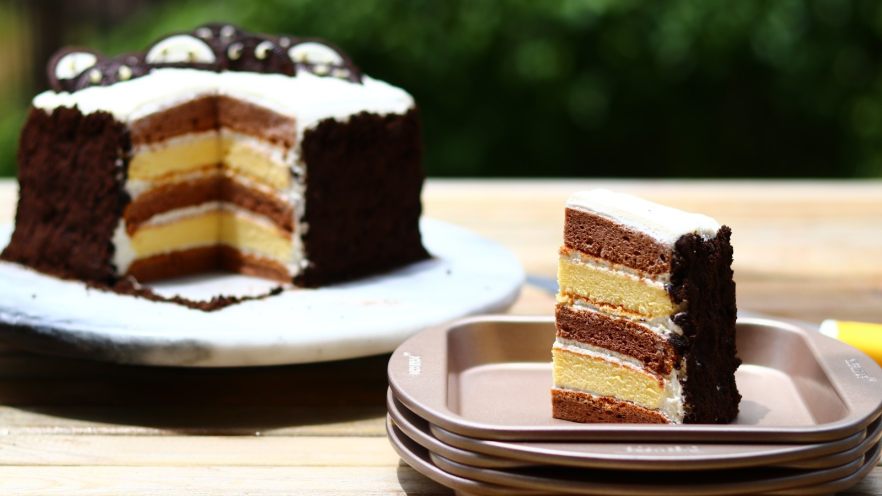
Pro tip: Don’t overmix! Each fold should be gentle to avoid deflating the cake. Now, pour the batter into your 6-inch mold. I alternated layers: 3 chocolate and 2 vanilla, which gives that beautiful marbled look. If you’re not into marbling, just pour all the batter—no judgment! Tap the mold gently on the counter to release air bubbles, then level the top with a spatula.
Step 9: Bake the Cake

Preheat your oven to 150°C (300°F). If you have a 38L oven like me, you can bake multiple layers at once—just space them out. For smaller ovens, bake in batches. I placed the tray on the bottom rack, then a cooling rack on top, and baked 4 layers at once. For a 6-inch cake, bake for 25 minutes. Check with a toothpick—if it comes out clean, it’s done!
Step 10: Cool and Invert

When the timer dings, take the cake out and let it cool for 5 minutes in the mold. Then invert it onto a cooling rack—this helps it keep its shape and makes it easy to remove. Let it cool completely before assembling—impatience leads to crumbs, trust me!
Assembling the Oreo Cream and Decorating
Now, let’s turn this cake into an Oreo masterpiece!
Step 1: Whip the Cream to Stiff Peaks

In a chilled bowl, add 300g whipping cream and 30g sugar. Whip until it reaches 8-9 stiff peaks—this means it’s thick enough to hold its shape but not rock-hard. No need for super smoothness here, since we’re not aiming for a perfect finish. A little stiffness helps the Oreo crumbs stick!
Step 2: Layer with Cream and Oreos

Cut the cooled cake into 5 layers (3 chocolate, 2 vanilla). Spread a generous layer of cream between each cake layer. Since I skipped fruit (5 layers were already tall enough!), just stick to the creamy Oreo goodness. Add a final layer of cream on top.
Step 3: Smooth the Sides and Decorate

Spread cream on the sides to smooth them out. Then, take half of the Oreos, crush them into crumbs, and press them onto the sides of the cake with the back of a spoon. For the top, use a wide spatula or a star-tip piping bag to spread cream and arrange whole Oreos for a fun, rustic look.

Ta-da! Your Oreo 6-inch cake is ready to eat. Slice it up and enjoy with a cup of coffee or tea—it’s the perfect treat for any occasion!
Pro Tips for Flawless Baking
- Oven Temperatures: Every oven is different! If the top browns too fast, cover with foil halfway through baking.
- Don’t Overmix! Folding the meringue gently keeps the cake fluffy—stop as soon as there are no streaks.
- Room Temp Ingredients: Eggs and oil at room temp mix better, avoiding lumps.
- Cooling Time: Let the cake cool completely before cutting—no rushing, or it’ll crumble!
- Oreo Crunch: Crush extra Oreos for filling or use whole ones for a fun texture.
Final Thoughts
There you have it! A sweet, chocolatey 6-inch Oreo small cake that’s simple enough for beginners but impressive enough to share. The layers of vanilla and chocolate, creamy Oreo filling, and that iconic cookie decoration make every bite a winner. Whether you’re hosting, gifting, or just treating yourself, this recipe is a game-changer. Tag me if you bake it—I’d love to see your Oreo creation! Happy baking, and remember: life’s better with a little chocolate and a lot of joy.