Homemade Colorful Fruit Cream Cake Recipe | Perfect Summer Dessert
Hey there, dessert lovers! 🍓 Summer is the BEST time for fresh fruit, right? And what better way to enjoy those juicy mangoes, strawberries, and kiwis than in a super creamy, colorful fruit cream cake? I’ve been obsessed with making this cake lately, and honestly, it’s way easier than it looks. Plus, it’s the perfect showstopper for backyard barbecues, potlucks, or even just a cozy night in with a movie. Let’s dive into how to make this dreamy treat from scratch!

Ingredients You’ll Need
Let’s start with the basics! You’ll need ingredients for the cake batter and the fresh fruit & cream decoration. Here’s what I used:
- Cake Batter: 4 eggs, 50g corn oil, 60g pure milk, 70g powdered sugar, 80g low-gluten flour, a pinch of salt
- Decoration: 1000g fresh cream, 100g powdered sugar for cream, fresh fruits (mango, kiwi, strawberries, etc.), and a sprinkle of powdered sugar for dusting
Pro tip: Use room-temperature eggs for easier mixing—they blend better with the other ingredients! Also, make sure your cream is cold when you start decorating; it’ll hold its shape better that way.
Step-by-Step: Baking the Perfect Cake Base
 First, in a large bowl, mix the pure milk and corn oil until they’re completely emulsified—no oil droplets left! It should look thick and creamy, almost like a smooth paste. If you see any oil, just keep mixing a little more. Trust me, this emulsification is key for a soft cake.
 Next, add the egg yolks one at a time. Whisk them in gently with a spatula until everything is smooth and runny—like a thick, glossy mixture. Don’t overmix here; we just want it to combine evenly, not beat the air out of it.
 Now, sift the low-gluten flour and a pinch of salt into the bowl. Sifting is crucial to avoid lumps! Use a whisk or spatula to mix it in in a “Z” pattern—don’t stir in circles, or you’ll get gluten development, which is bad for a fluffy cake. Mix until there are no more dry bits; you’ll have a thick, shiny batter now!
 Now, let’s tackle the egg whites! In a clean, dry bowl, add the egg whites with a pinch of salt. Then, slowly add the powdered sugar in three batches while beating. First, beat on low to combine, then medium-high until you get stiff peaks—this means the meringue is ready! Preheat your oven to 115-120°C while you’re doing this, because we’ll be baking soon.
 To combine the meringue and batter, take 1/3 of the meringue and gently fold it into the yolk mixture. Hold the bowl with your left hand and use a spatula to cut through the batter from the bottom, then scrape up and over—like you’re giving the batter a little hug. Fold until just combined, then add the remaining meringue in two more batches.
 Once all the meringue is in, fold everything together carefully. If your bowl is square or rectangular, use a silicone spatula to scrape the bottom and sides—this ensures no meringue is left behind, which would make the cake uneven. The batter should be light and airy but still thick enough to hold its shape.
 Now, pour the batter into a greased cake pan—about 80% full. Tap the pan gently on the counter to release any big air bubbles, then use a spatula to smooth the top. A quick tap on the counter will make the batter settle, so you don’t get a lumpy top!
 Slide the pan into the preheated oven, and bake at 120°C for 75 minutes. Set a timer—don’t open the oven early, or the cake might sink! I usually check mine at 60 minutes to see if it’s browning nicely, but every oven is different, so adjust as needed.
 When the timer dings, take the cake out of the oven and immediately tap it firmly on the counter to release the steam. Then, invert it onto a cooling rack and let it cool completely—this prevents the bottom from getting soggy. Patience is key here!
Decorating Your Colorful Fruit Cream Cake
 First, once the cake is completely cool, carefully remove it from the pan and slice it into 3 even layers. Use a long serrated knife for this—slice straight down, no sawing, to keep the layers flat.
 Next, prep your fruits! I used mango, kiwi, and strawberries—you can use any fresh fruits you love, like blueberries, peaches, or even pineapple. Slice them into bite-sized pieces, and for decoration, save a few whole strawberries to make the top look extra fancy.
 Now, whip the cream! In a chilled bowl, add 1000g of fresh cream and 100g powdered sugar. Beat on medium speed until it’s thick enough to hold peaks—about the 90% of stiff peaks. If you’re splitting the cream, do half at a time to make sure it doesn’t melt; cold cream is your best friend here!
 Let’s start assembling! Place the first cake layer on a cake stand or turntable. Spread a thick layer of cream over the top, then add a generous amount of fruit—don’t be shy, but leave a little space around the edges so the cream doesn’t squish out. Add the second layer of cake, then more cream and fruit. Repeat with the third layer until all three are stacked.
 Once your cake is stacked, apply a thin “crumb coat” of cream over the entire surface to seal in any loose crumbs. This makes the final layer smoother and easier to decorate. Put the cake in the fridge for 10-15 minutes to let the crumb coat set, then remove and add the final thick layer of cream.
 Now, the secret to a pro-looking cake without fancy tools: using a spoon to smooth the sides! Hold a metal spoon (I use a round tablespoon) against the side of the cake and spin the turntable while gently pressing the back of the spoon against the cream. It’s surprisingly easy—no need for a professional pastry bag! Just keep going until the sides are smooth.
 For the top, use the same spoon method: start from the center and work your way out, or just swirl the cream with the back of the spoon for a rustic look. I like to keep it simple here!
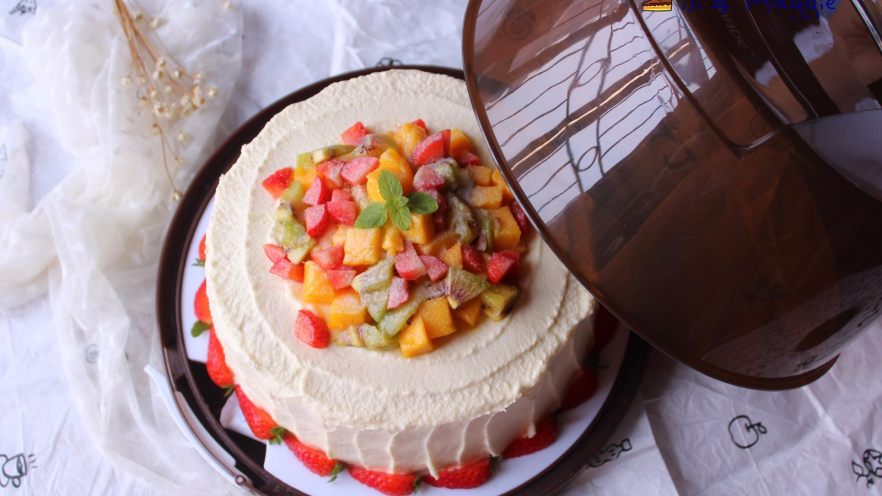
 Now, add the fresh fruit decorations! I used a mix of sliced and whole strawberries. For the sides, I placed sliced strawberries vertically around the base to create a pretty border. On top, I scattered the kiwi and mango pieces in a rainbow pattern, then added a few strawberry slices for extra flair.
 Finally, dust the top with a little powdered sugar for that elegant finishing touch. Let the cake sit in the fridge for at least 30 minutes before serving to let all the flavors meld together—it’s worth the wait!
Pro Tips for Better Results
- Oven Variations: Every oven is different! If your cake is still wet after 75 minutes, bake it at 115°C for a few more minutes. If it’s browning too fast, lower the temperature to 110°C.
- Fruit Selection: Seasonal fruits are best—mango in summer, apples in fall, but fresh is always better! You can even use frozen fruit if fresh isn’t available, but thaw them first.
- Decorating Hacks: If you don’t have a turntable, use a plate and spin it with your hand. And if you’re not confident with the spoon, use a bench scraper or even a straight edge to smooth the sides.
- Cake Layers: If your cake doesn’t split evenly, use a serrated knife to trim the tops flat—this makes stacking easier and looks neater.
There you have it! A stunning, colorful fruit cream cake that’s perfect for any occasion. It’s sweet, creamy, and loaded with fresh fruit—your taste buds will thank you. Plus, it’s way cheaper than buying from a bakery, and you can customize it however you want. Tag me if you make it—I’d love to see your version! Happy baking, and enjoy every bite! 😊