


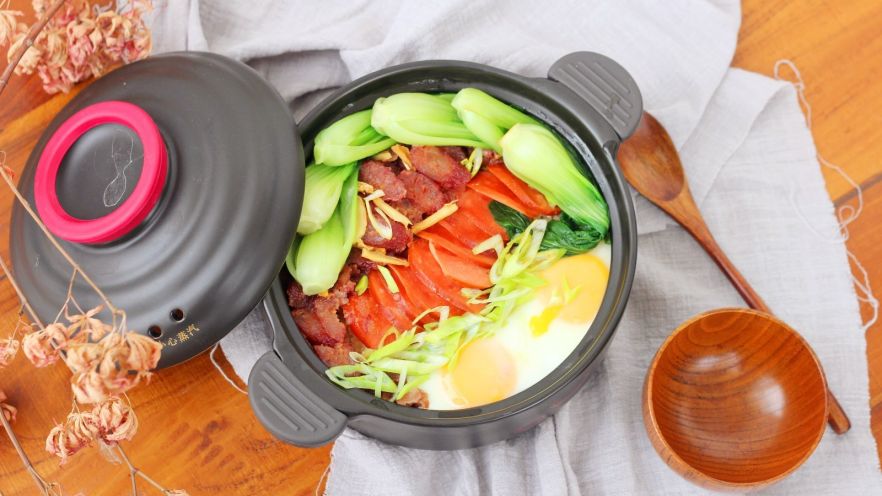

Let’s cut to the chase: I’m a total northern China kid, but if there’s one southern dish that’s stolen my heart (and my lunch plans every other week), it’s Chinese sausage clay pot rice. Think about it—fluffy rice soaked in rich sausage oil, a runny-yolk egg oozing into every crevice, crisp-tender greens, and that iconic crispy rice crust at the bottom. It’s a one-pot wonder that’s cozy, flavorful, and so satisfying, I’ve even been known to skip takeout just to make it at home. And today? I’m spilling my go-to recipe—no fancy skills required, promise.
Why This Chinese Sausage Clay Pot Rice Works (Trust Me, I’ve Tested It Too Many Times)
First off, let’s talk about the star: Guangdong-style Chinese sausage (lap cheong). That sweet, savory, slightly smoky flavor? It’s non-negotiable. I pair it with garlic sausage for an extra kick—because why not double down on the sausage goodness? Then there’s the rice: short-grain rice is key here (long-grain just won’t get that sticky, absorbent texture). And the clay pot? Oh, it’s not just for show—it locks in moisture and creates that crispy crust we all crave. Plus, this recipe uses an electric clay pot, so you don’t have to hover over a stove worrying about burning the rice. Win-win!
Ingredients You’ll Need (No Fancy Groceries Required)
Let’s keep this simple—most of these ingredients are either in your pantry or at your local Asian market. Here’s what you’ll grab:
- 5 Guangdong-style Chinese sausages (lap cheong) – the sweet, reddish ones are perfect
- 2 cups short-grain rice (japonica rice works too—just make sure it’s sticky)
- 1 garlic sausage (for that extra garlicky punch)
- 5 small leafy greens (bok choy, choy sum, or even spinach—whatever you have)
- 1 large egg (for that runny yolk magic)
- A few drops of sesame oil (for aroma)
- 2 tbsp light soy sauce (for saltiness and umami)
- ½ tbsp dark soy sauce (for color—don’t overdo it, or it’ll be too dark!)
- 2 tsp sugar (balances the saltiness of the soy sauces)
- 1 tsp salt (adjust to taste—go easy if your sausages are salty)
- 1 tbsp cooking oil (for coating the clay pot)
- 1 green onion (scallion) – for garnish
- 1 small piece of ginger (adds a subtle warmth)
- Cool boiled water (for soaking rice and making the sauce)
Pro tip: If you can’t find Guangdong sausage, don’t panic—look for “Chinese sweet sausage” at the market. It’s the same thing, just labeled differently.
Step-by-Step Instructions (Let’s Make This Rice!)
Okay, let’s get cooking. I’ve broken this down into super easy steps, with photos to guide you. No stress—you’ve got this!
Step 1: Prep the Rice (Don’t Skip Soaking!)

Rinse the rice under cold water until the water runs clear (about 3-4 rinses). Then soak it in cool boiled water for 30 minutes. Why soak? Because it softens the rice grains so they cook evenly and absorb all that sausage flavor later. Trust me—skip this step, and your rice might be undercooked or crunchy in spots. Not cute.
Step 2: Coat the Clay Pot (For That Crispy Crust)

Take your electric clay pot (or regular clay pot if you’re using one) and brush the bottom and sides with a thin layer of cooking oil. This is the secret to getting that crispy rice crust without the rice sticking to the pot. Don’t be stingy—cover every inch!
Step 3: Add Rice and Water to the Pot

Drain the soaked rice and put it into the oiled clay pot. Add cool boiled water until it’s about 0.5-1 cm above the rice. How to check? Stick your finger into the rice— the water should come up to the first knuckle of your index finger. Perfect.
Step 4: Start Cooking the Rice

Place the clay pot on its electric base (if you’re using a stovetop pot, turn the heat to medium-high until it boils, then low). Press the “clay pot rice” function (most electric pots have this) and hit start. Now, go take a 15-minute break—you’ve earned it!
Step 5: Prep the Greens While the Rice Cooks

Wash the leafy greens thoroughly and soak them in water for 10 minutes to get rid of any dirt or pesticides. Set them aside—we’ll blanch them later.
Step 6: Slice the Sausages (And Try Not to Snack on Them)

Take the Chinese sausages and garlic sausage out of their packaging. Now, slice them diagonally into 0.5 cm thick pieces. Diagonal slices look fancier, right? Plus, they cook faster. Pro tip: If your sausages are super hard, pop them in the microwave for 10 seconds to soften them up—slicing will be a breeze.
Step 7: Prep Ginger and Green Onion

Peel the ginger and slice it into thin strips. Chop the green onion into small pieces—reserve some for garnish. These add a fresh, aromatic touch that balances the richness of the sausages.
Step 8: Make the Magic Sauce (Don’t Skip This!)
This sauce is what ties everything together—sweet, salty, and umami-packed. Here’s how to make it:
- In a small bowl, mix 2 tbsp light soy sauce, ½ tbsp dark soy sauce, 2 tsp sugar, 1 tsp salt, and a few drops of sesame oil.
- Add 2 tbsp cool boiled water and stir until the sugar and salt dissolve. Taste it—adjust if needed (more sugar for sweetness, more soy sauce for saltiness).
Warning: Don’t use too much dark soy sauce! A little goes a long way—you want the sauce to be golden, not black.
Step 9: Add Sausages and Egg to the Rice

Check the rice: when the surface is no longer soupy (about 15-20 minutes into cooking), it’s time to add the good stuff. Scatter the ginger strips over the rice, then arrange the sausage slices on top. Crack the egg right in the center—this is where the runny yolk magic happens. Cover the pot and let it cook for another 5-7 minutes.
Step 10: Blanch the Greens

While the sausages and egg cook, bring a pot of water to a boil. Add a pinch of salt and a drop of oil (to keep the greens bright green). Toss in the greens and blanch for 30 seconds—just until they’re crisp-tender. Drain them and immediately put them in ice water to stop the cooking process. This keeps them bright and crunchy!
Step 11: Assemble and Serve (The Best Part!)

Check the pot: the sausages should be cooked through (they’ll plump up), and the egg white should be set (the yolk should still be runny—fingers crossed!). Arrange the blanched greens on top, sprinkle with green onion, and pour the magic sauce evenly over everything. Now, take a spoon and mix it all up—watch the runny yolk coat the rice and sausages. Mmm, that’s the stuff.

Dig in while it’s hot—the crispy crust is best when it’s fresh. Trust me, you’ll be going back for seconds (and maybe thirds).
My Top Tips for Perfect Clay Pot Rice Every Time
I’ve made this recipe so many times, I’ve learned a few tricks the hard way. Here’s what to remember:
- Soak the rice! This is non-negotiable. If you skip soaking, the rice will take longer to cook, and you might end up with undercooked grains. I soak mine for 30 minutes—set a timer so you don’t forget.
- Go easy on the dark soy sauce. A little adds color, but too much makes the rice taste bitter and look burnt. Start with ½ tbsp, and add more only if you need to.
- Customize it! Don’t like garlic sausage? Skip it. Want more veggies? Add mushrooms or carrots. Craving more protein? Throw in a few shrimp. This recipe is flexible—make it your own.
- Don’t overcook the egg. The goal is a runny yolk, so don’t leave it in the pot too long. If your electric pot cooks fast, check the egg after 5 minutes.
- Use cool boiled water. Tap water has chlorine, which can affect the taste of the rice. Cool boiled water is gentler and keeps the rice flavor clean.
Final Thoughts (Why This Recipe Is a Keeper)
Let’s be real—cooking shouldn’t be stressful. This Chinese sausage clay pot rice recipe is easy, forgiving, and tastes like it came from a restaurant. It’s perfect for busy weeknights (you can prep the ingredients ahead) or lazy weekends (when you want something cozy). Plus, it’s a crowd-pleaser—my friends who’ve never had clay pot rice are obsessed after trying this. So grab your clay pot, stock up on sausages, and get cooking. Your taste buds will thank you.
P.S. If you don’t have an electric clay pot, you can use a regular stovetop clay pot. Just follow these steps: cook the rice on medium-high until it boils, then turn to low, add the sausages and egg, and cover for 10 minutes. Keep an eye on it—stovetop pots can burn the rice fast! But trust me, it’s worth the extra attention.



![French Savory Tart [Magic Cake] – Sugar-Free, Layered Delight (Forced My Friend’s Recipe to Obsession!)](https://hearthsiderecipes.com/images/5214/5mit2exneu1.jpg "French Savory Tart [Magic Cake] – Sugar-Free, Layered Delight (Forced My Friend’s Recipe to Obsession!)")


