

 – Easy Recipe for Summer")

What is Chongyang Cake? A Sweet Tradition for China’s Double Ninth Festival
Let’s talk about Chongyang Cake—this soft, cozy treat is way more than just a dessert. It’s tied to one of China’s most heartwarming traditional festivals: the Double Ninth Festival (also called Chongyang Festival). If you haven’t heard of it, it’s a day all about honoring elders—think family gatherings, admiring chrysanthemums, climbing mountains, and of course, eating this fluffy cake. The best part? It’s super easy to make at home, even if you’re not a pro baker. No fancy tools, no weird ingredients—just simple stuff you probably already have in your pantry.
Chongyang Cake goes by a few fun names: flower cake, chrysanthemum cake, or five-color cake. The best thing about it? There’s no strict recipe. Every family tweaks it to their taste! Some add nuts, some use different fruits, but the core idea is to keep it soft enough for grandparents to bite into easily. That’s why it’s perfect for the festival—showing love to the elders doesn’t have to be complicated, right?
Ingredients You’ll Need for Homemade Chongyang Cake
Before we dive into the steps, let’s round up the ingredients. I promise, nothing here is hard to find. Just grab these:
- 80g glutinous rice flour (this makes the cake sticky and soft—don’t skip it!)
- 130g rice flour (balances the glutinous flour so it’s not too chewy)
- 40g sugar (for the cake base—adjust if you like it less sweet)
- 110g water (just regular tap water works)
- 60g red beans (the star filling—sweet and creamy)
- 30g sugar (for the red bean filling)
- 5g red dates (adds a chewy, sweet touch)
- 3g longans (dried ones are fine—they’re like little sweet bombs)
- 8g raisins (I used two colors for fun—makes the cake look pretty!)
Pro tip: If you don’t have red dates or longans, no big deal—swap them for other dried fruits like cranberries or apricots. The recipe is flexible!
Step-by-Step Guide to Making Chongyang Cake
Okay, let’s get cooking! I’ve broken this down into super simple steps—even if you’re new to baking, you’ve got this.
Step 1: Prep All Your Ingredients First
First things first: lay out all your ingredients on the counter. There’s nothing worse than mid-recipe panic because you can’t find the sugar. Trust me, I’ve been there!

Step 2: Soak the Dried Fruits
Take the red dates, longans, and raisins and pop them in a bowl of warm water. Let them soak for about 15-20 minutes until they’re soft. This way, they won’t be dry and hard in the finished cake.

Step 3: Cook the Red Beans (No Soaking Needed!)
Here’s a time-saver: you don’t have to soak the red beans overnight. Just put them in an electric pressure cooker with some water (cover the beans by about 1 inch) and cook until they’re soft—usually 15-20 minutes. If you don’t have a pressure cooker, a regular pot works too, but it’ll take longer (around 40 minutes). Just make sure the beans are tender enough to mash a little.

Step 4: Make the Honey Red Beans
Once the beans are cooked, drain any excess water (but leave a little if they’re too dry). Add the 30g of sugar and stir well. Let them sit for a minute so the sugar melts and coats the beans. Voilà—you’ve got sweet, sticky honey red beans! This is my favorite part—they smell amazing.

Step 5: Mix the Flour and Sugar
Now, grab a big bowl. Add the glutinous rice flour, regular rice flour, and 40g sugar. Give them a quick stir to mix evenly. No lumps here—yet!


Step 6: Add Water and Make Flour Granules
Slowly pour in the 110g of water while stirring the flour mixture. Don’t pour it all at once—you want to make small, crumbly granules, not a paste. Once it’s mixed, spread the granules on a baking sheet and let them sit for 10 minutes. This helps the flour absorb the water evenly.

Step 7: Sift the Flour (Super Important!)
Now, here’s a non-negotiable step: sift the flour granules through a fine mesh sieve. This is what makes the cake super soft and fluffy. If you skip this, your cake might be lumpy and dense—yuck. Trust me, the extra 2 minutes are worth it!

Step 8: Layer the Cake in a Mold
Take a heart-shaped mousse ring (or any round mold you have—even a small bowl works!) and place it on a baking sheet lined with parchment paper. Now, let’s layer:
- First, add a thin layer of sifted flour and pat it down gently.
- Next, spread a layer of honey red beans—don’t overdo it, or the cake might fall apart.
- Add another layer of flour, then another layer of beans.
- Finish with a thick layer of flour on top.
Pro tip: Pat each layer down lightly so the cake holds its shape, but don’t press too hard—you want it to stay fluffy.


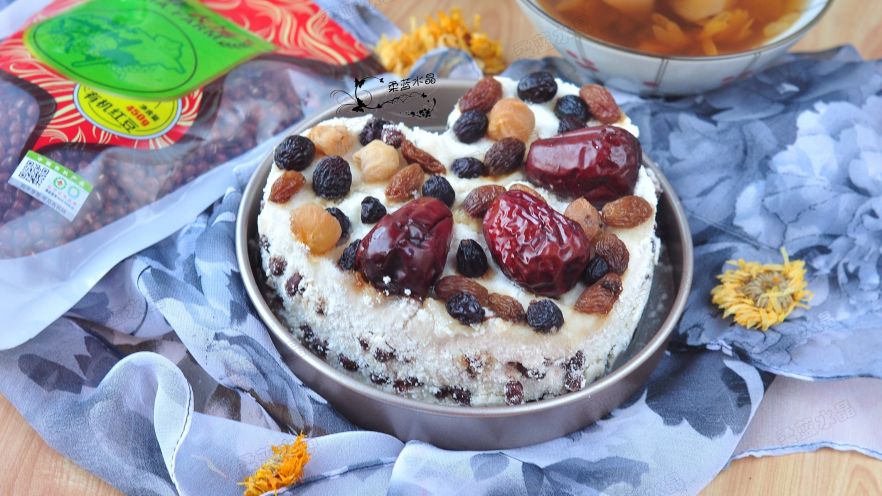
Step 9: Decorate with Dried Fruits
Take the soaked red dates, longans, and raisins and arrange them on top of the flour layer. This makes the cake look pretty and adds extra flavor. Be creative—make a little pattern if you want!

Step 10: Steam the Cake
Put the mold in a steamer (make sure there’s enough water in the steamer pot). Steam on medium heat for 30 minutes. Set a timer—you don’t want to overcook it! After 30 minutes, turn off the heat and let it cool for 5 minutes before taking it out of the mold.

Step 11: Enjoy Your Homemade Chongyang Cake!
Once it’s cool, carefully remove the mold. Cut it into slices and serve. The inside should be soft, sweet, and full of red bean goodness. Your grandparents will love it—mine did!


My Top Tips for the Perfect Chongyang Cake
I learned these the hard way, so you don’t have to! Here are my go-to tips:
- Use two-colored raisins: It makes the cake look more festive—trust me, presentation matters!
- Don’t skip sifting: This is the secret to a fluffy cake. Lumpy flour = dense cake.
- Don’t overcook the red beans: They should be soft but not mushy. If you use too little water, they’ll be hard—so add enough!
- Let it cool slightly: The cake is easier to cut when it’s not piping hot. Plus, the flavors get better as it cools a little.
Why Chongyang Cake Matters for the Double Ninth Festival
Chongyang Cake isn’t just a snack—it’s a symbol of respect for elders. The festival is all about showing love and gratitude to the older people in our lives, and making this cake is a simple, heartfelt way to do that. It’s soft enough for them to eat easily, and the sweet flavors are usually a hit. Plus, baking it together as a family makes the day even more special.
I hope you try this recipe! It’s easy, fun, and full of meaning. Let me know in the comments if you make it— I’d love to see your creations!
")


 – A Refreshing Summer Seafood Recipe")
")


 with Colorful Veggies | A Simple, Flavor-Packed Recipe")