

Why Bother with Cute Egg Dishes? Because Kids Love Them!
Let’s be real—getting kids to eat eggs can feel like a battle sometimes, right? They’ll pick at their food, say “eggs are yucky,” and then you’re stuck forcing them to take one bite. But what if I told you there’s a trick to make eggs so fun they’ll beg for seconds? Yep, by turning plain old eggs into tiny, adorable mushrooms and bunnies! I’ve tried this with my own little niece, and let me tell you—once she saw the first “mushroom” pop out of her plate, she was hooked. Now she asks for “funny egg food” every single morning. Trust me, this is the ultimate hack for picky eaters!
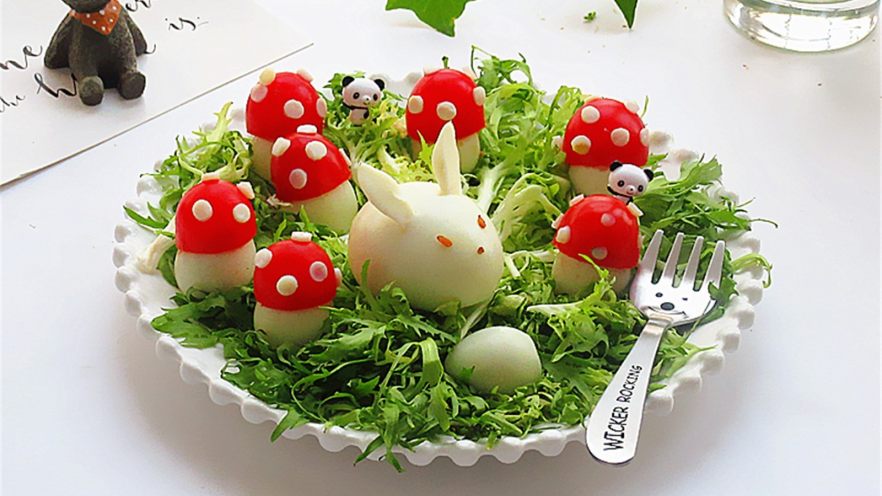
The secret? Making your eggs look like characters from a storybook. Think: cute little white mushrooms with red spots, and a fluffy bunny with a carrot nose. Kids’ eyes light up when they see something that looks like art, not just food. And the best part? It’s actually super easy to make! You don’t need fancy tools—just some basic kitchen supplies and a little creativity. Let’s dive into how to make these magical egg dishes step by step!
What You’ll Need: Ingredients for Your Egg Art
First, let’s gather all the ingredients. Don’t worry, most of these are things you probably already have in your fridge or pantry! Here’s what you need:
- Quail eggs (8 pieces): These are perfect for the tiny mushroom caps—small, round, and so cute!
- 1 regular egg: This will be the star of the bunny show (it’s bigger, so the bunny looks fluffy).
- Cherry tomatoes (8 pieces): We’ll use these for the mushroom caps (if we don’t have cherry radishes handy).
- Cherry radishes (3 pieces): These tiny round radishes are gold for the mushroom stems—so they look like real mushrooms!
- Chicory (40g): To spread on the plate as a “grass” bed for your cute creations.
Optional tools: A small knife, scissors, a tiny spoon (for scooping out seeds), and a toothpick or small piping bag if you want to decorate the mushrooms with white spots (more on that later!).
How to Make These Cute Egg Dishes: Step-by-Step
Step 1: Boil the Eggs—Soft & Ready to Shape
First up: boil the eggs! This is the foundation. I use my egg cooker because it’s foolproof, but you can boil them on the stove too. Either way, make sure the quail eggs and the regular egg are fully cooked. Let them cool for a few minutes after boiling—you don’t want to burn your fingers! Once they’re cool, gently peel the shells off (if you’re using quail eggs, peel them carefully—they’re smaller and more delicate!).

Pro tip: If you’re short on time, hard-boil the eggs the night before and store them in the fridge. Then you can just grab them in the morning and start decorating! So easy, right?
Step 2: Prep the Cherry Radishes for Mini Mushrooms
Let’s start with the cherry radishes—these will be our classic “white button mushrooms” with red caps. First, take a cherry radish and check if it’s round and small (like the size of a quail egg). If it’s too big, pick a smaller one. You want the radish to look like a perfect little mushroom cap and stem combo.

Now, slice the radish in half horizontally (like cutting a tomato, but more gently). The bottom half will be the “stem” of the mushroom, and the top half will be the “cap.”
Step 2a: Carve the Mushroom Stem
For the stem, take the bottom half of the radish and peel off all the red skin (just the outer layer). Use a small knife to carefully trim the skin so it’s smooth and flat on the bottom—this way, the mushroom can stand straight on the plate. The peeled part should look like a light pinkish-white stem, just like a real mushroom’s stem!

Pro tip: If the radish is a little lopsided, gently cut the bottom to make it flat. No need to be perfect—kids won’t notice, and it’ll still look cute!
Step 2b: Make the Mushroom Cap
Now the top half (the cap). Use a small knife to gently scrape off the red skin from the top half—this will make it look like a white mushroom cap with a red spot (or just keep the red if you want a brighter cap!). Then, take a tiny spoon or toothpick and make a few small holes in the cap—these are the “spots” on the mushroom! So cute, right?

Wait, what if you don’t have cherry radishes? No problem! We can use another trick with quail eggs and cherry tomatoes. Let’s see how that works next.
Step 3: Quail Eggs + Cherry Tomatoes = Mini Mushrooms
Here’s a backup plan if you’re out of cherry radishes (or if you just want more mushrooms!). Grab a quail egg and a cherry tomato. First, pick a cherry tomato that’s roughly the same size as the quail egg. If the tomato is too big, cut it down a bit to match the quail egg’s size.

Step 3a: Prep the Quail Egg for the Base
Take the quail egg and find the “top” end (the hollow part where the shell is thinner). Gently slice off a tiny bit of the shell from the top so the egg can stand flat. You’ll need this flat part to be the base of the mushroom. The little bit you cut off? Don’t throw it away—we can use it for decorations later!
Step 3b: Cut the Cherry Tomato for the Cap
Now the cherry tomato: slice it about two-thirds of the way down from the top. The bottom third will be the “stem” part (which we’ll use to attach to the quail egg). The top two-thirds is the cap—scoop out the seeds from the top part (the bigger part) using a tiny spoon. The smaller part (the bottom third) is optional—you can pop that into your mouth right now (no judgment if you do!).

Pro tip: If you don’t have a tiny spoon, use the end of a toothpick to gently dig out the seeds. It’s easy, and way less messy than you think!
Step 3c: Assemble the Quail Egg Mushroom
Now, place the cherry tomato cap onto the quail egg base. To make it extra cute, take the tiny piece of eggshell you cut off earlier and use it to decorate the top of the mushroom cap—like a little “button” on the cap! Or, if you want white spots, use a toothpick to dab a bit of white cream cheese or Kewpie salad dressing (more on that in the tips section!).

You can make as many of these as you want—these mini mushroom caps are so easy, and kids will love picking them off the plate like little treats!
Step 4: Create the Fluffy Bunny with an Egg
Now for the star of the show: the bunny! This is where the regular egg comes in. We’ll use it to make a round, fluffy bunny body. First, take the regular hard-boiled egg and place it on a flat surface. Gently cut off a tiny sliver from the bottom (just enough to make it stand straight). This will be the bunny’s “feet” so it doesn’t tip over.

Next, cut two small triangles from the top of the egg—these will be the bunny’s ears! Use scissors to snip them off (carefully, so you don’t cut too much). You can also use a small knife if scissors feel tricky. Now, you need to make the bunny’s face.
Step 4a: Add the Bunny’s Face
For the eyes, use two tiny black sesame seeds (or black olives, if you prefer). For the nose, use a tiny slice of carrot (or even a small dot of orange food coloring on a toothpick). For the mouth, a tiny line of the same carrot slice (or use a toothpick to make a little 3-lobed mouth—so fancy!).

Pro tip: If you’re worried about the bunny’s ears falling off, gently press the ears into the top of the egg with a little bit of cream cheese or mayo (just a tiny dab!). It’ll stick, so the bunny stays together!
Step 5: Arrange Everything on a Fresh Bed of Greens
Now, it’s time to plate your masterpiece! Take the chicory (or any leafy green like spinach or arugula) and tear it into small pieces. Spread it on a plate to look like a little grassy field. Then, carefully place all your mushrooms and the bunny on top.

Add a few extra greens around the edges to make it look lush, and arrange the mushrooms in a cluster—some standing straight, some leaning for a “wild meadow” vibe. The bunny can sit in the middle, looking like it’s guarding the mushrooms (or just enjoying the view!).
Pro Tips to Make Your Egg Dishes Even Cuter
Here are some quick tips to level up your egg art game:
- White spots on mushrooms: Instead of using eggshell, use a small piping bag with white cream cheese or Kewpie salad dressing to dot the mushroom caps. It’s way neater!
- Bunny nose hack: If you don’t have a carrot, use a red pepper slice (cut into a tiny circle) or even a red candy dot. Kids won’t notice the difference!
- Extra mushrooms: If you have leftover quail eggs or tomatoes, make more mushrooms! The more, the merrier.
- Make it healthy: Add more veggies to the mix—like cucumber slices for the bunny’s whiskers or celery sticks as “grass” around the plate.
Final Thoughts: Your Kids Will Beg for Egg Art Every Day!
So there you have it—fun egg recipes that turn ordinary breakfasts into magical adventures! No more fighting with kids over eggs—just set the table with cute mushrooms and a fluffy bunny, and watch them gobble up their food without a fuss. My niece now calls this “mushroom and bunny breakfast” and asks for it every weekend. It’s the perfect way to make mealtime special, one adorable egg at a time!
Remember, the key is to keep it simple and let your creativity flow. You don’t need to be a chef—just grab the ingredients, have fun, and enjoy the smiles! Now go get those eggs cooking, and let the fun begin!


