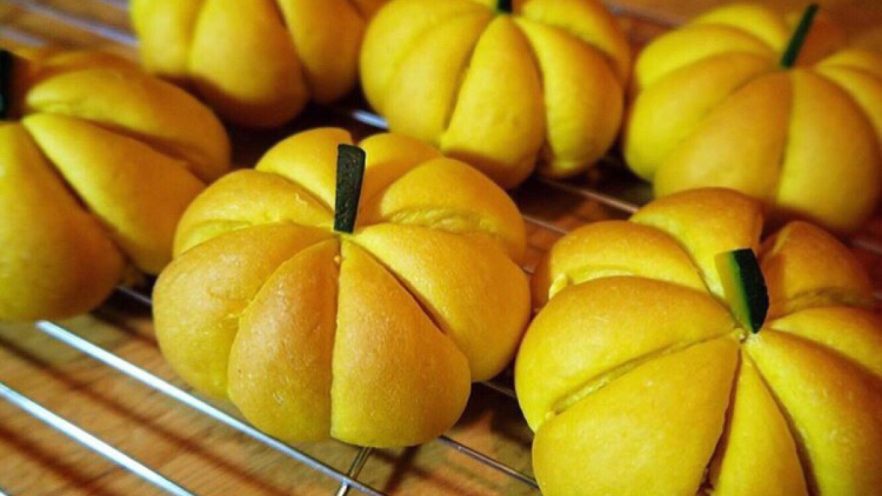

Why You’ll Obsess Over This Japanese Pumpkin Shaped Bread
Let’s be real—who can resist a bread that looks like a tiny, adorable pumpkin? This Japanese pumpkin shaped bread isn’t just a feast for the eyes; it’s packed with a creamy, sweet pumpkin filling that’ll make every bite feel like a cozy fall hug. I first stumbled on this recipe when I was scrolling through Japanese baking blogs (blame my late-night snack cravings), and I knew I had to try it. Spoiler: It’s way easier than it looks, and the payoff? So worth it. Let’s dive in!
What You Need to Make Japanese Pumpkin Shaped Bread
Before we get our hands floury, let’s round up all the ingredients. I’ve split them into two main parts: the bread dough and the pumpkin filling. Pro tip: Measure everything out first—nothing kills a baking vibe like rummaging for sugar mid-mix!
Bread Dough Ingredients
- 100g high-gluten flour (that’s half of 200g—don’t worry, I did the math!)
- 1 tsp dry yeast
- 20g granulated sugar
- 10g honey (adds that perfect subtle sweetness)
- Another 100g high-gluten flour (the other half of the 200g)
- 1/3 tsp salt (to balance the sweetness—trust me, it’s key)
- 20g unsalted butter (make sure it’s room temp! Soft butter = smooth dough)
- 30cc water (about 2 tbsp)
- 70cc milk (warm it up a bit—more on that later)
- 230g fresh pumpkin (we’ll use part for the dough and part for the filling)
Pumpkin Filling Ingredients
- 120g pumpkin puree (from the 230g pumpkin we’re using)
- 80g white bean paste (shiroan—you can find this at Asian grocery stores or online)
Step-by-Step Guide to Making Japanese Pumpkin Shaped Bread
Okay, let’s get baking! I’ve broken this down into super simple steps—no fancy skills required, I promise.
Step 1: Prep the Pumpkin

First, peel that pumpkin! I know, peeling pumpkin can be a little tedious (my hands always get sticky), but it’s worth it. Cut it into small chunks so it cooks faster, then pop it in the microwave for 5-7 minutes until it’s soft enough to mash with a fork. Let it cool completely—hot pumpkin will kill the yeast later, so don’t skip this!
Step 2: Make the Pumpkin Filling

Once the pumpkin is cool, mash it into a smooth puree. We need 120g of this puree for the dough, so set that aside. For the filling, take the remaining pumpkin puree (about 110g, since we started with 230g) and mix it with 80g of white bean paste. Stir until it’s well combined—this is your creamy, sweet filling! Divide it into 6 equal parts and roll each into a small ball. Set those aside too.
Step 3: Mix the Dough (Part A)

Grab a big mixing bowl and add all the Part A ingredients: 100g high-gluten flour, 1 tsp dry yeast, 20g sugar, and 10g honey. Give them a quick stir to mix everything up.
Step 4: Prep Part B Ingredients

Take another bowl (or just keep track of the ingredients—your call) and note the Part B stuff: the other 100g high-gluten flour, 1/3 tsp salt, and 20g room temp butter. We’ll add these to the dough soon!
Step 5: Activate the Yeast

Here’s a crucial step: Pour the 30cc warm water over the dry yeast in the Part A bowl. Use a wooden spatula to mix it well—you want the yeast to dissolve completely. Let it sit for 1-2 minutes to activate (it might get a little foamy, which is a good sign!).
Step 6: Combine All Dough Ingredients

Now, add the Part B ingredients (flour, salt, butter) and the 120g pumpkin puree to the Part A bowl. Stir slowly at first—trust me, you don’t want flour flying everywhere! Once everything starts to come together, you can stir a bit faster.
Step 7: Knead the Dough (The Fun Part!)

Turn the dough out onto a lightly floured surface. Now, knead it! I like to knead for about 10-15 minutes—you want the dough to become smooth, elastic, and not sticky. If it’s too sticky, add a tiny bit more flour (but not too much!). When it’s ready, shape it into a ball, put it back in the bowl with the seam side down, cover with plastic wrap, and let it rise at 40°C (104°F) for 25-35 minutes. This is called the first rise—your dough should double in size!
Step 8: Check the First Rise

Look at that! The dough has puffed up so much—it’s like a little balloon. This is when I get excited because I know the bread is going to be fluffy.
Step 9: Divide and Rest the Dough

Punch down the dough to release the air (satisfying, right?). Divide it into 6 equal parts—use a kitchen scale if you want them to be perfectly even. Roll each part into a ball, cover with a damp towel, and let them rest for 10 minutes. This is called bench rest, and it helps the dough relax so it’s easier to shape.
Step 10: Fill the Dough

Take one dough ball and flatten it into a circle about 9-10cm (3.5-4 inches) wide. Place one pumpkin filling ball in the center. Pinch the edges of the dough together to seal the filling inside—make sure it’s tight, so the filling doesn’t leak out while baking!
Step 11: Shape into Pumpkins

Now for the fun part: shaping the bread into pumpkins! Take a cotton kitchen string (make sure it’s food-safe) and tie it around the dough in a star (or rice) pattern—like you’re dividing it into 6 sections. Don’t tie it too tight, but tight enough to make those cute pumpkin ridges.
Step 12: Second Rise and Bake

Place the shaped dough on a baking sheet lined with parchment paper. Cover with plastic wrap and a damp towel, then let it rise again at 40°C (104°F) for 25 minutes. The dough will puff up and the pumpkin shape will become more defined. Before baking, insert a small piece of pumpkin skin (from the one we peeled earlier) into the center to make a stem—such a cute touch!
Preheat your oven to 160°C (320°F). Bake the bread for 15 minutes—keep an eye on it, you want it to be golden brown. Once it’s done, let it cool for a few minutes, then carefully cut the strings off. Voilà—your adorable Japanese pumpkin shaped bread is ready!
Pro Tips for Perfect Pumpkin Bread Every Time
- Room temp ingredients are your friend! Let the butter and any eggs (wait, no eggs here—oops!) sit out for 30 minutes before starting. Warm the water and milk to 42-43°C (108-109°F)—this helps the yeast activate better.
- Don’t over-knead the dough! If it gets too tough, the bread won’t be fluffy.
- If you don’t have a 40°C spot, turn your oven on to the lowest setting for 1 minute, then turn it off. Place the dough inside—it’s the perfect warm spot for rising.
- White bean paste can be a bit sweet, so adjust the amount if you prefer less sweetness. You can also add a pinch of cinnamon to the filling for extra fall flavor!
Final Thoughts
This Japanese pumpkin shaped bread is such a fun recipe to make—whether you’re baking for a fall party, a weekend snack, or just to impress your friends. The combination of fluffy bread and creamy pumpkin-bean filling is chef’s kiss. I’ve made this a few times now, and every time, people go crazy over how cute and delicious it is. Give it a try—you won’t regret it!