

 & Red Dates Pork Bone Soup Recipe | Nourishing Chinese Wellness Dish")

")
Easy Fluffy Steamed Sponge Cake Recipe (No Oven Needed, Kid-Friendly!)
Okay, let’s be real—my family’s oven gets a workout. Like, 5-6 times a week, we’re baking cakes, bread, muffins… you name it. But lately? My mom’s been side-eyeing the oven like it’s personally responsible for her latest “too much sugar” guilt. “Can’t we make something that doesn’t make me feel like I’m chugging a fireball?” she groaned yesterday.
Enter: the steamed sponge cake lifesaver. I was rummaging through my pantry (you know, that dark corner where you forget half your snacks?) and found TWO boxes of steamed cake mix. Jackpot. Because this recipe? It’s so simple, even my 7-year-old could “help” (read: lick the spoon and make a mess). No fancy skills, no oven required—just mix, beat, steam, and boom: fluffy, sweet, way less guilty cake. Let’s dive in!
Why Steamed Sponge Cake? (Spoiler: It’s All About the Perks)
Before we get to the how-to, let’s gush about why this cake is my new go-to:
- No oven drama: Perfect if you don’t own one, or if your AC is already fighting for its life (looking at you, summer).
- Light & fluffy: Steam makes it so airy—way softer than some dense baked cakes.
- Kid-approved (and parent-approved): No weird additives, just simple ingredients. My niece went crazy for these as breakfast.
- Less “afterburn”: My mom’s happy, so that’s a win in my book.
What You’ll Need: Super Simple Ingredients
Let’s keep this easy. You don’t need a fancy grocery list—just grab these:
Ingredients List
- 3 large eggs (room temp is best! Trust me, they whip better)
- 150g steamed cake mix (I used a pre-mixed one with sugar, milk powder—no extra sugar needed!)
- 15g corn oil (light, neutral taste—perfect for this)
Tools You’ll Need
- Clean, dry mixing bowl (no oil/water—eggs hate that!)
- Electric mixer (handheld is fine—no stand mixer required)
- Sieve (to get that smooth batter)
- Piping bag (or a zip-top bag with a corner cut—lazy hack!)
- Cake mold (silicone is best for easy popping out)
- Steamer (or a steamer basket + pot, or even a steam oven if you’re fancy)
Step-by-Step: How to Make Fluffy Steamed Sponge Cake
Okay, let’s get cooking. I’ll walk you through every step—no skipped details!
Step 1: Prep Your Eggs (The Most Important Part!)
First up: grab your 3 eggs and crack them into a completely clean, dry mixing bowl. If there’s even a drop of oil or water, your eggs won’t whip up fluffy. Trust me—I learned this the hard way (once, I used a bowl with a tiny bit of butter, and my batter was a sad, flat mess).

Step 2: Whisk Those Eggs (Just a Quick Start)
Next, give the eggs a quick whisk with a fork or your mixer on low speed. You don’t need to whip them yet—just break up the yolks and whites so they’re mixed. Think: “scrambled eggs before you add milk” level of mixing.

Step 3: Add the Cake Mix (Sieve It, Don’t Skip It!)
Now, take your 150g steamed cake mix and sift it into the egg mixture. Sifting is key here—no lumps allowed! If you skip sifting, your batter will be clumpy, and your cake will have weird little hard bits. Not cute.

Step 4: Mix Until Smooth (No Dry Spots!)
Use a rubber spatula (or a whisk) to mix the cake mix and eggs together. Stir slowly—you don’t want to overmix, but you do want to get rid of all the dry powder. Stop when you have a smooth, thick batter (it should look like a thick pancake batter).

Step 5: Whip That Batter (The Magic Step!)
Now, this is where the fluff happens. Grab your electric mixer and set it to medium-high speed. Whip the batter for 8 minutes straight. I know, 8 minutes sounds like forever, but set a timer—don’t stop early!
What to look for: The batter will get pale, thick, and fluffy. When you lift the mixer, the batter should form a “ribbon” that sits on top of the mixture for a few seconds before sinking. That’s your sign it’s ready!

Step 6: Add the Corn Oil (Gently, Gently)
Pour the 15g of corn oil into the whipped batter. Now, here’s the thing: don’t mix it with the mixer. Use a rubber spatula to fold the oil in gently. Folding means cutting through the center of the batter and bringing the bottom up to the top—this keeps all that fluff intact. If you overmix here, your cake will deflate.

Step 7: Fold Until Combined (No Oil Streaks!)
Keep folding until the oil is completely mixed in—no yellow streaks left. The batter should still be thick and fluffy. If it starts to look flat, you overfolded—oops! But don’t panic—just try to be more gentle next time.

Step 8: Prep Your Piping Bag (Lazy Hack Included!)
Now, grab a piping bag (or a zip-top plastic bag—cut a small corner off). Pour the batter into the bag. This makes it easy to fill the molds without making a mess. Pro tip: If you don’t have a piping bag, just use a spoon— it’s a little messier, but it works!

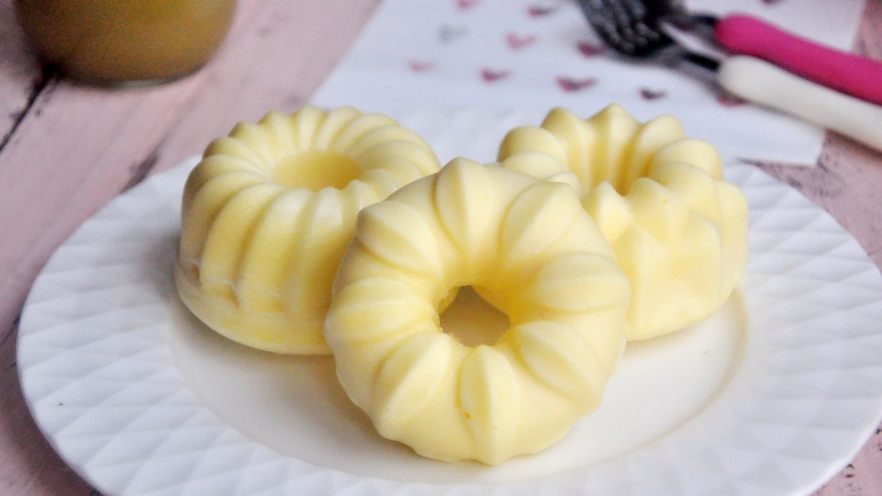
Step 9: Choose Your Cake Mold (Silicone = No Stick!)
I used a 6-cavity silicone mold for this (they’re so easy to pop out!). If you don’t have silicone, you can use metal molds—but grease them first! Silicone is my favorite because the cakes come out perfectly smooth every time. No scraping, no broken cakes.

Step 10: Fill the Molds (70% Full, Please!)
Now, pipe the batter into the molds—fill them about 70% full. Why 70%? Because the cake will rise as it steams! If you fill them too full, the batter will overflow and make a mess. After filling, give the mold a gentle tap on the counter—this gets rid of any air bubbles (so your cake is smooth, not full of holes).

Step 11: Steam That Cake (Oven or Stovetop?)
Now, the big question: how to steam it? I used a steam oven (100°C for 24 minutes) because my 6-cavity mold was too big for my regular steamer. But if you don’t have a steam oven, no problem!
Stovetop Steamer Hack: Use a pot with a steamer basket. Bring water to a rolling boil, then place the mold in the basket. Cover the pot and steam for 24 minutes. Important: Don’t open the lid while steaming! The sudden drop in temperature will make the cake deflate.

Step 12: Let It Cool (Patience = Perfect Cake!)
Once the timer goes off, turn off the heat (or oven) and let the cake sit for 5 minutes. Then, take the mold out and flip it onto a cooling rack. Let it cool completely—don’t try to pop it out while it’s hot! It will stick, and you’ll have a sad, broken cake.

Step 13: Pop It Out (The Most Satisfying Step!)
Once the cake is cool, gently push the bottom of the silicone mold. Pop! The cake will slide right out. I swear, this step makes me so happy—like, “I’m a baking genius” happy. Even if it’s a tiny cake, the smooth texture and perfect shape are chef’s kiss.

Final Thoughts: Why This Cake Is a Game-Changer
Let’s recap: This steamed sponge cake is easy (no fancy skills), fluffy (steam magic), kid-friendly (my niece ate three for breakfast), and guilt-free (my mom approved!). The best part? You can make it with or without an oven—so it’s perfect for anyone, anywhere.
Pro tip: If you want to mix it up, add a little vanilla extract, or even some matcha powder to the batter for a green tea twist. But honestly? The plain version is so good, you might not need to add anything.

And let’s talk about the taste: It’s sweet, but not too sweet—just the right amount. The texture is so soft, it melts in your mouth. No dry edges, no dense spots—just pure, fluffy goodness.

So next time your oven is busy, or you want something light and delicious, give this steamed sponge cake a try. I promise—you won’t regret it. And if you make it, tag me (or just tell your mom it’s healthy)—she’ll love it.
")


")
")
![French Savory Tart [Magic Cake] – Sugar-Free, Layered Delight (Forced My Friend’s Recipe to Obsession!)](https://hearthsiderecipes.com/images/5214/5mit2exneu1.jpg "French Savory Tart [Magic Cake] – Sugar-Free, Layered Delight (Forced My Friend’s Recipe to Obsession!)")


 | Easy, Nutritious Recipe")