

 & Red Dates Pork Bone Soup Recipe | Nourishing Chinese Wellness Dish")

")
Thanksgiving Recipe: Homemade Mung Bean Paste (Father’s Love Like a Mountain)
Let me start by saying this: Thanksgiving isn’t just about turkey and stuffing (though don’t get me wrong, I’ll still be there shoveling those mashed potatoes). For me, it’s also a chance to celebrate the unsung heroes—the people who’ve shaped us without saying a word of praise. That’s my dad. His love is like a quiet song you never notice until it’s stuck in your head, warm and familiar. This year, I wanted to give him something that tasted as good as his hugs, so I dug up a family recipe: mung bean paste. It’s sweet, smooth, and totally guilt-free (no oil, no weird additives—just pure, creamy goodness). Plus, I shaped it into a tiny bike scene… because why not make dessert cute? Let’s dive in!
Why Mung Bean Paste is the Perfect Thanksgiving Treat for Dad
First off, let’s talk about dad’s love language. He’s the guy who fixes your bike, carries your groceries, and pretends he doesn’t care when you cry over a bad grade. So, I wanted a recipe that’s as reliable as he is—easy, comforting, and always hits the spot. Mung bean paste is basically the OG “healthy dessert” in my family. It’s traditional, nostalgic, and way better than store-bought (which is usually full of extra sugar and preservatives). Plus, no oil means dad can eat it without side-eye from his diet-conscious self. Win-win!
The Ingredients: Simple, Just Like Dad’s Advice
Let’s keep it real: you don’t need a fancy kitchen for this. Here’s what you’ll need (and why each ingredient matters):
- 400g mung beans: I swear by organic mung beans from the farmers’ market—they’re fresh, plump, and give the paste that beautiful pale yellow color. If you’re lazy (no judgment), grab pre-peeled mung beans from the grocery store. Trust me, peeling them by hand takes forever, but it’s worth it for the texture.
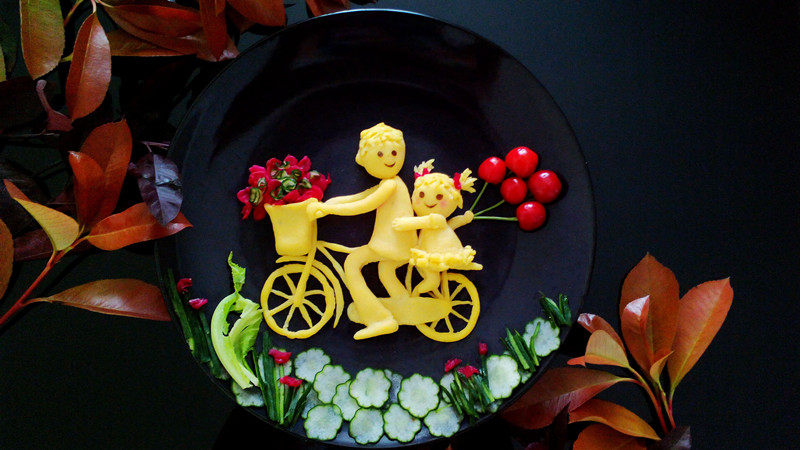
- 10g cherries: These are for decoration! I used fresh cherries, but dried ones work too. They add a pop of red and make the tiny bike look less like a sad blob.
- 30g powdered sugar: Skip regular sugar if you can—it dissolves way faster, so the paste stays smooth. If you’re not into sweet stuff, cut it to 20g, but Dad’s a sweet tooth (or at least, that’s what I tell myself).
Step-by-Step: Making Mung Bean Paste (and a Mini Bike!)
Okay, let’s get our hands dirty (but not literally—we’re doing this clean!). Here’s how to turn simple ingredients into a heartwarming dessert for Dad:
Step 1: Prep the Mung Beans (Soaking & Peeling)

Soak the mung beans in water overnight. The longer they soak, the easier the skins come off! I throw them in a bowl, cover with water, and leave them on the counter (no need for a fridge—dad’s kitchen isn’t that fancy). In the morning, drain the water and rinse the beans. Now, grab a colander and rub the beans between your fingers under running water. The skins will float off—this is so satisfying, like peeling a perfect banana without the stickiness.
Pro tip: If you’re in a rush, use a food processor to “shock” the skins off. Pulse the soaked beans a few times, and the skins will separate. But hand-peeling is more zen… trust me, it’s like a little dad lesson in patience.
Step 2: Steam the Beans Until Soft

After peeling, transfer the beans to a steamer basket. Steam them for 20-25 minutes until they’re mushy. Stick a fork in one—if it slides right in, you’re good! Let them cool for 10 minutes, then transfer to a blender or food processor. Blend until you get a smooth paste. No lumps, no chunks—just silkiness. If it’s too thick, add a splash of water (1-2 tbsp max). If it’s too runny, blend longer.
Step 3: Cook the Paste in a Bread Machine (Or Pot)

Transfer the blended mung bean paste to a bread machine (or a heavy-bottomed pot). Add the powdered sugar and stir. If using a bread machine, select the “Jam” or “Mash” function—set it to 1 hour. If you’re using a pot, simmer over low heat for 20-30 minutes, stirring occasionally to prevent burning. The goal? A thick paste that holds its shape (like a thick smoothie, but way less green).
Troubleshooting: My Bread Machine Hates Me (But It’s Okay)
When I first tried this, my bread machine kept beeping “Error: Too thick!” So I added a splash more water. It worked! The key is to check the consistency every 10 minutes. If it’s too thick, adjust with water; if too thin, blend longer.
Step 4: Cool & Form the Base

Once the paste is thick and smooth, let it cool for 30 minutes. Then, take a handful of the paste and shape it into a ball. Roll it gently between your palms to make a smooth, even surface. This is your “base” for the bike. Wet your hands if it sticks—water is your best friend here!
Step 5: Shape the Wheels (The Hardest Part!)

Now, the fun part: making the bike! Start with the wheels. Take a small piece of the paste (about 1/4 cup) and roll it into a thin cylinder. Use your fingers to flatten it into a circle—like a tiny coin. Do this for two wheels. They don’t have to be perfect! Dad’s bike might have wobbly wheels, but that’s what makes it you.
Step 6: Assemble the Bike Frame

Roll a longer, thinner strip of paste for the bike frame. Make it curved (like a real bike!) by gently pressing the ends with your thumb. Then, place the two wheels on either end of the frame. Wet the frame with your finger to “glue” the wheels in place—they’ll stick better than you think.
Step 7: Add the Girl & Her Details

Now, the adorable part: the girl! Roll a small ball of paste for her head. Add two tiny balls for her hands, and a longer strip for her hair (I used a toothpick to make a little braid). Stick the head on top of the frame, then attach the arms and hair. Use a toothpick to draw a smile with nori sheets (cut seaweed into a little smiley face!).
Step 8: Decorate with Cherries & Bows

For the balloon, take a tiny piece of cherry and stick it on a toothpick. Then, use a small piece of bamboo skewer to make a bow on her hair. I also added a little “basket” on the front with another piece of paste—just roll a tiny cylinder and press it into the frame.
Step 9: Add Legs & Feet

Roll two thin strips for the legs—one long, one short (to make it look like she’s standing). Attach them to the bottom of the frame. For feet, roll tiny balls and stick them on the ends of the legs. If they’re too messy, dip your finger in water and smooth the edges.
Step 10: Perfecting the Details (Don’t Stress!)

Here’s the thing: if your bike looks a little wonky, that’s okay! Dad won’t care if the wheels are lopsided—he’ll see the love. I spent an extra 20 minutes fixing the frame because I wanted it to look “cool,” but honestly, the messier parts make it more real. Think of it like your dad’s old bike—scratches and all, it’s still the best ride ever.
Step 11: Pro Tips for Success

- If the paste is too dry: Add a tsp of honey or milk to loosen it up.
- If it’s too sticky: Sprinkle a little powdered sugar on your hands before shaping.
- Saving for later: Store leftover mung bean paste in an airtight container in the fridge for up to 5 days. Spread it on toast or eat it straight—no judgment.
Final Thoughts: Dad Deserves This (and More!)
As I sat there shaping that lopsided bike, I kept thinking about how my dad’s love is like mung bean paste: simple, sweet, and comforting. It’s not flashy, but it’s there—always. This Thanksgiving, give him a hug and this mung bean paste. He’ll smile, maybe even tease you about the wonky wheels, but deep down, he’ll know you put your heart into it. And that’s the magic of dad’s love: he loves you no matter what, and this recipe is just one way to say, “I see you, Dad. And I love you too.”
Happy Thanksgiving (and Happy Eating!)
Now go share your mung bean paste bike with dad, and don’t forget to take a million photos—you’ll want to remember this messy, sweet moment forever. Let me know how it goes in the comments!

")


")
")
![French Savory Tart [Magic Cake] – Sugar-Free, Layered Delight (Forced My Friend’s Recipe to Obsession!)](https://hearthsiderecipes.com/images/5214/5mit2exneu1.jpg "French Savory Tart [Magic Cake] – Sugar-Free, Layered Delight (Forced My Friend’s Recipe to Obsession!)")

