")


Introduction: Why Homemade Ice Skin Mooncakes Are the Best for Mid-Autumn Festival
Mid-Autumn Festival is just around the corner, and if you’re tired of the same old store-bought mooncakes that taste like cardboard or cost a fortune, let me tell you—homemade ice skin mooncakes are the real MVP this year! 🥮 These fluffy, chewy beauties are way healthier, more customizable, and honestly, way more fun to make than you think. Plus, the ingredients are super easy to grab—even if you order online, places like Taobao sell entire kits with everything you need, so no stress about hunting down obscure ingredients. Trust me, once you bite into a homemade one, you’ll never go back to bakery versions. Let’s get started!
What You’ll Need: Ingredients for Homemade Ice Skin Mooncakes
Here’s the breakdown of what you need—no fancy tools required, just a few basics and a mold! I’ll list the exact amounts, but feel free to adjust if you’re doubling the recipe for a big family gathering.
- Ice Skin Powder: 200g (this is the star! It’s a pre-mixed blend of glutinous rice flour, tapioca starch, and sugar, which gives that iconic chewy, melt-in-your-mouth texture. I bought mine on Taobao as part of a kit, but you can find it at Asian grocery stores too.)
- Pure Water: 200ml (use room-temperature water to prevent the dough from cracking later. Filtered water works best if you’re worried about impurities.)
- Ice Skin Filling: 400g (choose your favorite! I used red bean paste, but lotus seed paste, mung bean, or even savory options like pork floss are delish. Pro tip: If you’re using salted egg yolk, make sure to break the yolk into small pieces before wrapping—trust me, no one wants a big yolk surprise!)
- Butter: 20g (softened, not melted! This is the secret to keeping the ice skin tender. If you’re dairy-free, swap it with coconut oil, but butter gives the best flavor.)
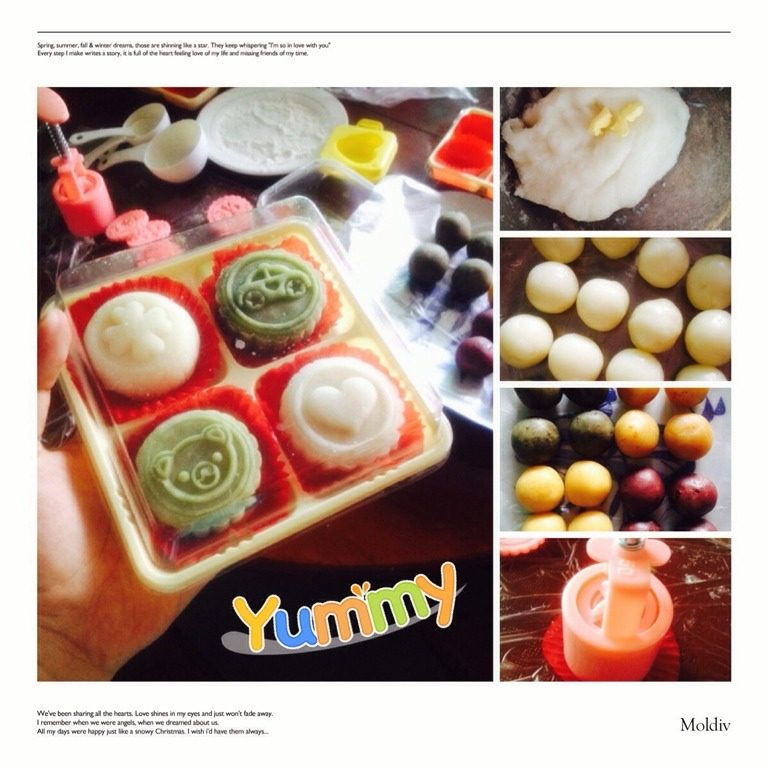
- Ice Skin Mold: Any cute design you like! I used a flower pattern, but round or traditional shapes work too. Silicone molds are easiest for popping out, but plastic ones work too if you grease them.
- Dusting Powder (Sanyo Kofun): A small amount (about 2 tbsp). This is sweet rice flour or mochi flour, which prevents the dough from sticking to your hands and the mold. If you can’t find Sanyo Kofun, use cornstarch or glutinous rice flour instead—just dust lightly!
- Colorants (Optional): Matcha powder, food coloring, or cocoa powder. I used matcha for a pretty green, but you can go wild with pink, purple, or even gold for a festive touch!
Step-by-Step Guide: Making Ice Skin Mooncakes Like a Pro
Okay, let’s get our hands dirty! I promise this is easier than it looks—just follow each step carefully, and you’ll have Instagram-worthy mooncakes in no time. Let’s start!

Step 1: Gather & Prep All Ingredients
First things first—lay out all your ingredients on the counter. Double-check you have everything: ice skin powder, water, filling, butter, mold, and colorants. (Pro tip: If you’re using pre-made ice skin powder, it might already have sugar, so check the filling for added sweetness if needed.) If you’re missing the butter, don’t panic—you can substitute with shortening, but it won’t taste as buttery. I learned that the hard way… oops!

Step 2: Mix Ice Skin Powder & Water
Now, pour the 200ml water into a large bowl with the 200g ice skin powder. Stir like your life depends on it—until it’s smooth, no lumps! At first, it might look super watery, but keep stirring—trust me, it’ll thicken up. I once mixed it too fast and got a weird lumpy texture, but a whisk fixed it. Aim for a thick batter consistency, like thick cream.

Step 3: Add Butter (In 3 Batches!) for Silky Texture
Cut the 20g butter into tiny cubes and add them one by one. Stir after each addition—this is crucial! The butter melts into the batter and gives that dreamy, chewy texture. If you add all the butter at once, it’ll clump up and you’ll end up with a grainy mess. Take your time here, friends. I added the first cube, stirred for 30 seconds, then the second, then the third. Now the batter is glossy and smooth—you’re doing great!

Step 4: Chill the Dough for 30 Minutes (Patience, Please!)
Cover the bowl with plastic wrap and pop it in the fridge for 30 minutes. This resting time is NON-NEGOTIABLE—it makes the dough firm enough to handle without sticking. While it chills, go prep the filling if you haven’t already. I portioned my 400g filling into 16 equal balls (25g each) and stuck them in the fridge too. Cold filling = easier wrapping!

Step 5: Portion the Ice Skin Dough (15g Each)
Take the chilled dough out and portion it into 16 pieces (since we have 400g filling, 16 portions of 25g each makes sense). If you don’t have a scale, pinch off chunks roughly the size of a ping pong ball—about 15g each. Roll them into smooth balls and place them on a plate dusted with a little Sanyo Kofun to prevent sticking. I used a tiny bowl to scoop them out, which helped keep them even—no more lopsided mooncakes!

Step 6: Add Color (Make It Festive!)
Now, add your colorant! I mixed 1 tsp of matcha powder into one portion of dough for a green twist—so cute for autumn! If you’re using food coloring, add a tiny drop at a time to avoid overpowering the flavor. For cocoa powder, go for 1-2 tbsp if you want chocolate flavor. Pro tip: If you’re making multiple colors, label them so you don’t mix up! I did green and plain, but next time I want to try pink too—maybe with strawberry powder.

Step 7: Wrap the Filling with Ice Skin (The Fun Part!)
Take a colored ice skin ball and flatten it slightly in your palm. Place a 25g filling ball in the center, then gently pull the ice skin up and around the filling. Pinch the edges closed—like closing a present! Roll the whole thing into a smooth ball, then roll it in Sanyo Kofun to dust off excess. This step is so satisfying—watch the dough glide over the filling, no cracks, no tears. If it cracks, add a tiny drop of water and smooth it out.

Step 8: Impress the Mold (Get That Perfect Design!)
Time to show off your mold! Press the wrapped dough into the mold firmly, making sure to press all the way to the edges. If your mold is plastic, tap the bottom gently to loosen it. If it’s a silicone mold, twist the top to pop it out. The pattern should be crisp—if it’s blurry, try pressing harder or using more dusting powder. I messed up my first try by pressing too soft, so the flower petals were faint. Don’t worry, practice makes perfect!

Step 9: Freeze the Mooncakes (Critical Step!)
Once your mooncakes are molded, pop them into the freezer for at least 30 minutes. IMPORTANT: They need to stay in the freezer, not the fridge! I made the mistake of refrigerating once, and they turned into rock-hard monsters. Freezing preserves the moisture and keeps the ice skin chewy. If you’re short on time, 15 minutes will work, but 30+ is better for a perfect texture. Take them out when you’re ready to eat, but let them sit at room temp for 10 minutes before biting—they’ll be soft and not icy!
Pro Tips to Avoid Common Mistakes (I Learned the Hard Way!)
Here are my top tips to make your mooncakes flawless, based on my “oops I did it again” moments. Save this list! 😂
- Steam the Dough First for Crisper Texture: The original tip! If you steam the ice skin powder for 10 minutes before mixing with water, the texture becomes smoother and the pattern on the mold pops even more. I skipped this once, and my mooncakes looked dull—don’t make the same mistake!
- Check Filling Consistency: If your filling is too wet (like with fresh fruit), wrap it in plastic wrap first to absorb moisture. Otherwise, the ice skin will get soggy. Trust me, I learned this the hard way with a mango filling—never again!
- Don’t Rush the Chilling Step: If you skip chilling the dough, it’ll be too sticky to handle. I tried making a mooncake after 10 minutes in the fridge, and it was a sticky disaster. 30 minutes is the minimum—your future self will thank you.
- Use Non-Stick Molds: If your mold isn’t non-stick, dust it with Sanyo Kofun before pressing. I used a plastic mold once without dusting, and the mooncake stuck like glue—had to break it to get the pattern out. Not fun.
- Freeze Extra for Later: Make a double batch and freeze them! They’ll last up to 1 month in the freezer. Just take them out a few hours before eating to thaw, or pop them in the microwave for 10 seconds for a quick fix.
Conclusion: Go Bake Those Mooncakes Already!
Homemade ice skin mooncakes are more than just a dessert—they’re a tradition, a craft, and a whole lot of fun to make. Whether you’re gifting them to friends, sharing with family, or just treating yourself, nothing beats the pride of saying, “I made these!” The best part? You can customize them however you want—matcha green, chocolate brown, strawberry pink… the sky’s the limit. So, what are you waiting for? Grab your ingredients, pre-order the mold online, and start baking. Trust me, once you taste that first bite, you’ll be hooked. Happy Mid-Autumn Festival, and may your mooncakes be chewy, colorful, and absolutely perfect! 🌕
ice skin mooncakes, homemade ice skin mooncakes, mid-autumn festival mooncakes, how to make ice skin mooncakes, best ice skin mooncake recipe, ingredients for ice skin mooncakes, freezing ice skin mooncakes, matcha ice skin mooncakes, sanyo kofun for mooncakes, mid-autumn festival desserts
")


 – A Refreshing Summer Seafood Recipe")
")


 with Colorful Veggies | A Simple, Flavor-Packed Recipe")