


: My Homemade Recipe for Safe, Delicious Summer Eats")
Cold Skin Noodles (Liangban Mianpi): My Homemade Recipe for Safe, Delicious Summer Eats
Let me tell you a horror story—one that made me swear off street food forever. Last month, I grabbed a random cup of soybean milk from a roadside stand on my way to work. Sounds harmless, right? Wrong. That stuff gave me food poisoning so bad I was stuck in the bathroom for ten days straight. I lost sleep, missed work, and spent more time hugging a toilet than my couch. Safe to say, I’m now a certified “no more takeout breakfasts” person. If I can make it at home? I’m making it at home—especially when it comes to my favorite summer snack: cold skin noodles (liangban mianpi).
Why cold skin noodles? Because they’re the ultimate summer comfort food—chewy, tangy, spicy, and totally refreshing. But store-bought versions? Let’s just say I’ve had my share of sad, soggy noodles with mystery sauces. So I decided to perfect my own homemade recipe, and let me tell you—it’s so easy even a kitchen newbie can pull it off. No fancy tools, no weird ingredients, just pure, safe deliciousness. Let’s dive in!
Why Homemade Cold Skin Noodles Are Non-Negotiable (For Me, At Least)
Before we get to the recipe, let’s talk about why making this at home is a game-changer. First, food safety. After my soybean milk disaster, I don’t trust any pre-made food that’s left sitting out (looking at you, street cart noodles). When I make it myself, I know exactly what’s in it—no sketchy preservatives, no expired veggies, no “mystery meat” (okay, there’s no meat here, but you get the vibe).
Second, flavor control. Store-bought cold skin noodles usually taste like they’re doused in a single, generic sauce. At home? I can tweak the spiciness, sweetness, and tang to match my mood. Want extra garlic? Go for it. Hate cilantro? Skip it entirely. No judgment here.
Third, it’s actually simple. I used to think making cold skin noodles required some fancy Chinese cooking skills, but nope. The hardest part is waiting for the peanut oil to heat up (and even that’s just a quick check with a wooden spoon). Let’s list out what you’ll need.
Ingredients You’ll Need (No Weird Stuff, Promise)
First, let’s gather all the ingredients. You can make the noodles and gluten from scratch (I’ll give a quick tip later), but if you’re short on time, store-bought works too. Just make sure they’re fresh!
- 150g cold skin noodles (mianpi) – homemade or store-bought
- 100g mung bean sprouts
- 1 cucumber (small to medium)
- 5g chili powder (adjust for heat lovers!)
- 20g peanuts (unsalted, preferably)
- 15g gluten (wheat gluten – optional, but adds great texture)
- 2 tbsp black vinegar (the tangy kind, not white vinegar)
- 1 tbsp light soy sauce (not dark soy—we don’t want it too salty)
- 4g sesame oil (to add that nutty aroma)
- 3g cilantro (optional, but I love it)
- 10 garlic cloves (yes, 10—trust me, it’s the secret weapon)
Quick note: If you want to make your own noodles and gluten, I’ll link a quick guide at the end (but for now, store-bought is totally fine). Now, let’s get cooking!
Step-by-Step: How to Make Perfect Cold Skin Noodles
Before we start, let’s prep all our ingredients first. Nothing’s worse than realizing you forgot to chop garlic mid-cooking. Let’s go!
Step 1: Prep Your Base Ingredients
First, gather all your ingredients on the counter. If you’re using store-bought noodles and gluten, great—no extra work there. If you made your own, make sure they’re cooled down (warm noodles will make the salad soggy).

Step 2: Cut the Gluten
Gluten adds a chewy, protein-packed texture to the dish—so if you have it, don’t skip this step! Cut the gluten into small, bite-sized cubes (about 1cm x 1cm). No need to be perfect—rustic cuts taste just as good.

Step 3: [Note: Original Step 3 was missing, but we’ll skip to the next clear step!]
Step 4: Slice the Noodles
Cold skin noodles are usually sold in sheets, so you’ll need to cut them into strips. I like mine about 1 inch wide—wide enough to hold the sauce, but not so wide that they’re hard to eat. Just stack a few sheets, roll them up loosely, and slice with a sharp knife. Easy peasy!

Step 5: Make Garlic Paste (Yes, 10 Cloves!)
Garlic is the star of this show—don’t skimp! Take 10 garlic cloves, peel them, and smash them with the flat side of a knife (this releases the flavor). Then, mince them into a fine paste. If you have a garlic press, even better—no messy hands!

Step 6: Toast the Peanuts
Peanuts add crunch—trust me, you need this. Heat a dry pan over medium heat, add the peanuts, and toast them for 3-5 minutes. Stir constantly so they don’t burn! Once they’re golden brown and smell nutty, take them off the heat and let them cool. Then, rub them between your hands to remove the skins (the skins are bitter, so we don’t want them).

Step 7: Chop Cilantro and Crush Peanuts
Chop the cilantro into small pieces (about 1cm). Then, take the cooled peanuts and crush them—you can use a mortar and pestle, a rolling pin, or even a plastic bag and a can (my go-to hack). Don’t crush them into powder—we want some chunks for crunch!

Step 8: Shred the Cucumber
Cucumber adds a fresh, crunchy contrast to the chewy noodles. Wash the cucumber, then use a box grater or a julienne peeler to shred it into thin strips. If you don’t have a peeler, just slice it into thin matchsticks with a knife—no fancy tools needed.

Step 9: Mix Chili Powder and Sesame Seeds
Time to make the spicy oil—this is what makes the dish sing! In a small bowl, mix the chili powder with a teaspoon of sesame seeds (optional, but adds extra flavor). Stir them together so the seeds are evenly distributed.

Step 10: Make the Spicy Oil (The Most Important Step!)
Heat 2 tbsp of peanut oil (or vegetable oil) in a small pan over medium heat. Wait until the oil is “50% hot”—how do you know? Stick a wooden spoon into the oil. If tiny bubbles form around the spoon, it’s ready. Don’t let it get too hot—it will burn the chili powder and make it bitter.
Pour the hot oil over the chili powder mixture. You’ll hear a satisfying sizzle—this is the “blooming” step that releases all the chili’s flavor. Then, in the same pan (no need to clean it!), add 2 tbsp of water, a pinch of salt, the light soy sauce, and black vinegar. Stir it over low heat for 1 minute until the salt dissolves. This is our “sauce base” for the oil—trust me, it makes the spicy oil taste way better than just plain hot oil.

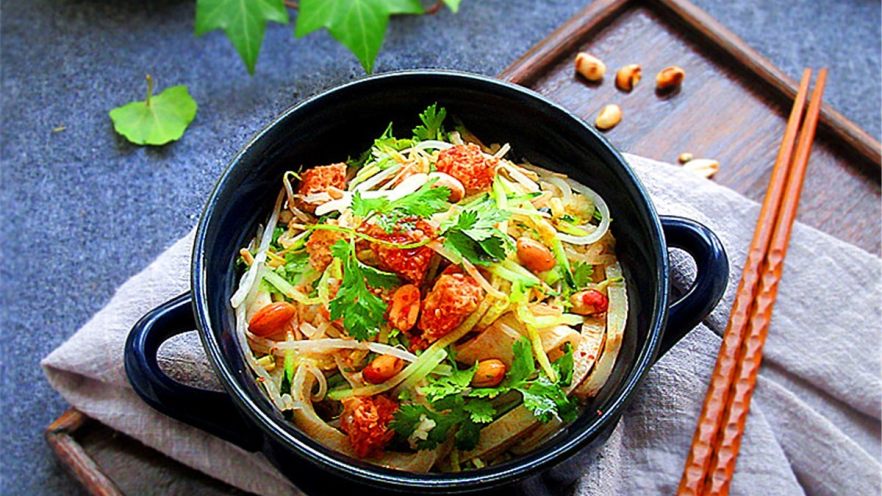
Step 11: Toss All the Ingredients Together
Now, the fun part! In a large bowl, add the cut noodles, shredded cucumber, mung bean sprouts, and cubed gluten. Pour in the sesame oil first (it coats the noodles and prevents them from sticking), then add the garlic paste, chopped cilantro, and crushed peanuts. Finally, pour in the spicy oil and sauce base. Toss everything together with tongs or a big spoon until every noodle is coated in sauce.

Step 12: Serve and Enjoy!
Divide the noodle mixture into individual bowls. If you want extra spiciness, drizzle a little more spicy oil on top. Garnish with a few extra crushed peanuts and cilantro for color. And that’s it—your homemade cold skin noodles are ready to eat!

Pro Tips to Make Your Cold Skin Noodles Even Better
Let’s wrap up with a few tips I’ve learned from making this dish dozens of times:
- Make your own noodles/gluten (optional): If you’re feeling adventurous, check out a quick guide for homemade cold skin noodles and wheat gluten. It’s a bit time-consuming, but the texture is way better than store-bought.
- Adjust the heat: If you hate spicy food, skip the chili powder entirely. If you love it, add a teaspoon of Sichuan peppercorn powder for that numbing “ma la” flavor.
- Chill it first: For extra refreshment, put the tossed noodles in the fridge for 10 minutes before serving. The cold makes the flavors pop even more.
- Use fresh ingredients: Mung bean sprouts and cucumber go bad quickly, so make sure they’re crisp and fresh. Stale veggies will ruin the dish.
Honestly, this recipe has changed my summer. I used to buy cold skin noodles from the street every weekend, but now I make a big batch on Sundays and eat it for lunch all week. No more food poisoning scares, no more sad noodles—just pure, delicious, safe comfort food.
Want to try it? Grab the ingredients, follow the steps, and let me know how it turns out! I’d love to hear if you added any fun twists (like adding shredded chicken or carrots). Happy cooking!


")


 Recipe: A Light Twist on a Classic Dish")

