


🥢 What is Sha Cha Squid? Let’s Dive Into This Flavorful Dish!
First off, let’s talk about the star of this dish: Sha Cha sauce! 🥢 If you’ve never tried it, prepare to have your taste buds blown away. This savory-sweet-spicy sauce is a staple in southern Chinese cuisine, especially in Fujian and Guangdong provinces. Its origins trace back to the Chaoshan region (a cultural area in Guangdong and eastern Fujian), where it was originally created by blending ingredients like garlic, onions, peanuts, dried shrimp, and soy sauce. Over time, it evolved into the creamy, umami-rich condiment we know today!
Fun fact: The name “Sha Cha” actually comes from the Indonesian word “Satay,” which means “grilled meat skewers.” Originally, Satay was a spiced grilled meat dish from Indonesia, but when it traveled to China, it was adapted into a sauce instead of a skewer-based dish. That’s why Sha Cha sauce has those bold, spicy notes—they’re a nod to its Indonesian roots! 🌶️
Now, pairing this amazing sauce with fresh squid? That’s pure magic. Squid is tender, slightly chewy, and soaks up flavors like a sponge—perfect for a quick, flavorful meal. Let’s get into how to make this Sha Cha Squid at home! 👩🍳
🧾 Ingredients You’ll Need
Let’s list out what you’ll need. All measurements are easy to adjust, so don’t stress if you’re missing something—we’ll make substitutions work! 😊
- 600 grams (about 1.3 lbs) fresh squid, cleaned and cut into rings or strips (I prefer rings for easier eating!)
- 2 tablespoons Sha Cha sauce (use a good quality brand—trust me, this makes a difference!)
- 8 grams (about 1.5 teaspoons) light soy sauce (adds saltiness without overpowering)
- 2 grams (1 teaspoon) minced ginger (fresh is best for that zingy flavor)
- 2 grams (1 teaspoon) minced garlic (garlicky goodness in every bite!)
- A pinch of chili (adjust to taste—add more if you love heat!)
- A handful of chopped green onions (for garnish and extra freshness)
- Vegetable oil for cooking (peanut oil works great for that extra nuttiness)
📝 Step-by-Step Guide to Making Perfect Sha Cha Squid
Okay, let’s get cooking! This recipe is super straightforward, even if you’re not a pro in the kitchen. Just follow these steps carefully, and you’ll have a restaurant-quality dish in no time. Let’s start with the squid prep—this is crucial for tender, not rubbery squid! 😅

 First, clean the squid properly: Rinse the squid under cold water and remove the tough outer skin (it’s usually a bit rubbery if left on). Then, carefully cut a small opening and pull out the ink sac—gross, but necessary for that squeaky-clean squid! 🧽
 Next, remove the “sand bag” or digestive gland from the squid’s belly. It’s that dark, slimy part—discard it, no one wants that in their dish! 🌋
 Now, your squid is clean! Pat it dry with paper towels—this helps it cook evenly later. Set it aside while you gather the other ingredients. 🛠️
 Time to prep the sauce! Mince the ginger, garlic, and slice the chili into rings (or use a food processor if you’re lazy like me). Chop the green onions too—keep some for garnish! 🧂
 Blanch the squid quickly: Bring a pot of water to a boil, then drop the squid in for 30 seconds. That “flashing” blanch helps remove any excess slime and makes the squid more tender. Don’t overcook it, though—30 seconds max! 🔥
 After blanching, immediately drain the squid and run it under cold water to stop the cooking. This is called “shocking” the squid, and it keeps it juicy and firm. Pat dry again—trust me, dry squid is happy squid! 🧊
 Heat up the pan: In a large skillet or wok, add a few tablespoons of vegetable oil (peanut oil is traditional here, but any oil works). When the oil is hot, add the minced ginger, garlic, and chili rings. Sizzle them until fragrant—this should take about 30 seconds to a minute. Be careful not to burn the garlic, it gets bitter fast! 🥄
 Now, add the star: Sha Cha sauce! Stir it into the oil mixture quickly. The sauce should start to bubble and release its rich aroma—you’ll smell garlic, peanuts, and that signature umami flavor! 🎉
 Pour in the blanched squid: Toss it into the pan with the sauce, and stir everything together. The squid should be evenly coated in that creamy, spicy sauce. Keep the heat on medium-high for this part! 🥢
 Add the soy sauce: Drizzle the light soy sauce over the squid. Stir gently—you don’t want to overcook the squid here, just mix it in to add a salty kick. Taste as you go if you need to adjust! 🍶
 Cook for 2 minutes: Keep stirring the squid and sauce for about 2 minutes until everything is well combined. The squid will absorb the sauce and turn a beautiful golden-brown color. 🍳
 Garnish and serve: Turn off the heat, sprinkle the chopped green onions over the top, and give it one final stir. The green onions add a fresh pop of color and a mild oniony flavor that balances the richness of the sauce. 🌱
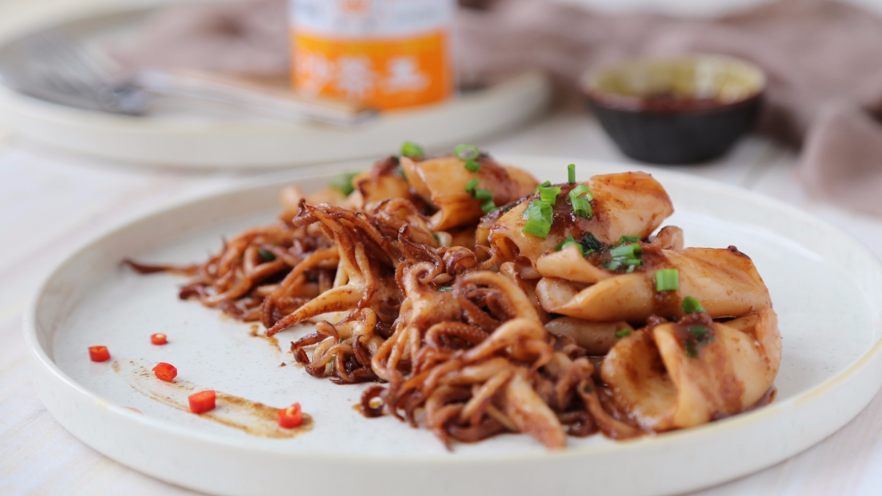
 Plate it up and enjoy! Serve this hot, fresh off the pan—this is the perfect side for rice, noodles, or even eaten alone as a snack. Trust me, you’ll want to dig in immediately! 🥢
💡 Pro Tips for Maximum Flavor
Here are some extra tips to make your Sha Cha Squid even better:
- Adjust the spice: If you love heat, add a pinch more chili flakes or a drizzle of sriracha! If not, skip the chili or use mild pepper flakes. Remember, this is your dish—customize it to your taste! 🌶️
- Fresh squid is key: Whenever possible, buy fresh squid from a market (not the pre-packaged stuff in the fridge). Fresh squid has a better texture and flavor—your taste buds will thank you! 🦑
- Don’t overcook the squid: Blanching for 30 seconds and cooking for 2 minutes total is the sweet spot. Overcooking squid turns it into rubber—yuck! 👎
- Use Sha Cha sauce wisely: If you can’t find Sha Cha sauce, you can make a substitute by mixing peanut butter, soy sauce, garlic, and a pinch of sugar. But let’s be real—buying good quality Sha Cha sauce is worth it for authenticity! 🍯
- Store leftovers: If you have leftovers, store them in an airtight container in the fridge for up to 2 days. Reheat gently in a pan with a splash of water to keep the squid tender. 🍱
✨ Why This Dish Is a Must-Try
Let me just say, this Sha Cha Squid is the ultimate comfort food. The combination of the creamy, nutty Sha Cha sauce with the tender, slightly chewy squid is just chef’s kiss! 👩🍳💋 It’s quick to make (30 minutes tops), uses simple ingredients, and is packed with flavor. Whether you’re a seafood lover or just want to try something new, this recipe is for you. Plus, it’s a great way to use up leftover squid or experiment with bold flavors!
So, what are you waiting for? Grab your ingredients, fire up the pan, and make this Sha Cha Squid tonight. I guarantee it’ll become a regular in your recipe rotation—my family begs me to make it every week! 😊
Let me know how it turns out in the comments below—I’d love to hear about your cooking adventures! And if you liked this recipe, don’t forget to share it with friends and family. Happy cooking, and enjoy your delicious Sha Cha Squid! 🥢✨


")

 – A Classic Cantonese Home-Cooked Dish You Need to Try")
