
Introduction: Why This Pumpkin Egg Custard is a Game-Changer for 8-Month-Olds
Hey there, fellow new parent! If you’re scrolling through baby food blogs or Pinterest boards trying to find something that’s both easy and nutritious for your 8-month-old, I feel you. I spent weeks stressing over what to feed my little munchkin – some recipes were too complicated, others tasted like plain mush, and don’t even get me started on the ones that required 17 different gadgets.
But today, I’m here to save you from the chaos! This Pumpkin Egg Custard recipe is my absolute favorite go-to. It’s gentle on tiny tummies, packed with nutrients, and tastes so good even the pickiest babies (yes, even the ones who act like they’re allergic to veggies) will devour it. Plus, it’s so easy to make – no fancy tools needed, and you’ll have it on the table in under 30 minutes. Let’s dive in!
Why This Recipe Works: Nutrition & Age-Appropriateness
First off! Let’s talk about why this is perfect for 8-month-olds. At this stage, babies are transitioning from purees to slightly thicker textures, but they still need soft, easy-to-chew foods. This custard is creamy, smooth, and melts in your baby’s mouth – no choking hazards here!
Now, nutrition-wise, we’re using two star ingredients:
- Pumpkin: A total MVP for babies! It’s loaded with vitamin A (great for eye health), fiber (to keep those little tummies regular), and beta-carotene (which turns into vitamin A in the body). Plus, it has a naturally sweet flavor that babies often love, making it a great way to introduce new tastes without overwhelming them.
- Egg Yolk: We’re only using the yolk here, which is a protein powerhouse! It’s packed with choline (supports brain development), vitamin D, and healthy fats. Choline is super important for those growing little brains – think of it as baby brain fuel!
And the best part? No dairy, no nuts, no added sugars. It’s free of common allergens and easy to digest. No weird after-dinner meltdowns from tummy aches – promise!
Ingredients: What You’ll Need (Spoiler: It’s Simple!)
Let’s keep it basic, because simplicity is key with baby food. You’ll need:
- 100g (about ½ cup) pumpkin – fresh, peeled, and seeded (I use sugar pumpkin or butternut squash if I don’t have regular pumpkin; same texture, just adjust cooking time slightly if needed)
- 1 whole egg (just the yolk) – We’re skipping the white to keep it gentle on tiny tummies (the yolk is where all the nutrients are, anyway!)
- Water (as needed) – to thin the pumpkin puree and cook the custard
Optional (but totally optional!): A splash of breast milk or formula (if you want to add extra flavor or if your baby prefers a little liquid). I usually skip this unless my baby is being extra picky, though – simplicity is still best for introducing new foods!
Step-by-Step: How to Make This Magical Pumpkin Egg Custard
Let’s get cooking! I’ll walk you through each step, and there’s an image for every step, so you can see exactly what it should look like. Let’s start with the first image!
Step 1: Gather Your Ingredients

First things first: Grab everything you need! A clean cutting board, a small knife, a pot for steaming, a food processor, and of course, the 100g pumpkin and 1 egg yolk. I like to lay everything out so I don’t have to hunt around halfway through – saves time and sanity, trust me!
Step 2: Slice the Pumpkin Thinly

Peel the pumpkin (if it has a skin) and cut it into thin slices – like, “paper thin” because thinner = faster cooking and smoother puree later. If your pumpkin is already peeled (like if you bought pre-cut), skip this step! Just make sure the pieces are small and even.
Pro tip: If you’re using butternut squash, you might need to roast it instead of steaming, but the method is similar. Just adjust the cooking time to 15-20 minutes since squash is a bit denser.
Step 3: Steam the Pumpkin Until Soft

Put those thin pumpkin slices into a steamer basket over boiling water. Cover the pot and let it steam for about 10-15 minutes. How do you know it’s done? Stick a fork into a slice – it should slide right in with zero resistance. If not, give it another 5 minutes. Patience, grasshopper!
Once steamed, let it cool for a couple of minutes. You don’t want to burn your hands or the baby’s mouth, so cooling is key. Plus, hot pumpkin puree is way harder to blend into a smooth texture.
Step 4: Transfer Pumpkin to a Food Processor

Now, pop that cooled pumpkin into a baby food processor or blender. If you don’t have one, a fork or potato masher works too, but the processor will give you that silky-smooth texture we’re aiming for. I’m lazy, so I use a blender – it’s quicker and less cleanup!
Step 5: Mash the Pumpkin into a Smooth Puree

Blend or mash the pumpkin until it’s as smooth as possible. No lumps! If there are lumps, blend it again for 30 seconds. You want this puree to be thick but pourable – like the consistency of pudding, but even silkier.
Pro tip: If you’re using a blender, add a splash of water if it’s too thick. But don’t overdo it – we want to keep it thick enough so it holds shape on a spoon.
Step 6: Separate the Egg Yolk

Now, crack your egg into a small bowl. Gently separate the yolk from the white. I use a little trick: hold the egg over the bowl and crack it with a spoon, then use the white shell halves to scoop out the yolk. Or, if you’re like me and have a tiny egg separator (game-changer!), use that. Just make sure you only get the yolk – no white sneaking in! We don’t want that extra protein clumping later.
Step 7: Whisk the Egg Yolk

Whisk the egg yolk until it’s smooth and creamy. You don’t need a fancy whisk – a fork works! Just whisk it for about 30 seconds until it’s runny but not too watery. This helps it blend evenly into the pumpkin later.
Pro tip: If the yolk is too thick, add a tiny splash of water to loosen it up. You want it to pour smoothly into the pumpkin mixture.
Step 8: Add Pumpkin Puree to a Pot with Water

Now, take a small pot (I use a 1-quart pot, but any small pot works). Pour in the pumpkin puree. Add about ¼ cup of water – that’s enough to thin it out and make it easier to stir with the egg yolk. If you have more or less, adjust accordingly.
Step 9: Stir the Pumpkin Puree and Water

Grab a wooden spoon and stir the pumpkin and water together until it’s fully combined. No lumps, no clumps – just a smooth, watery pumpkin base! If it’s too thick, add a splash more water; if too thin, let it simmer for a minute to thicken slightly.
Step 10: Pour the Whisked Yolk into the Pot

Now, slowly pour the whisked egg yolk into the pot, stirring constantly with the spoon. This is the moment where it might look a little curdled at first – don’t panic! It’s supposed to happen. Just keep stirring, and it’ll blend into a beautiful yellow-orange mixture.
Pro tip: Pour the yolk slowly along the edge of the pot to prevent splashing, and stir in a circular motion to ensure even mixing.
Step 11: Heat Until It Boils

Turn the heat on low and let the mixture simmer, stirring occasionally, until it starts to bubble. This takes about 3-5 minutes. The key is to keep it on low heat so it doesn’t burn or curdle – high heat = disaster, trust me. I’ve made that mistake before and ended up with a burnt pumpkin egg mess. Not fun.
When it starts to bubble, that’s your cue to stop stirring and let it boil gently for 1 more minute. This will thicken the mixture just enough to form that custard-like texture.
Step 12: Serve When Cooled to Room Temperature

Once it’s bubbling and slightly thickened, turn off the heat and scoop it into a baby-safe bowl. Let it cool down to room temperature before serving. Why? Because hot food can scald a baby’s mouth or throat, and we want them to enjoy it without crying because it’s too hot.
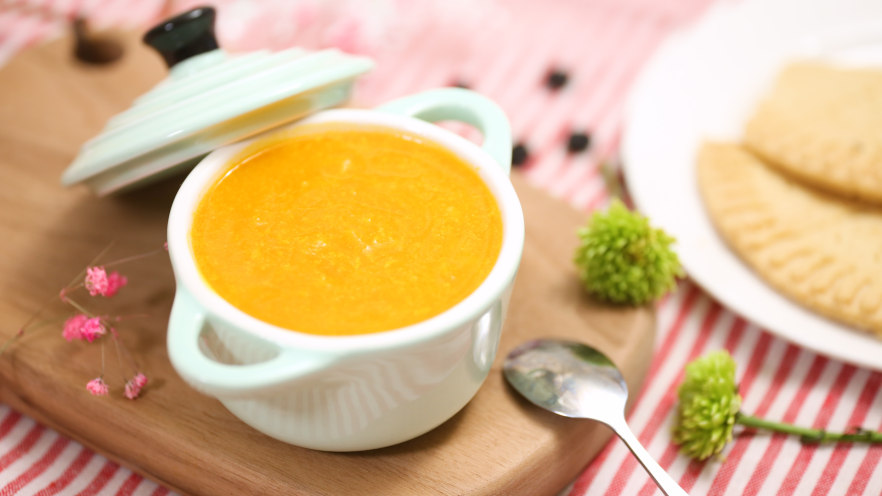
Look at that! You’ve made a delicious, nutritious pumpkin egg custard for your 8-month-old. It’s ready to be devoured! I promise, your baby will love the sweet, creamy taste and the smooth texture.
Pro Tips: Make It Even Better (Trust Me!)
Okay, let’s be real – even the best recipes can be tweaked to perfection. Here are my top tips for making this pumpkin egg custard extra special:
- Texture Adjustments: If you want a thicker custard, reduce the water by a tablespoon or two. If you want it runnier, add a splash more. Every baby is different, so feel free to experiment!
- Extra Flavor Boost: Stir in a pinch of cinnamon or nutmeg (if your baby is over 1 year old) for a warm, cozy flavor. But for 8-month-olds, keep it simple – no extra spices unless they’ve had them before!
- Make Ahead: Double the recipe and store it in an airtight container in the fridge for up to 3 days. Reheat in the microwave on low power or on the stovetop with a splash of water. Freeze it for up to a month, then thaw overnight in the fridge before serving.
- Freeze for Later: Portion the custard into ice cube trays, freeze, and pop into a freezer bag. Perfect for quick baby food on the go!
- Common Mistakes to Avoid:
– Overcooking the pumpkin – it’ll turn mushy and lose flavor.
– Using too much egg – stick to 1 yolk for 8-month-olds; whole eggs can be a choking hazard.
– Not stirring while adding the egg yolk – this causes curds!
Frequently Asked Questions (FAQ)
Got questions? Let’s answer the most common ones I get from fellow parents!
Q: Can my 7-month-old eat this?
A: It depends! If your baby is already eating purees and has had egg yolks as part of their diet (check with your pediatrician first), then yes! Just make sure the texture is extra smooth, and start with a tiny spoonful to see how they react.
Q: What if my baby doesn’t like the taste?
A: No worries! Some babies take to pumpkin slowly. Try adding a little breast milk or formula to make it creamier and more flavorful. You can also mix in a tiny bit of mashed banana (but that’s optional!). If they still reject it, try a different recipe next time, like sweet potato egg custard or carrot puree with egg.
Q: Is this recipe suitable for babies with allergies?
A: Yes! This recipe uses only pumpkin and egg yolk, which are low-allergen foods. But if your baby has a history of egg allergies, consult your pediatrician before introducing eggs. Also, always check for other potential allergens if you’re mixing in other ingredients later!
Q: Can I use a different type of pumpkin?
A: Absolutely! Butternut squash, acorn squash, or even sweet potatoes work great. Just adjust the cooking time: squash might need 15-20 minutes, sweet potatoes 20-25 minutes. The texture will be slightly different, but the taste will still be amazing!
Final Thoughts: Let’s Feed Those Happy Tummies!
Okay, so there you have it – the ultimate guide to making a simple, nutritious, and delicious pumpkin egg custard for your 8-month-old. It’s quick, easy, and packed with the good stuff your baby needs. Plus, you can feel good knowing you’re giving them a homemade meal without any preservatives or weird additives.
Remember, every baby is different, so don’t stress if they’re not into it at first! Keep offering new foods (and keep it fun!) – consistency is key. And if you love this recipe, share it with your friends or follow my blog for more baby food ideas! I’ll be sharing more simple, 10-minute meals for busy parents soon.
Happy feeding, and may your baby’s first bites be full of smiles (and maybe a few messy faces!). Catch you next time!