How to Make a Tiramisu-Style Japanese Cheesecake (No Tiramisu Ingredients Needed!)

Have you ever had one of those last-minute kitchen hacks that totally saves the day? Last week, my 7-year-old came bounding down the hallway begging for tiramisu for his upcoming class picnic. The problem? I was fresh out of ladyfingers, mascarpone, and even the espresso powder we usually use for the classic Italian dessert. I stared blankly at our kitchen counter, and then my eyes landed on the 6-inch round cake mold I’d bought on a random Amazon sale months ago—you know, the one I’ve used exactly twice total.
And that’s how I ended up turning a basic Japanese light cheesecake into a dead ringer for tiramisu, no fancy tiramisu ingredients required. My kid ate three whole slices, insisted it was the “best tiramisu ever,” and asked to bring it to his picnic on Wednesday. Spoiler: It was actually way easier to make than real tiramisu, and it’s way lighter too, perfect for packing in a lunchbox. Let me walk you through this totally foolproof, kid-approved hack recipe!
First: What Exactly Is This Cake, Anyway?
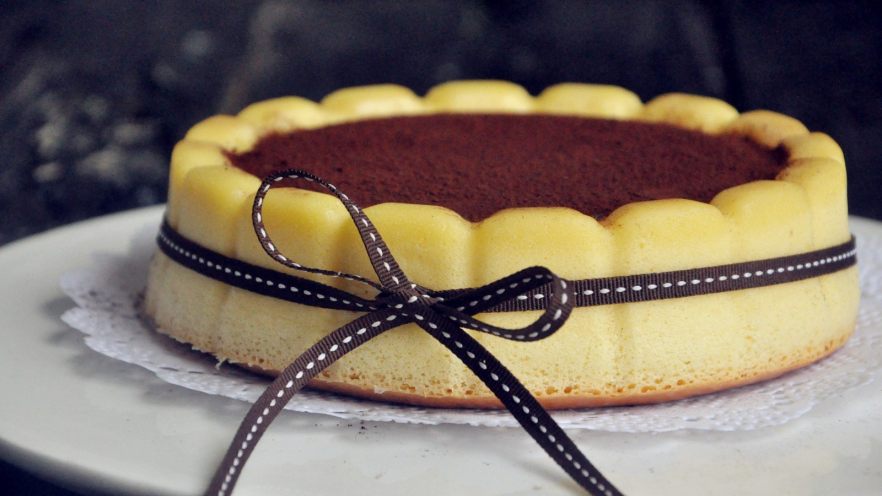
Let’s get one thing straight first: This isn’t actual tiramisu. It’s a classic 6-inch Japanese light cheesecake, dressed up to look just like your favorite coffee-soaked Italian dessert. The magic is just the cocoa powder dusted on top, which makes it look identical to traditional tiramisu at first glance. No coffee, no rum, no ladyfingers, no fancy mascarpone needed—just your standard cheesecake ingredients that most home bakers already have in their pantry.
I’ll admit, I was nervous at first that my son would notice the difference, but he didn’t even bat an eye. He just took a big bite, grinned, and said, “Mom, this is even better than the tiramisu we got at the bakery last month!” High praise from a 7-year-old who will complain about broccoli if it’s cut the “wrong” way.
Full Ingredients List for This Tiramisu-Style Light Cheesecake
Before we jump into the steps, let’s gather all the supplies and ingredients you’ll need. This recipe makes exactly one 6-inch cake, which is the perfect size for a family snack or a kid’s class picnic.
- 3 large eggs (separated into yolks and whites—pro tip: make sure your bowl for egg whites is totally clean and dry, no stray yolk allowed!)
- 100 grams cream cheese (softened to room temperature, not melted—we want it smooth and spreadable, not runny)
- 30 grams low-protein cake flour (also called low-gluten flour; regular all-purpose flour works too, just sift it first to get rid of lumps)
- 50 grams whole milk (any milk works, even oat or almond milk if you’re dairy-free!)
- 30 grams unsalted butter (melted, not hot—we don’t want to cook the egg yolks later)
- 35 grams powdered sugar (split evenly between the egg yolks and egg whites)
You’ll also need a few kitchen tools: a hand mixer (or a stand mixer if you have one), a rubber spatula, a sifter, a microwave or small pot for melting butter, a 6-inch round cake mold, and a baking pan large enough to fit your cake mold for the water bath method.
Step-by-Step Tutorial for This Easy Cheesecake Hack
Let’s walk through each step slowly, just like I did in my kitchen that night. I even took photos along the way so you can follow along perfectly!

Step 1: Separate your eggs and prep your workspace
Start by cracking your 3 eggs one at a time, carefully separating the yolks into a large mixing bowl and the whites into a separate, completely clean, dry bowl. I always keep a small bowl handy just in case I accidentally drop a yolk into the whites—nothing ruins egg white meringue like a stray bit of egg yolk fat!
Set both bowls aside for now, and grab all your other pre-measured ingredients so you don’t have to scramble mid-step. Baking is all about prep, right?

Step 2: Mix the cream cheese and egg yolks
Take your softened cream cheese and use a handheld mixer on low speed to beat it until it’s totally smooth, no lumps left. Then add the egg yolks one at a time, mixing on low after each addition until the yolk is fully incorporated into the cream cheese.
I like to scrape down the sides of the bowl with a rubber spatula after each yolk addition to make sure every last bit of cream cheese gets mixed in. No one wants a random clump of unmixed cream cheese in their cake!

Step 3: Fully combine the egg yolks and cream cheese
Once you’ve added all three egg yolks, keep mixing on low speed for another 30 seconds, then scrape down the bowl again. You want the mixture to be pale yellow and totally smooth, like a thick yogurt. If you see any tiny lumps of cream cheese, just keep beating until they’re gone!

Step 4: Add the milk and mix until smooth
Slowly pour the 50 grams of whole milk into the cream cheese mixture, mixing on low speed as you pour. Keep mixing for another minute until the milk is fully combined and the mixture is runny but not separated.

Step 5: Mix in the melted butter
Melt your 30 grams of butter either in the microwave in 10-second bursts or in a small pot over low heat on the stove. Let it cool for a minute so it’s not hot, then pour it into the cream cheese mixture. Mix on low speed until everything is fully combined.
Pro tip: If your butter is too hot, it will cook the egg yolks in the mixture and make your cake curdle. I learned this the hard way once, so trust me on this one!

Step 6: Add the flour and mix gently
Take your sifter and sift the 30 grams of low-protein flour directly into the cream cheese mixture. This step is super important—it keeps your cake light and fluffy instead of dense and gummy. If you skip sifting the flour, you’ll end up with lumps of flour in your batter!
Use your rubber spatula to gently cut and fold the flour into the batter. Don’t overmix here—just mix until you no longer see any visible flour, then stop. Overmixing will make your cake tough!

Step 7: Make the meringue for the light cheesecake
Now it’s time to work on the egg whites! Grab your clean, dry bowl of egg whites and add about half of the 35 grams of powdered sugar. Turn your handheld mixer on medium speed and beat the egg whites until they start to get foamy, then add the remaining powdered sugar.
Keep beating on medium-low speed until the egg whites become glossy and form soft peaks. That means when you lift the mixer attachment out of the whites, a small, curved peak will form and then flop over. Don’t overbeat them to stiff peaks—your cake will be too dry!

Step 8: Fold the meringue into the batter
Take about one-third of the meringue and add it to the cream cheese batter. Use your rubber spatula to gently fold the meringue into the batter—this means cutting down through the middle of the bowl with the spatula, scraping along the bottom, and folding the batter over the top. Do this until the first batch of meringue is fully combined.
This step loosens up the thick cream cheese batter so the rest of the meringue mixes in evenly without deflating the whites.

Step 9: Add the rest of the meringue and combine fully
Pour the remaining two-thirds of the meringue into the batter, and repeat the folding process. Keep folding gently until the batter is totally uniform and no streaks of white meringue are left. Be careful not to overfold—you just want everything to be mixed together evenly.

Step 10: Pour the batter into the prepared mold
First, prep your 6-inch cake mold: lightly rub a thin layer of butter all over the inside of the mold, then use a paper towel to wipe away any excess butter. This will make sure your cake doesn’t stick to the mold when it’s done baking!
Slowly pour the cheesecake batter into the prepared mold. Once it’s all in the mold, tap the mold firmly on the counter a few times to release any large air bubbles. This will keep your cake from having big, ugly holes in the middle after baking.

Step 11: Set up the water bath for baking
Fill a larger baking pan with about 1 inch of hot water. Place your cake mold inside the larger pan, making sure the water doesn’t spill over into the batter. The water bath will keep your cheesecake moist and prevent it from cracking on top.
I always line the bottom of the larger baking pan with a towel first to keep the cake mold from sliding around, but that’s totally optional!

Step 12: Bake the cheesecake at low temperature
Preheat your oven to 145°C (293°F) before you start, or right after you set up the water bath. Carefully place the entire baking pan into the preheated oven, and bake for exactly 1 hour. Don’t open the oven door while it’s baking—this will cause the cake to sink in the middle!
If your oven runs hot, you can turn it down to 140°C (284°F) for the last 20 minutes of baking. I have a gas oven that runs a little hot, so I always do this to keep my cake from cracking.

Step 13: Let the cake cool and release from the mold
Once the hour is up, turn off the oven and leave the oven door slightly ajar. Let the cake cool in the oven for another 30 minutes. This slow cooling process will prevent the cake from shrinking or cracking as it cools down.
After 30 minutes, take the cake mold out of the oven and place it on a wire rack to cool completely. As it cools, you’ll notice the cake will naturally pull away from the sides of the mold—this is totally normal!

Step 14: Dust with cocoa powder to look like tiramisu
Once the cake is completely cool, run a knife around the inside edge of the mold to loosen any remaining stuck bits, then flip the cake onto a serving plate. It should slide right out, thanks to the butter we added earlier!
Take a small sifter and fill it with cocoa powder, then dust a thin, even layer over the center of the cake. This is the secret trick that makes it look exactly like classic tiramisu! My son thought I’d used espresso powder and cocoa powder together, but nope—just plain old cocoa powder from the grocery store.

Step 15: Serve and enjoy!
Slice up the cake and serve it immediately. The first bite is so light and fluffy, with just the right amount of sweetness. It has that classic creamy cheesecake flavor, but it’s way lighter than a traditional baked cheesecake. The cocoa powder adds a subtle bitter-sweet note that makes it taste just like tiramisu, without all the extra work.
My son packed half of the cake into his lunchbox for his picnic on Wednesday, and he came home with an empty container. His friends all asked for the recipe, and I’m happy to share it with you too!
Tips for Making This Cheesecake Even Better
Want to tweak this recipe to make it your own? Here are a few quick tips:
- If you want a more intense cocoa flavor, mix a tiny bit of cocoa powder into the batter before baking, but don’t add too much—this will make the cake darker and denser.
- If you’re feeling fancy, you can add a splash of vanilla extract to the batter for extra flavor.
- If you don’t have a 6-inch mold, you can use a 7-inch mold, just bake the cake for 10 minutes less time.
- For a dairy-free version, swap the cream cheese for vegan cream cheese and the butter for vegan butter.
- If you don’t have powdered sugar, you can grind regular granulated sugar in a blender until it’s fine, but powdered sugar works way better for meringue.
Final Thoughts on This Kid-Approved Cheesecake Hack
I was so shocked at how well this recipe turned out, especially since it was a total last-minute hack. I went into the kitchen thinking I’d have to tell my son we couldn’t make tiramisu that night, and instead, we ended up with a cake that he absolutely loved. It’s easy to make, uses basic ingredients, and looks impressive enough to serve at a dinner party or a kid’s birthday party.
If you’re looking for a light, fluffy cheesecake recipe that’s way easier than traditional tiramisu, give this one a try. I promise you won’t be disappointed. And if you have a kid who’s begging for tiramisu but you don’t have the ingredients, this is the perfect backup plan!