Fall Dessert Obsession: Creamy Milk Pumpkin Pie

Fall is here, and that means it’s time to break out the warm, comforting desserts! If you’re tired of the same old apple pies or chocolate cakes, let me introduce you to my latest obsession: this creamy milk pumpkin pie. It’s the perfect blend of sweet, smooth pumpkin and rich, milky flavor—so good you’ll want to make it every weekend! Plus, it’s surprisingly easy to make, even if you’re not a pro baker. Let’s dive in!
What You’ll Need: Ingredients Breakdown
- Pie Crust: 100g all-purpose flour (low-gluten is best for a tender crust!), 40g unsalted butter (chilled and cubed for flakiness), 20g granulated sugar (adds a subtle sweetness), 25g milk (keeps the crust moist).
- Pumpkin Filling: 200g pumpkin puree (fresh or canned—your choice!), 40g heavy cream (for that luxurious creaminess), 20g plain yogurt (adds tang and helps bind the filling), 1 large egg (binder), 15g granulated sugar (adjust to taste), 10g all-purpose flour (thickens the filling).
- Garnish: Powdered sugar (for dusting on top, optional but chef’s kiss).
Step-by-Step: Making Your Perfect Milk Pumpkin Pie
Part 1: Crafting the Silky Pumpkin Filling
First up, the star of the show—the pumpkin filling! Grab your pumpkin, peel it (I use a vegetable peeler for this), and slice it into 1-inch thick round pieces. Place the slices in a steamer or a pot with just enough water to cover the bottom, then steam for about 20 minutes until it’s super soft. You’ll know it’s done when a fork easily pokes through with no resistance—no soggy mess, just tender perfection!

Once the pumpkin’s cooked, let it cool for 5 minutes, then transfer to a blender. Add the heavy cream, plain yogurt, and 15g sugar. Blend on high until it’s completely smooth—like, no lumps, just velvety goodness! The cream and yogurt? Total game-changers for that creamy texture. You’ll want to eat it straight from the blender, trust me.

Now, crack in the egg and whisk everything together until combined. Sift in the 10g flour—this step is non-negotiable! Sifting keeps the filling lump-free and helps it thicken nicely. Mix until the batter is smooth enough to leave a trail when you drag a spatula through it. If it’s too runny, add a tiny bit more flour; if it’s too thick, stir in a splash of cream. Perfect consistency is key here!

Set the filling aside—it should look like a smooth, creamy sauce. Taste-test now if you want; adjust sugar to your sweet tooth. I like mine with a little extra, so feel free to add more if you’re a sugar fiend like me! This is where the magic happens, folks.

Part 2: Perfecting the Flaky Pie Crust
Now, let’s talk crust! The crust is what makes or breaks a pie, and this one’s going to be so flaky you’ll cry. Start by sifting 100g all-purpose flour into a bowl. Add 40g cold, cubed unsalted butter—chilling the butter is CRUCIAL for that flaky texture. If it melts before you’re done, your crust will turn tough, so work quickly!

Rub the butter into the flour with your fingertips or a pastry cutter until it looks like coarse cornmeal. You want small butter chunks scattered everywhere—no big globs! This is the secret to flakiness. Once it’s mixed, stir in 20g sugar and 25g milk. Use a fork to combine until a dough forms, then gently knead with your hands for 1 minute. Don’t overdo it—just enough to bring it together into a soft, not sticky, ball.

Wrap the dough in plastic wrap and chill in the fridge for 20 minutes. Trust me, this resting time relaxes the gluten, so your crust won’t shrink or get chewy. After chilling, roll the dough out on a floured surface until it’s ¼-inch thick and slightly bigger than your 6-inch pie pan. Drape it over the pan, press into the edges, and crimp with a fork for a pretty finish. Pro move: save leftover dough for mini tarts or cookies!

To prevent the crust from puffing up during baking, line it with parchment paper and fill with pie weights or dried beans (I use old lentils from my pantry—no need to buy fancy ones!). Preheat oven to 180°C (350°F) and bake the crust for 10 minutes. Pull it out, remove the weights, and pour in that creamy pumpkin filling. Smooth the top with a spatula, then bake at 170°C (340°F) for 20-25 minutes until golden and set.

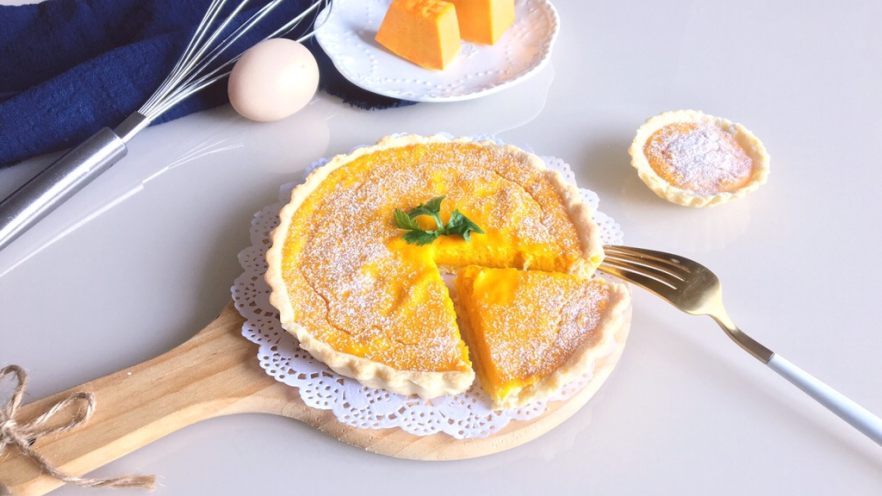
Once done, let it cool for 10 minutes, then dust with powdered sugar for that Instagram-worthy finish. The moment you slice into it, that golden crust and creamy filling will make you go, “Why didn’t I try this sooner?!”

Pro Tips for the Best Milk Pumpkin Pie Ever
- Butter Hack: Always use unsalted butter! You control the salt, so no salty surprises. If you only have salted butter, cut sugar by 5g to balance.
- Save the Pumpkin Water: When you steam the pumpkin, the leftover liquid is GOLD. Skip adding extra milk and use this liquid in the crust for extra moisture—flawless crust guaranteed!
- Room Temp Ingredients = Win: Let eggs, cream, and butter sit out 30 minutes before mixing. Cold ingredients = lumpy, tough mixtures. Warm = smooth silkiness.
- Blind Bake Smart: If your crust puffs up, press down with a fork or use parchment weights. No one wants a lumpy crust.
- Filling Test: Spoon some filling before baking—if it slides off, add 1 tbsp flour. If it’s too thick, stir in 1 tbsp cream. Perfect every time!
Final Verdict: Why This Pie Deserves a Spot in Your Fall Routine
There you have it! This creamy milk pumpkin pie is the ultimate fall comfort food. Whether you’re hosting a cozy dinner, need an afternoon tea treat, or just want to impress friends with your “I’m a pastry chef” skills, this recipe delivers. It’s not just a dessert—it’s a hug in a pie crust. So grab your ingredients, preheat the oven, and let’s make magic. Trust me, your taste buds will do a happy dance!