
Introduction: Why Totoro Cream Puffs Are the Perfect Treat
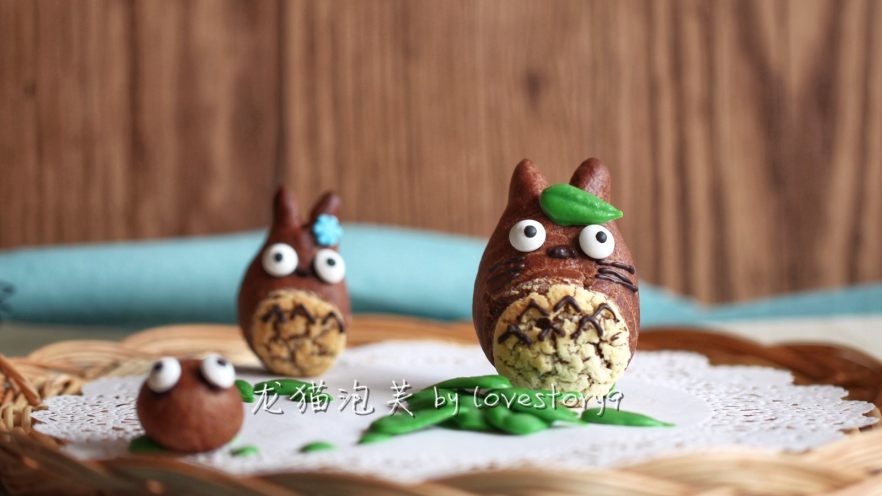
Let’s be real—who doesn’t love a good cream puff? Flaky, buttery pastry filled with smooth, creamy goodness? It’s a classic for a reason. But what if we took that classic and gave it a cute, whimsical twist? Enter Totoro cream puffs! Combining a rich cocoa puff body with a sweet vanilla shortcrust top, these little guys are not only delicious but also totally Instagram-worthy. Whether you’re a Studio Ghibli fan, a baking enthusiast, or just looking for a fun activity to do with the kids, this recipe is for you. Trust me, once you take that first bite, you’ll be hooked.
Ingredients You’ll Need
Before we dive into the steps, let’s gather all our ingredients. Don’t worry, most of these are pantry staples—no fancy gadgets required!
Puff Body Ingredients
- 53g high-gluten flour
- 7g cocoa powder
- 2g sugar
- 100g milk
- 40g unsalted butter
- 105g whole egg (about 2 large eggs)
Shortcrust Top Ingredients
- 20g unsalted butter
- 5g milk powder
- 20g low-gluten flour
- 15g granulated sugar
Filling & Decoration
- 200g custard cream (store-bought or homemade)
- 1 small piece dark chocolate
- A few sugar sprinkles (optional)
Step-by-Step Instructions
Let’s break this down into two main parts: the shortcrust top and the puff body. Ready? Let’s get baking!
Making the Shortcrust Top
First up, the shortcrust top. This is the “belly” of our Totoro, so we need it to be nice and flaky.

1. Start by softening the butter. Pop it in a bowl and add the sugar. Use a mixer or a spatula to beat them together until light and fluffy. You don’t need to overdo it—just until combined.

2. Sift the low-gluten flour and milk powder into the bowl. Mix everything together until there are no dry lumps left. The dough should be smooth and easy to handle.

3. Wrap the dough in plastic wrap and use a rolling pin to flatten it into a thin sheet (about 3mm thick). Pop it in the freezer for at least 30 minutes to harden—this makes it easier to cut later.
Making the Puff Body
Now for the star of the show: the cocoa puff body. This is what gives our Totoro that iconic dark color.

4. In a small saucepan, combine the milk, butter, and sugar. Heat it over medium heat until the butter melts and the mixture starts to boil. Keep an eye on it—you don’t want it to burn!

5. While the milk mixture is heating, mix the high-gluten flour and cocoa powder in a separate bowl. Sift them together to make sure there are no clumps.

6. Once the milk mixture is boiling, turn off the heat. Immediately add the flour-cocoa mixture to the pan. Stir vigorously with a spatula until everything is well combined and forms a smooth dough.

7. Return the pan to low heat and cook the dough for another 1-2 minutes, stirring constantly. This helps to cook out the raw flour taste. The dough should pull away from the sides of the pan when it’s ready.

8. Remove the pan from the heat and let the dough cool for a few minutes (until it’s about 60°C or 140°F). Then, add the beaten eggs gradually—about 1 tablespoon at a time. Mix well after each addition. You want the dough to be thick enough to hold its shape when piped.

9. To test if the dough is ready, lift some with a spatula. It should form a soft peak that droops slightly. If it’s too runny, add a little more flour; if it’s too thick, add a touch more egg.
Assembling and Baking
Now it’s time to put it all together and bake our Totoros!

10. Preheat your oven to 200°C (400°F). Line a baking sheet with parchment paper.

11. Transfer the puff dough into a piping bag fitted with a round tip. Pipe small, Totoro-shaped mounds onto the baking sheet—about 5cm in diameter. Make sure to leave some space between them, as they will expand while baking.

12. Take the shortcrust top out of the freezer. Use a round cookie cutter (or the mouth of a glass) to cut out small circles. Place one circle on top of each puff mound—this will be Totoro’s belly.

13. Bake the puffs in the preheated oven for 10 minutes at 200°C (400°F). Then, reduce the heat to 180°C (350°F) and bake for another 20-25 minutes, or until they are golden brown and crispy. Don’t open the oven door during the first 15 minutes—this can cause the puffs to deflate!

14. Once baked, let the puffs cool completely on a wire rack. This is important—if you fill them while they’re still warm, the cream will melt.
Decorating Your Totoro Puffs
The fun part! Let’s give our Totoros their cute faces.

15. Melt the dark chocolate in a microwave-safe bowl (in 30-second intervals) or over a double boiler. Transfer the melted chocolate into a small piping bag or a plastic bag with a tiny hole cut in the corner.

16. Use the chocolate to draw Totoro’s eyes, nose, and whiskers on each puff. For the eyes, you can also use sugar sprinkles if you prefer a more colorful look.

17. Once the chocolate has set, it’s time to fill the puffs. Use a piping bag fitted with a long tip to inject the custard cream into the bottom of each puff. Alternatively, you can cut a small slit in the side and spoon the cream in.
Tips for Perfect Totoro Puffs
- Make sure the shortcrust top is completely frozen before cutting—it will be easier to handle.
- Don’t overmix the puff dough after adding the eggs—this can make the puffs tough.
- Let the puffs cool completely before filling to keep the cream fresh.
- For extra cuteness, add a small leaf or a tiny mushroom (made from fondant) next to each Totoro.
Final Thoughts
And there you have it—your very own Totoro cream puffs! These little guys are not only delicious but also a great way to bring some magic into your kitchen. Whether you’re making them for a party, a movie night, or just because, they’re sure to put a smile on everyone’s face. So grab your apron, preheat that oven, and let’s get baking. Happy cooking!