
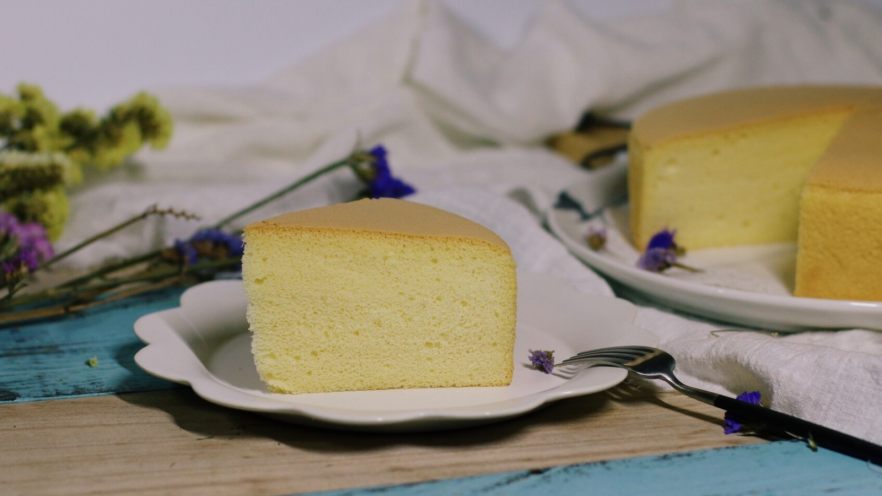
Hey there, sweet tooths! If you’ve been craving a fluffy, moist cake but hate feeling guilty about added oils or excess calories, today’s your lucky day. I’m sharing a game-changing recipe: Oil-Free Soy Milk Cake! It’s light, tender, and packed with that cozy, nutty flavor you love from soy milk. Plus, no oil means it’s vegan-friendly, perfect for weight loss, and even easy for beginners to pull off. Let me walk you through it—you won’t believe how delicious something this healthy can be!

Why This Cake is a Must-Try
First off, let’s talk about soy milk! It’s not just any breakfast drink—it’s a nutrient powerhouse. Loaded with plant-based protein, calcium, iron, and those hard-to-find B vitamins, it’s like a “super milk” for your body. And since we’re using it in cake form, you get all those benefits without sacrificing taste. Plus, no oil? That’s a game-changer for anyone trying to eat cleaner. This cake stays moist naturally, thanks to the soy milk and careful mixing, so you don’t miss the oil one bit. Trust me, even my non-vegan friends were shocked when I told them it had no oil!
Ingredients You’ll Need
Let’s gather the goods. Grab these (I’ll list them with measurements, but adjust to your oven and egg size if needed!):
- 5 large eggs (room temperature works best—let them sit out for 30 mins before starting)
- 65g unsweetened soy milk (I use homemade, but store-bought is fine if you’re short on time)
- 50g sugar (for the egg whites)
- 15g sugar (for the egg yolks)
- 80g all-purpose low-gluten flour (this helps keep the cake tender!)
- A pinch of lemon juice (or white vinegar—helps stabilize the egg whites)
Step-by-Step: Making the Cake (With Photos!)
Alright, let’s dive into the magic. Follow along, and you’ll have a cake that’s both pretty and practical. I promise, it’s easier than it looks!
Step 1: Prep Your Soy Milk (If You’re Making It Homemade)
If you’re using homemade soy milk, soak the beans overnight (or at least 4 hours) to soften them. Then, blend with enough water to reach about 65g of finished soy milk (I used a blender and then strained it through a cheesecloth—you can also use a dedicated soy milk maker, like the one I used, which saved so much time!). If you’re using store-bought, skip this step—just make sure it’s unsweetened and fresh.
Pro tip: Let the soy milk cool to room temperature before using it in the batter. Hot milk can scramble the egg yolks!

Step 2: Strain the Soy Milk (If Needed)
Even if you use homemade soy milk, give it a quick strain through a fine mesh sieve to remove any extra bean bits. This ensures your cake batter is super smooth. I had extra soy milk for other recipes, so I just kept it in a jar for later!

Step 3: Separate Eggs (No Oily Mess Allowed!)
Grab two clean, grease-free bowls: one for egg whites, one for yolks. Crack the eggs gently into the yolk bowl—never let any yolk drop into the white bowl, or your meringue will never get stiff peaks! If you’re worried about separation, use a clean spoon or just do it carefully over the yolk bowl.
Big warning: Oil or water in the egg white bowl = failed meringue. So make sure those bowls are spotless!

Step 4: Mix Egg Yolks + Soy Milk + Sugar
In the yolk bowl, add the 15g sugar and 65g soy milk. Stir with a hand whisk until the sugar dissolves. It’ll look like a light yellow liquid—no big sugar clumps, promise!

Step 5: Whisk Until Smooth
Whisk the mixture for about 30 seconds until everything is fully combined. It should be runny but smooth—no gritty bits here!

Step 6: Sift the Flour
Sift the 80g low-gluten flour into the yolk mixture. This adds air and keeps the cake tender. Sifting also helps break up any flour lumps—trust me, your future self will thank you!

Step 7: Mix to a Silky Batter
Now, use a rubber spatula to “cut and fold” the flour into the wet ingredients. Start from the bottom and go up, scraping the sides to mix everything evenly. Stop when the batter is smooth with no lumps—overmixing here will make the cake dense, so go slow!

Step 8: Add the Remaining Egg Yolks
Add the last 3 egg yolks (since we started with 5 eggs total, 2 in the yolk bowl already) to the batter. Fold them in gently—don’t stir too hard, just enough to combine. The batter should now be a thick, glossy yellow!

Step 9: Whip the Egg Whites to Stiff Peaks
In the egg white bowl, add the 50g sugar and a squeeze of lemon juice. Use an electric mixer (or a hand whisk if you’re old-school) to beat the whites until they start to thicken. Keep beating until you get stiff, glossy peaks—when you lift the whisk, the peak should stand straight up, not droop!
Pro move: If you’re using a mixer, start on low, then high speed for about 2-3 minutes. Stop once it’s smooth and holds shape—no overbeating!

Step 10: Fold 1/3 of Egg Whites into Yolk Batter
Take a big spoonful (about 1/3) of the egg white mixture and fold it into the yolk batter. This lightens the batter and makes it easier to mix the rest without deflating the air. Go slow and gentle—cut through the center, then scrape the bottom and fold over.

Step 11: Combine All Batter
Now, pour the folded batter back into the remaining egg white bowl. Use a spatula to fold the rest of the egg whites in. This is the “final mix”—you want no plain white or yellow patches left, just a uniform batter.
Remember: Folding keeps the air in the cake, so don’t stir like you’re cooking risotto!

Step 12: Pour Batter into a Greased Pan
Grease an 8-inch cake pan (or use a silicone mold, which makes releasing easier). Pour the batter in—use a spatula to smooth the top gently. Then, tap the pan firmly on the counter a few times to release any big air bubbles. Finally, use a toothpick to drag through the top surface in a circle—this pops tiny bubbles that would ruin the cake’s smooth top.

Step 13: Bake to Perfection
Preheat your oven to 130°C (lower temp = less drying out!) on the bottom rack, and set the top rack to 100°C. Bake for 60-70 minutes. Pro tip: Every oven is different! Check at 50 minutes—if the top is golden and the cake bounces back when you touch it, it’s done. For me, 65 minutes was perfect, but adjust based on your oven’s heat.

Step 14: Cool and Release
Once baked, take the pan out and tap it on the counter to release the cake. Immediately invert it onto a cooling rack (or plate) and let it cool completely—don’t try to eat it warm! If you’re impatient, let it cool for 10 minutes, then invert again to finish cooling.

Step 15: Unmold and Enjoy!
After it’s cool, gently run a knife around the edges to loosen the cake, then flip it out onto a plate. Look at that beautiful, smooth top! Slice it up and dig in—you’ll be amazed at how moist and tender it is.

Expert Tips for Success
I’ve made this cake a few times now, so here are my best tips to avoid mistakes:
- Soy Milk Quality: Use unsweetened soy milk! Sweetened ones will make the cake too sweet, and you don’t need the extra sugar.
- Egg Freshness: Room-temperature eggs whip better and mix more evenly. If your eggs are cold, let them sit out for 30 minutes.
- Baking Time: Lower temperature (130°C/265°F) is key here—higher temps make the outside dry before the inside is done.
- Cooling: Don’t skip cooling! Letting it rest overnight is a secret hack—my cake was a bit dry the first day, but after 24 hours, it was fluffy and moist.

Why This Cake is So Special
This Oil-Free Soy Milk Cake isn’t just “healthy”—it’s flavorful! The soy milk adds a subtle nutty depth, and the lack of oil keeps it light enough for dessert after dinner, or even breakfast. It’s vegan, egg-friendly, and low in fat—no joke! I’ve brought this to friends’ houses, and they’ve all asked for the recipe. It’s that good.
Final Thoughts
If you’re tired of heavy, oily cakes or want a vegan dessert that doesn’t taste “diet-y,” this recipe is for you. It’s easy, adaptable, and actually satisfying. So grab your ingredients, follow the steps, and let me know how it turns out! Tag me in your photos—I’d love to see your version of this moist, oil-free delight.

Now, go forth and bake—your taste buds (and your wellness routine) will thank you!


![French Savory Tart [Magic Cake] – Sugar-Free, Layered Delight (Forced My Friend’s Recipe to Obsession!)](https://hearthsiderecipes.com/images/5214/5mit2exneu1.jpg "French Savory Tart [Magic Cake] – Sugar-Free, Layered Delight (Forced My Friend’s Recipe to Obsession!)")


