

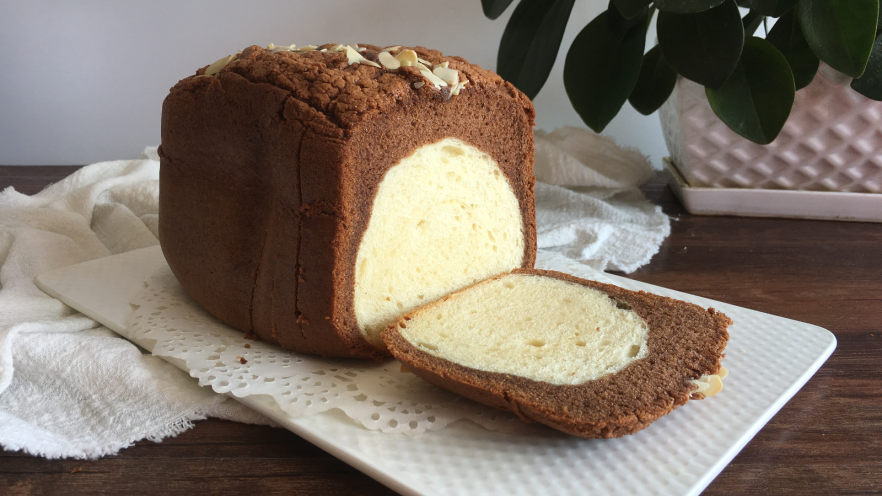

Let’s be real, how many of us have a bread machine sitting on our counter that we only use for basic white loaves? Raises hand. I used to think my bread machine could only make, well, plain bread, until I stumbled on this black diamond toast recipe and my mind was blown. If you haven’t tried it before, black diamond toast is the best of both worlds: soft, fluffy bread on the inside, rich, fudgy chocolate sponge cake on top, all in one perfect slice. It tastes like you picked it up from a fancy bakery, but you can make it at home without even turning your oven on. Yes, really. No oven required, just your trusty bread machine. Let’s get into it.
What Makes This Bread Machine Black Diamond Toast So Good?
Okay, let’s talk about why this recipe is worth your time. First off, if you only have a bread machine and no oven, this is a game-changer. I’ve seen so many black diamond toast recipes online that require a fancy loaf pan and oven time, and I always thought “well that’s not for me.” But this version works perfectly in a standard bread machine, and it comes out just as good as the bakery kind.
Every bite has two totally different textures: the chewy, soft bread layer and the moist, chocolatey cake layer. The chocolate flavor is super prominent, but not overpoweringly sweet, so it’s perfect for breakfast with a cup of coffee, or as a midday snack. I’ve made this for my family three times in the last month, and they keep asking for more. Even my kid who hates “weird bread combos” ate two slices in one sitting, so that’s a win in my book.
Ingredients You’ll Need
I split this into two sections, since we’re making both the bread base and the chocolate cake top. Don’t worry, none of these are weird specialty ingredients – you probably have most of them in your pantry already!
Bread Base Ingredients
- 150g bread flour (high gluten flour, this is what makes the bread chewy! Don’t use all-purpose here, trust me)
- 25g granulated sugar
- 1g fine salt (just a pinch to balance the sweetness)
- 55g water (room temperature, not cold! Cold water will kill your yeast)
- 10g milk powder (you can use regular liquid milk if you don’t have powder, just adjust the water amount a tiny bit)
- 1 large egg (room temp, again, helps the yeast work better)
- 15g unsalted butter, softened (leave it out on the counter for 30 minutes before you start, or microwave it for 5 seconds if you’re impatient like me)
- 2g instant high-sugar yeast (critical! Regular yeast won’t hold up to the sugar in this recipe, so make sure it’s high-sugar tolerant)
Chocolate Sponge Cake Topping Ingredients
- 65g cake flour (low gluten flour, this keeps the cake light and fluffy)
- 3 large eggs (for the cake, separate from the egg you used for the bread! Room temperature is non-negotiable here for good egg whipping)
- 75g granulated sugar (for the cake, this is what helps the eggs whip up nice and voluminous)
- 50g corn oil (neutral flavored, don’t use olive oil or it will taste weird)
- 10g cocoa powder (unsweetened, good quality cocoa powder makes a huge difference in the chocolate flavor)
- Handful of sliced almonds, for topping (optional, but they add a great crunchy contrast! You can use chocolate chips or dried fruit too if you want)
Step-by-Step Instructions
I’m going to walk you through every step, and I’ve included photos so you can see exactly what each stage should look like. Don’t stress if something looks a little off at first – baking is forgiving, I promise!
Step 1: Make the Bread Dough

First, take all your bread base ingredients and dump them straight into your bread machine pan. I usually add the wet ingredients first (water, egg, butter) then the dry ones on top, with the yeast last so it doesn’t touch the salt directly (salt can kill yeast if they sit together too long before mixing). Then turn your bread machine to the standard dough kneading setting, and let it run its full cycle. Most machines take about 20 minutes for this part, so go scroll TikTok or make yourself a snack while you wait.

Once the kneading cycle is done, take a small piece of dough and stretch it between your fingers. You should be able to stretch it thin enough to see light through it without it tearing – that’s the “window pane” test, and it means your dough is kneaded perfectly. If it tears right away, just put it back in the machine and run the knead cycle for another 5 minutes.
Step 2: First Dough Rise

Shape your dough into a nice smooth ball, plop it back into the bread machine pan, and put the pan back into the machine. Turn on the dough fermentation (rise) setting, and let it sit for 30 minutes.

After 30 minutes, check your dough. It should be about doubled in size! If you poke it with a floured finger, the indent should stay and not spring back right away. If it springs back super fast, let it rise for another 10 minutes. If it collapses when you poke it, you let it rise too long – but don’t panic, just knead it a little bit and let it rise again for 20 minutes, it’ll still work.
Step 3: Shape the Dough for Second Rise

Take the dough out of the pan and punch it down to get all the air out – this is the most satisfying part of baking, tbh. Then use a rolling pin to roll it out into a rectangle shape, about the same width as your bread machine pan. Flip it over so the smooth side is on the bottom, and press the bottom edge thin with your fingers so it sticks when you roll it up.

Roll the dough up tightly from the top down, like you’re rolling a burrito. Pinch the seam shut really well, and pinch the ends closed too so no air gets inside.

Put the rolled dough seam-side down into the bread machine pan, horizontally. Yep, horizontally! I know it feels weird, but this way it will rise evenly and fit perfectly under the cake layer. Put the pan back into the bread machine, and turn on the second rise setting for another 30 minutes or so.
Step 4: Make the Chocolate Cake Batter

Okay, now’s the time to make the cake batter! You want to time this so the batter is done right when the dough finishes its second rise – that’s why we wait until the second rise starts to make the cake. I timed myself last time, and the cake batter takes about 25 minutes to make, which lines up perfectly.

First, sift your cake flour and cocoa powder together into a bowl. Sifting is important here! It gets rid of any lumps in the cocoa powder, and makes the cake extra fluffy. Set that bowl aside for later.

Take your 3 eggs for the cake, and put all 75g of sugar into the same bowl as the eggs. Get a bigger bowl that’s a little bit bigger than your egg bowl, and fill it with warm (not boiling!) water. Set the egg bowl inside the warm water bath – this helps the eggs whip up faster and get more volume. Grab your electric mixer (hand mixer works fine, you don’t need a stand mixer) and start whipping the eggs and sugar on high speed.

Whip until the eggs are super pale, fluffy, and tripled in size. The test for this is when you lift the mixer out of the batter, the drips should fall slowly and leave a visible ribbon on top of the batter that stays for at least 3 seconds before disappearing. If the ribbon disappears right away, keep whipping! This step is so important – if you don’t whip the eggs enough, your cake will be flat and dense. I usually whip mine for 8-10 minutes, so be patient here.

Now, take your sifted flour and cocoa powder mix, and sift it into the egg batter in 3 separate batches. Don’t dump it all in at once! Sift a third, mix it in, then sift the next third, etc. This helps prevent lumps and keeps the batter from deflating.

When you mix, don’t stir in circles! That will make all the air you whipped into the eggs disappear. Instead, use a silicone spatula to cut down through the middle of the batter, scrape along the bottom of the bowl, and fold the batter up over the top. Keep doing this gently until there are no more dry flour spots. It’s okay if there are a few tiny lumps, it’s better than overmixing!

Next, take a small scoop of the cake batter (about ¼ cup) and dump it into your bowl of corn oil.

Mix that small amount of batter and oil together until it’s completely smooth. Why do we do this? If you pour the oil straight into the main cake batter, it will sink to the bottom and be hard to mix in without deflating everything. Mixing it with a little batter first makes it incorporate way easier.

Pour the oil and batter mix back into the main cake batter bowl.

Fold it in gently the same way you did the flour, until everything is completely combined. Don’t overmix! The batter should still be light and fluffy.
Step 5: Assemble and Bake

Check on your bread dough! It should be doubled in size again, just like the first rise. Perfect timing, right? Take the bread pan out of the machine.

Pour all of your chocolate cake batter over the top of the risen bread dough, spread it out evenly with your spatula. Then put the pan back into the bread machine, and turn on the bake setting for 35 minutes.

After 35 minutes, open the bread machine lid as fast as you can! Use a sharp knife to cut a shallow slit down the middle of the cake top, then sprinkle your sliced almonds (or whatever topping you’re using) over the top. Close the lid as quick as you can so you don’t let too much heat out.

Set the bake setting for another 25 minutes, so total bake time is 60 minutes. If your bread machine runs hot, you might only need 20 minutes for the second bake, so keep an eye on it.

Once the bake time is done, don’t take it out right away! Stick a toothpick into the center of the cake part – if it comes out clean or with a few tiny crumbs, it’s done. If it comes out with wet batter, put it back for another 5 minutes.

Carefully take the hot pan out of the bread machine (use oven mitts! It’s super hot), and tip the loaf out onto a wire cooling rack. Don’t leave it in the pan to cool, or the bottom will get soggy.

Let it cool completely before you slice it – I know it’s hard to wait, but if you slice it while it’s warm the cake and bread layers will squish and separate.

Look at that! Perfect black diamond toast, with clear layers of bread and chocolate cake. It tastes even better than it looks, I promise.
Pro Tips to Make This Perfect Every Time
I’ve made this recipe a bunch of times, so I’ve got a few hacks to help you avoid the mistakes I made the first time around:
- Egg whipping is non-negotiable. Don’t skimp on the time here! If your eggs aren’t whipped enough, your cake will be flat and dense, no exceptions. Room temperature eggs whip way better than cold ones, so take them out of the fridge an hour before you start baking if you can.
- Always fold, never stir. When you’re mixing the flour and oil into the cake batter, stir in circles = flat cake. Gentle folding from the bottom up keeps all the air in the batter, so your cake is light and fluffy.
- Adjust bake time for your bread machine. Every bread machine is different! Mine runs a little cool, so I need the full 60 minutes, but if yours runs hot, check the cake at 50 minutes. The top should be firm to the touch, and a toothpick comes out clean.
- Want to add mix-ins? You can toss chocolate chips, dried cranberries, or raisins right into the cake batter before you pour it over the bread. So good!
- Time your cake making right. Start making the cake batter as soon as you put the bread in for its second rise. That way, the batter is done exactly when the bread is done rising, and you don’t have to wait around for either.
- If you don’t have sliced almonds, you can leave the topping off, or use sprinkles, crushed cookies, or extra cocoa powder dusted on top after it cools. Get creative!
That’s it! This recipe is so much easier than it looks, and it’s such a fun way to use your bread machine for something other than plain old white bread. If you make it, tag me on social media – I’d love to see how yours turns out! It’s become my go-to weekend bake, and I know it’ll become yours too.