
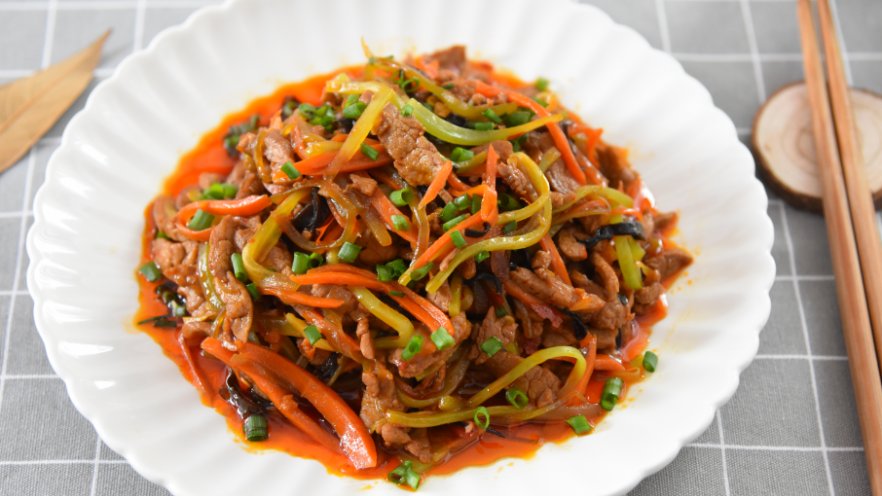

Easy Yu Xiang Rou Si Recipe: Authentic Sichuan Fish-Flavored Pork Stir-Fry You Can Master Today
Let’s be real: most of us have stared at restaurant menus and fallen hard for yu xiang rou si, that glossy, savory, slightly spicy pork stir-fry that tastes like it took a professional chef hours to perfect. But guess what? I used to think the same thing—until I messed around in my tiny apartment kitchen and figured out this foolproof, one-pan recipe that tastes just like the Sichuan diner down the street. No fancy tools, no hard-to-find ingredients, just 30 minutes of work and the most addictive weeknight dinner you’ll make all month.
First, let’s quickly break down what makes this dish special, okay? The name “yu xiang” actually translates to “fish fragrance,” but here’s the fun twist: there’s zero fish in this recipe! Local legend says the name comes from the lingering, rich aroma that sticks around your kitchen long after you finish cooking—some folks even call it “yu xiang” as a nod to that warm, lasting scent. The secret star of the show is Sichuan chili bean paste, which gives every bite that deep, umami kick that makes yu xiang rou si so iconic. Trust me, once you nail this, you’ll be making it for potlucks, date nights, and lazy Sunday dinners nonstop.
What You’ll Need for Yu Xiang Rou Si
I know ingredient lists can feel overwhelming, but I’ve kept this super simple. I’ve also listed exact measurements so you don’t have to guess—no “a pinch of this” or “a splash of that” here! Grab these things before you start, and you’ll be ready to cook in 2 minutes flat:
- 200g pork tenderloin (cut into thin matchsticks—pro tip: freeze it for 20 minutes first to make slicing way easier)
- ½ medium green bamboo shoot (or a crisp green bell pepper if you can’t find bamboo shoots!)
- A small handful of dried black fungus (about 10g, rehydrated)
- ½ small carrot (cut into thin matchsticks for color and extra crunch)
- 2 cloves garlic (finely minced)
- 1 thin slice of fresh ginger (minced)
- 1 small scallion (chopped, plus extra for garnish)
- 2 tbsp Sichuan chili bean paste (this is non-negotiable for that classic fish flavor!)
- Pinch of salt
- 2 tbsp granulated sugar
- 2 tbsp rice vinegar (or white vinegar works in a pinch)
- 1 tbsp Chinese cooking wine
- 1 tbsp light soy sauce
- ½ tsp dark soy sauce (just for color, don’t overdo it!)
- 1 tsp cornstarch
- 1 tbsp neutral cooking oil (like canola or vegetable oil)
Step 1: Prep Your Pork First (The Secret to Tender Meat)

Let’s start with the pork, because this is where a lot of people mess up. If your pork turns tough, you’re either overcooking it or not marinating it right. Grab your pork tenderloin, slice it into thin matchsticks (about the thickness of a pencil), and put it in a small mixing bowl.
Add ½ tbsp of the cooking wine, ½ tbsp light soy sauce, a tiny pinch of salt, ½ tsp cornstarch, and a drizzle of oil. Toss everything together really well until the pork is fully coated. Let it sit and marinate for 15 minutes—this will lock in all the juiciness and keep the meat from drying out while you stir-fry.

I know 15 minutes feels like a long wait, but trust me, it’s worth it. I’ve skipped this step before and ended up with rubbery pork that no one wanted to eat—never again!

Step 2: Mix Up Your Fish-Flavored Sauce (The Flavor Base)
While your pork is marinating, let’s make the star of the show: the fish-flavored sauce. This is what makes yu xiang rou si taste so balanced—sweet, sour, savory, and just a little spicy. Grab another small bowl and mix together:
- 1 tbsp light soy sauce
- 1 tbsp Chinese cooking wine
- 2 tbsp sugar
- 2 tbsp rice vinegar
- ½ tsp dark soy sauce
- ½ tsp cornstarch
- A tiny splash of water (just enough to loosen everything up)
Whisk this all together until the sugar and cornstarch fully dissolve. Set this aside for later—don’t add it to the pan yet, or it will get lumpy!

Step 3: Prep Your Veggies (Fast and Easy)
Now let’s get all the veggies ready so everything cooks at the same time. First, take your dried black fungus and soak it in 40°C (about 100°F) hot water for 20 minutes until it’s soft and plump. Drain it, squeeze out any excess water, and slice it into thin strips.

Next, peel your bamboo shoot (or bell pepper) and carrot, then slice all three into thin matchsticks just like the pork. Mince your garlic, ginger, and scallions—make sure the garlic and ginger are really fine so they don’t burn while cooking.

Step 4: Cook the Pork (The Hot Tip You Need)
Okay, time to start cooking! Here’s my #1 hot tip for perfectly tender pork: use hot cold oil. Wait, what’s hot cold oil? Basically, heat your pan over medium-high heat, add 1 tbsp of oil, and let it get just barely smoking. Then add your marinated pork and stir-fry it for 2-3 minutes until it’s no longer pink on the outside and just starts to brown.

As soon as it’s cooked through, scoop it out and set it on a plate. Don’t overcook it here—it will go back into the pan later, and you don’t want it to get tough.

Step 5: Build the Flavor With Chili Bean Paste
Now, use the same pan you cooked the pork in—no need to wash it! The leftover pork juices are full of flavor. Turn the heat down to medium, add your Sichuan chili bean paste, and stir-fry it for 30 seconds until it starts to release that rich, red oil. This is where the whole dish gets its iconic umami kick, so don’t skip this step!

If you’re sensitive to spice, you can reduce the amount of chili bean paste, but trust me, this is what makes this dish taste authentic. I love the slight numbing heat from the Sichuan peppercorns too, but if you don’t have any, don’t worry—the chili bean paste still packs plenty of flavor.
Step 6: Add Your Veggies and Cook Until Crisp-Tender
Next, add your minced garlic and ginger to the pan and stir-fry them for 10 seconds until they’re fragrant. Be careful not to burn the garlic—it will turn bitter fast! Then add your black fungus, carrot, and bamboo shoot (or bell pepper) strips to the pan.

Stir-fry all the veggies together for 2-3 minutes until they’re crisp-tender. You want them to still have a little crunch, not mushy softness. If your pan starts to get dry, add a splash of water, but don’t add too much—we want a saucy stir-fry, not a soup!
Step 7: Combine Everything and Finish the Dish
Now add your cooked pork back to the pan, and toss everything together so the veggies and pork are all coated in the chili bean paste sauce. Then pour your pre-mixed fish-flavored sauce into the pan and stir everything like crazy for 1 minute until the sauce thickens and coats every single piece of pork and veggie.


Step 8: Garnish and Serve (The Best Part!)
Turn off the heat, sprinkle on some chopped scallions, and give everything one last toss. Your yu xiang rou si is ready to eat!

I like to serve mine over a big bowl of steamed white rice—this sauce is so good, you’ll want to soak every last drop up with your rice. It also goes great with noodles or even as a wrap in soft tortillas if you’re feeling fancy.
Pro Tips and Quick Swaps for Yu Xiang Rou Si
Let’s go over a few quick tricks to make this dish even better, plus easy swaps if you don’t have certain ingredients:
- Hot cold oil for tender pork: This is the number one trick I learned from my Chinese grandma. Heating the oil first then adding the pork keeps it from sticking to the pan and stays extra juicy.
- Don’t overcook the pork: Even a minute extra can turn tender pork into rubbery scraps, so keep an eye on it while it’s stir-frying.
- No bamboo shoots? No problem: Use green bell pepper, celery, or even shredded cabbage instead. Anything crisp and light will work great here.
- No Sichuan chili bean paste? You can use regular yellow bean paste, but you’ll miss out on that iconic red color and spicy umami flavor. If you can’t find it at your local grocery store, you can order it online easily.
- Adjust the sweetness and sourness: Everyone’s taste buds are different! If you like it sweeter, add a little more sugar. If you love tangy flavor, add an extra splash of vinegar.
Why This Recipe Is Perfect for Beginners
Let’s be real: not everyone is a professional chef. I’ve burned toast, overcooked pasta, and ruined a pot of rice more times than I can count. But this yu xiang rou si recipe is so forgiving! Here’s why:
- All the prep is done ahead of time, so you don’t have to rush while cooking
- You can make the sauce ahead of time too, which is perfect for busy weeknights
- There’s no complicated technique—just stir-frying everything in order
- You can adjust every ingredient to fit your taste buds
- It only takes 30 minutes total from start to finish
I made this for my roommate last week, and she’s been begging me to make it every night since. She’s a total cooking newbie too, and she even asked for the recipe so she could make it for her family. That’s how easy this is!
Final Thoughts on Making Yu Xiang Rou Si at Home
At the end of the day, cooking should be fun, not stressful. This yu xiang rou si recipe lets you make a restaurant-quality dish right in your own kitchen without spending hours in the pantry or dropping hundreds on fancy ingredients. Whether you’re making it for a weeknight dinner, a potluck, or just treating yourself after a long day, this dish is sure to impress.
Next time you’re craving that classic Sichuan stir-fry, skip the takeout and give this recipe a try. I promise you won’t be disappointed. And if you do make it, tag me in your photos—I’d love to see how your yu xiang rou si turns out!