

 & Red Dates Pork Bone Soup Recipe | Nourishing Chinese Wellness Dish")


Why Basic Drip Cakes Are a Game-Changer for Home Bakers
Let’s be real—nothing makes a cake look more “I totally meant to do that” fancy than a drip cake. The best part? You don’t need to be a pro pastry chef to pull it off! Today, I’m breaking down my go-to basic drip cake recipe that’s basically a blank canvas. Once you nail the fundamentals, you can deck it out with literally anything: sprinkles, candy, cookies, macarons… even your favorite childhood snacks (no judgment—Fruit Loops would low-key slap here). Let’s dive in!
Ingredients You’ll Need (No Fancy Stuff, Promise)
First, let’s round up the goods. I’ve kept this list simple—no weird specialty ingredients here:
- 3 x 6-inch yogurt cakes (trust me, they’re moist and hold up great!)
- 1400g Swiss meringue buttercream (my ride-or-die frosting—stable and not too sweet)
- A dash of imported food coloring paste (for that pop of color)
- 50g heavy cream (for the chocolate drip)
- 150g pure cocoa butter white chocolate (for the drip)
- 200g pure cocoa butter white chocolate (extra for decorations)
Step-by-Step Guide to Your Perfect Drip Cake
Okay, let’s get hands-on. I’ve got step-by-step tips (and real talk) to make this smooth sailing.
1. Prep Your Cake Base (The “Don’t Let It Slide” Hack)

First things first: Grab a flat cake board or plate. Smear a tiny dollop of Swiss meringue buttercream right in the center—this is your “glue” to keep the cake from sliding around. Genius, right?
2. Set Up Your Workstation (Less Mess = More Fun)

Pop that cake board on a cake turntable (if you don’t have one, a lazy Susan works in a pinch!). To save yourself from scrubbing chocolate and frosting off the board later, lay down 4 strips of parchment paper under where the cake will go. Trust me—cleanup will thank you.
3. Stack Those Layers (Height = Drip Potential)

Place your first cake layer on the parchment. Then, scoop some buttercream onto it—don’t skimp, but don’t go overboard either.


Smooth it out with a small offset spatula. Then add your next layer… and repeat! I used 3 yogurt cakes cut into 6 thin layers total (pro tip: use a serrated knife for even slices—check my rainbow frosting video if you need a tutorial).


Here’s a non-negotiable tip: Your cake needs height for the drip to look good. If it’s too short, the drips will just blob at the bottom. My 6-layer stack was perfect—tall enough for drama, but not so tall it topples.


4. Crumb Coat Time (Hide Those Cake Crumbs!)

Once your layers are stacked, spread a super thin layer of buttercream all over the cake—this is called a crumb coat. It traps all those loose crumbs so your final frosting is smooth. No one wants crumb-speckled frosting, am I right?
Carefully pull out the parchment paper strips (they’ve served their purpose!) and pop the cake in the fridge for 20 minutes to set. This is your chance to clean up a little… or grab a snack. No judgment.


5. Color Your Buttercream (Get Creative!)
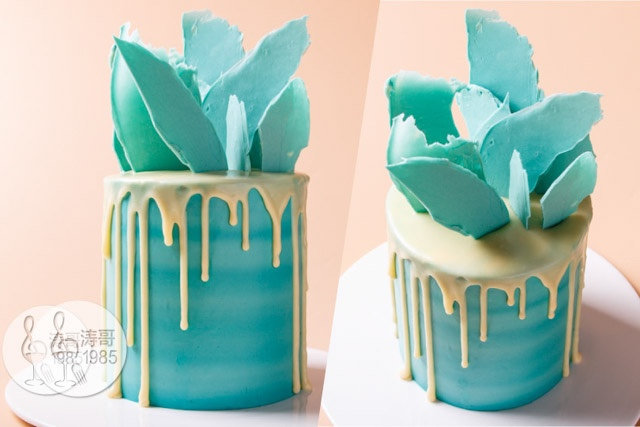
While the crumb coat chills, color your buttercream. I went with a fun turquoise, but you can use any hue—pastels, neons, even tie-dye (mix a few colors randomly!). Pop it into a piping bag with a round tip—easy peasy.

6. Final Frosting (Smooth = Satisfying)
Take the cake out of the fridge. Now for the fun part: Pipe your colored buttercream randomly around the sides (I did turquoise blobs) and fill in the gaps with plain buttercream. Pro tip: Pipe more than you think you need— I skimped and had to add more mid-smoothing. Oops.


Spread the top with plain buttercream and smooth it out with your offset spatula. For the sides, use a tall stainless steel scraper (taller than the cake!)—hold it steady against the cake and spin the turntable. The scraper will do the work for you, keeping the sides perfectly smooth.


Once the sides are smooth, clean up the top edge by gently scraping any excess buttercream toward the center. Wipe off the cake board with a paper towel—no smudges allowed!


Stick the cake back in the fridge to set while you make the drip.


7. Make the Chocolate Drip (The Star of the Show)
Now for the drip magic! In a small saucepan, heat the heavy cream over low heat until it just starts to bubble (don’t boil it—you’ll scorch the chocolate). Take it off the heat and dump in the 150g white chocolate.


Let it sit for 2 minutes—this melts the chocolate without stirring. Then grab a whisk and stir until it’s silky smooth. If you want a colored drip, add a drop of food coloring paste now and mix well.


8. Add the Drip (Control = No Mess)
Take the cake out of the fridge. Pour about two-thirds of the chocolate drip right in the center of the top. Use your offset spatula to spread it toward the edges—but stop just before it drips over. This gives you a clean top.


For the drips, put the remaining chocolate in a piping bag with a tiny hole. Squeeze short, controlled bursts around the edge—vary the length for a natural look. Some drips can be long, some short—no need for perfection!

9. Decorate (Go Wild!)
Now the fun part: Decorate! I made colorful chocolate shards (melt the extra 200g white chocolate, add color, spread on parchment, and let harden) and stuck them on top. But you can use anything: sprinkles, candy, cookies, macarons, even fresh fruit. The sky’s the limit!
Pro Tips for Drip Cake Success
Before you go, here are my must-have tools and quick hacks to avoid disasters:
- Small offset spatula: Essential for smoothing frosting (no more lumpy sides!)
- Flat cake board/plate: Keeps your cake stable (skip the flimsy paper plates—trust me).
- Cake turntable: Makes smoothing and dripping 10x easier (lazy Susan hack works too).
- Parchment paper: Saves you from scrubbing sticky messes off your board.
- Tall stainless steel scraper: The secret to perfectly smooth sides (get one taller than your cake).
- Small saucepan: For melting the chocolate drip (no microwave burns here).
And one last thing: Don’t stress if it’s not perfect! Drip cakes are supposed to look a little messy— that’s part of their charm. Experiment, have fun, and let your creativity shine.
 | Stir-Fried Broccoli with King Oyster Mushrooms")
 – Fluffy, Moist, and Easy to Make")


 – A Cozy Winter Treat")


