
Why This Chocolate Ganache Drip Cake Is My Go-To for Impressing Guests (And It’s So Easy!)
Let’s be real—nothing says “I put effort in” like a cake that looks like it came from a fancy bakery, but here’s the secret: this chocolate ganache drip cake is actually super doable at home. I’ve made it for birthdays, potlucks, and even a random Tuesday night (no judgment) because it’s simple, moist, and that shiny chocolate drip? Chef’s kiss. I even demoed it in a live baking class once—so if you’re a visual learner, you can grab that course later, but for now, let’s dive into how to make this beauty step by step.
Ingredients You’ll Need (For 2 Tiny 4-Inch Cakes—Perfect for Small Gatherings!)
First, let’s round up your stuff. No weird fancy tools here—just basic baking gear and ingredients you probably already have in your pantry. Here’s the breakdown:
- 2 large eggs (separated into yolks and whites—pro tip: make sure your bowl for whites is totally grease-free!)
- 33g cake flour (low-gluten flour works too—don’t skip sifting this later!)
- 20g milk (any kind is fine—dairy or plant-based, I’ve tested both)
- 20g corn oil (or any neutral oil like canola—no olive oil, please, it’ll change the flavor)
- 40g granulated sugar (for the cake layers—save the rest for cream!)
- 80g heavy cream (for the chocolate ganache—yes, the good stuff)
- 80g dark chocolate (I use 70% cacao for that rich, not-too-sweet kick)
- 16g granulated sugar (for the frosting cream)
- 160g heavy cream (for the filling and frosting—stock up!)
Quick note: The chocolate ganache recipe here is enough for both 4-inch cakes, so no need to double it unless you’re making bigger ones.
Step-by-Step: How to Bake the Moist Vanilla Cake Layers
Let’s start with the cake base—this is a classic sponge that’s light but holds up to frosting and ganache. Trust me, it’s not as scary as it sounds.
1. Prep Your Eggs & Yolk Mixture

First, separate your egg yolks and whites. Pop the whites into a clean, dry bowl (grease = no fluffy peaks, so don’t mess this up!). Whisk the yolks a little until they’re smooth—no need to go crazy here.

Next, add the corn oil and milk to the yolks. Stir, stir, stir until the oil is totally mixed in—no little oil bubbles floating on top! This is key for a smooth batter.
2. Mix in the Flour (Sift It!)

Now, sift the cake flour into the yolk mixture. I know sifting feels like a chore, but it keeps the batter from getting lumpy—skip this and you’ll have clumps, I promise.

Grab a rubber spatula and fold the flour into the yolk mix. Be gentle—don’t overmix! Just stir until there are no dry flour spots left. Your batter should be thick and smooth.
3. Whip Those Egg Whites (The Fun Part!)

Time for the egg whites! Take your clean bowl and add the 40g of sugar for the cake layers. Start whipping on low speed, then crank it up to medium-high. Keep going until you get stiff peaks—when you lift the mixer, the peak should stand straight up without bending over. If it flops, keep whipping a little longer.
4. Combine Batter & Bake

Take 1/3 of your fluffy egg whites and fold them into the yolk batter. This lightens up the yolk mix so the rest of the whites don’t deflate.

Now pour that lightened batter back into the bowl with the remaining egg whites. Fold gently again—cut through the middle, scrape the bottom, and turn the bowl. Don’t stir in circles, or you’ll lose all that air!

Split the batter evenly between two 4-inch round cake pans (I use removable-bottom ones—they’re easier to get the cake out later). Tap the pans on the counter a few times to pop any big air bubbles.
Preheat your oven to 140°C (284°F) first! Then pop the pans in and bake for 35 minutes. To check if they’re done, stick a toothpick in the center—if it comes out clean, you’re good to go. Let them cool completely on a rack (don’t skip this—warm cake = melty frosting).
Assemble the Cake: Filling, Frosting, and That Iconic Drip
Okay, the cakes are cool—let’s put this thing together! This is where it starts to look like a real bakery cake.
1. Level & Layer the Cakes

Take your cooled cakes and slice each one horizontally into two thin layers. I use a serrated knife for this—go slow, and keep the knife level. If the tops are domed, you can cut those off too (save the crumbs for snacking… or don’t, no one’s watching).
2. Make the Frosting Cream

Take the 160g of heavy cream and 16g of sugar. Whip it until you get soft peaks—when you lift the mixer, the peak bends over a little. You don’t want it too stiff, or it’ll be hard to spread.
3. Stack & Frost

Put one cake layer on a plate or cake stand. Spread a thin layer of frosting on top, then add some sweet red bean paste (or fresh fruit, if you prefer!). Smooth it out, then put the next layer on top.

Add another layer of frosting and red bean paste, then top with the last cake layer. Now, spread a thin “crumb coat” of frosting all over the cake—this traps crumbs so your final frosting is smooth. Pop it in the fridge for 10 minutes to set.

Take it out of the fridge and add the rest of the frosting. I like to make the top a little higher than the sides for that classic cake shape. Use a spatula to smooth it out as much as you can—don’t worry if it’s not perfect, the drip will cover small flaws!
4. Add a Pop of Color (Optional but Fun!)

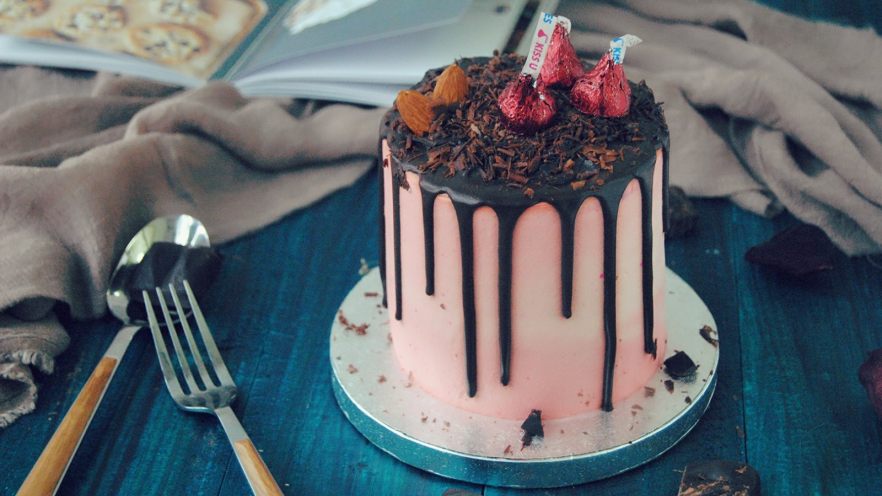
Want to make it extra pretty? Take a tiny bit of red food coloring and mix it into a small portion of the remaining frosting. Spread a thin layer on the top of the cake, then use the darker red frosting for the sides. It adds a fun gradient effect—trust me, your guests will notice!
5. The Star of the Show: Chocolate Ganache Drip

Now for the drip! Heat the 80g of heavy cream in the microwave for 30 seconds (or on the stovetop) until it’s just boiling. Pour it over the 80g of dark chocolate and let it sit for 5 minutes—don’t stir yet! The chocolate will melt from the heat of the cream.
After 5 minutes, stir the ganache until it’s smooth and shiny. Let it cool for 10-15 minutes until it’s thick enough to drip slowly (if it’s too runny, it’ll slide off the cake; if it’s too thick, it won’t drip at all). Test it by drizzling a little on a plate—you want it to flow but not spread too much.
6. Add the Drip & Decorate

Take a small spoon and drizzle the ganache around the edge of the cake. Let some of it drip down the sides—this is the “drip” effect! Don’t overdo it—just enough to look fancy.

Once the drip is done, decorate the top with extra chocolate shavings, fresh berries, or even a little gold leaf (if you’re feeling fancy). Slice it up and watch everyone’s eyes light up—this cake looks way harder to make than it is!
Pro Tips to Make This Cake Perfect Every Time
- Don’t skip sifting the flour—lumpy batter = dense cake.
- Make sure your egg whites are at room temperature—they whip up fluffier that way.
- If your ganache is too thick, add a tiny bit more warm cream. If it’s too runny, pop it in the fridge for 5 minutes.
- Let the cake cool completely before frosting—warm cake will melt the cream!
And hey, if you get stuck, I demoed this in a live class once—you can grab that course for step-by-step video help. But honestly, follow these steps, and you’ll nail it on the first try. Happy baking!