

 & Red Dates Pork Bone Soup Recipe | Nourishing Chinese Wellness Dish")


Cozy Walnut Multigrain Porridge: Easy, Nutritious Fall & Winter Comfort Food
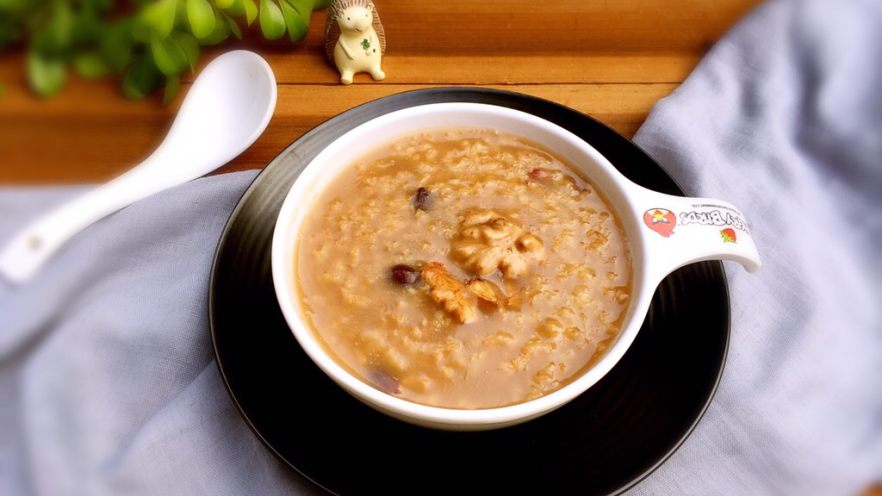
Let’s be real—when the air turns crisp and you’re bundled up in your fuzzy sweater, nothing hits quite like a steamy bowl of warm porridge. This walnut multigrain porridge is my go-to lazy weeknight meal or weekend brunch staple, especially once fall and winter roll around. It’s so easy to throw together, gentle on your stomach, and packed with enough good-for-you stuff to keep you full and energized all morning (or whenever you need a pick-me-up).
Why You’ll Love This Walnut Multigrain Porridge
First off, let’s talk about the obvious: it’s warm, creamy, and totally comforting. But beyond that, this porridge is a total nutrition powerhouse. Let’s break down why it’s worth adding to your weekly meal rotation:
- Super easy to make: No fancy skills required, even if you’ve never cooked porridge before!
- Great for digestion: The multigrains are loaded with dietary fiber that keeps your gut happy and helps prevent constipation, which is such a nice bonus during dry winter months.
- Boosts your immune system: Walnuts add a huge dose of protein, vitamins, and minerals that help your body fight off colds and fatigue.
- Versatile: You can swap out the multigrains for whatever you have on hand, and add mix-ins like cinnamon, honey, or fresh fruit if you want to mix things up.
- Perfect for kids too: It’s mild, soft, and full of good nutrients, so even picky little eaters will go for it. Great for soothing dry, irritated throats during cold and flu season!
What’s So Great About Walnuts, Anyway?
If you’ve ever heard walnuts called “longevity nuts” or “health treasures,” you’re not alone. These little guys are seriously packed with good stuff. First off, they taste amazing—nutty, slightly sweet, and add the perfect depth to any porridge. But nutritionally, they’re a star:
They’re loaded with healthy fats, protein, and a long list of vitamins and minerals like calcium, phosphorus, iron, and vitamin B1 and B2. Traditional Chinese medicine also loves walnuts: they have a warm, sweet flavor, and are said to support the lungs, liver, and kidneys, plus help with bowel movements. Even if you don’t buy into all the TCM stuff, you can’t argue with the fact that walnuts are a quick, easy way to add a ton of nutrition to any meal.
Full Ingredients for Walnut Multigrain Porridge
One of the best parts of this recipe is that you don’t need a million fancy ingredients. Here’s exactly what you’ll need:
- 1 cup pearl rice (regular white rice works too, but pearl rice makes the porridge extra creamy)
- 1 cup mixed dried beans (you can use kidney beans, black beans, mung beans, or whatever dried beans you have in your pantry—just make sure they’re rinsed well first!)
- 8 walnuts (shelled, of course—no one wants to crack walnuts while they’re cooking!)
- Enough water to cover everything by a few inches (don’t skimp on the water—you want a nice, creamy porridge, not a dry mess!)

Step-by-Step Instructions for Perfect Porridge Every Time
I know cooking porridge sounds straightforward, but there are a few little tricks to make sure it turns out creamy and not mushy. Follow these steps, and you’ll never mess it up:
Step 1: Gather all your ingredients
First things first: lay out all your ingredients so you don’t have to run around the kitchen mid-cook. You’ll need your mixed beans, pearl rice, walnuts, and a big pot or a rice cooker (pro tip: a rice cooker makes this so much easier—you just set it and forget it!).

Step 2: Soak your dried beans
Dried beans take a while to cook through, so you’ll want to soak them for at least 4 hours before you start cooking. If you forget to soak them the night before, no big deal—you can also boil them for 10 minutes and let them sit for an hour to speed things up. Soaking also helps reduce the cooking time and makes them easier to digest!

Step 3: Rinse your soaked beans
Drain the water from your soaked beans, and give them a good rinse under cold tap water. This gets rid of any dusty or bitter residue left on the beans.

Step 4: Prep your walnuts
Take your 8 walnuts and crack them open. If you have a nutcracker, use that—if not, a heavy spoon or the edge of a cutting board works too (just be careful not to smash your fingers!). Pop out the walnut meat, and discard any broken shells or bitter brown skin if you don’t like the texture.

Step 5: Rinse your walnut meat
Give your walnut meat a quick rinse under cold water to get rid of any small shell fragments, then pat them dry with a paper towel. You don’t have to dry them completely, but it helps keep them from sticking together in the pot.

Step 6: Rinse your pearl rice
Put your pearl rice in a fine-mesh strainer, and rinse it under cold water until the water runs clear. This removes excess starch so your porridge doesn’t get too thick and gummy.

Step 7: Add all your ingredients to the pot
Transfer your rinsed pearl rice to a large pot or your rice cooker. Then add your drained, rinsed beans and your prepped walnuts.

Step 8: Add the soaked and rinsed beans
Go ahead and dump your drained beans right into the pot with the rice. Mix them around a little bit so everything is evenly distributed.

Step 9: Add the walnuts
Toss in your prepped walnut meat. You can chop them up into smaller pieces if you want, but whole walnut halves work just fine too!

Step 10: Add the right amount of water
Now for the most important step: adding water. You’ll want to add about 4 cups of water for every 1 cup of dry ingredients. If you like thicker porridge, use a little less water; if you like it runny and soup-like, add a bit more. I usually go for a medium consistency that’s easy to spoon without being too thick.

Step 11: Cook the porridge
If you’re using a stovetop pot, bring the water to a boil, then reduce the heat to low, cover the pot, and let it simmer for about 45 minutes to an hour, stirring every 10 minutes or so to keep it from sticking to the bottom. If you’re using a rice cooker, just pop the lid on, press the porridge button, and walk away! It’ll automatically shut off when it’s done, which is perfect for busy weeknights.

Step 12: Enjoy your perfect porridge!
Once the porridge is done cooking, let it sit for a few minutes to thicken up a little bit. Then you can serve it as-is, or add your favorite toppings: a drizzle of honey, a sprinkle of cinnamon, some fresh berries, or even a dollop of Greek yogurt. I love to make a big batch on Sunday night and eat it for breakfast all week—just reheat it in the microwave or on the stovetop with a splash of water to loosen it up!
Pro Tips for Making This Porridge Even Better
- Swap out the grains: If you don’t have pearl rice, you can use brown rice, quinoa, or even rolled oats. Just keep in mind that cooking times will vary!
- Add extra flavor: A pinch of salt, a dash of vanilla extract, or some toasted sesame seeds can take this porridge from basic to amazing.
- Make it ahead: This porridge freezes really well! Portion it into freezer-safe containers, and it’ll keep for up to 3 months. Just thaw and reheat when you’re ready to eat.
- For a creamier texture: Blend a small portion of the cooked porridge with a immersion blender, then stir it back into the pot. This will make it extra smooth and creamy.
- Savory version: If you don’t like sweet porridge, add a little soy sauce, scallions, or fried garlic for a savory, savory breakfast or side dish.
Who Is This Porridge For?
Honestly, this porridge is for everyone. It’s gentle on sensitive stomachs, so it’s perfect for anyone who’s feeling under the weather, or for kids who don’t like heavy meals. It’s also a great breakfast for busy people who need something quick and filling—no fancy prep required. And since it’s so nutritious, it’s a great way to sneak extra vitamins and minerals into your family’s diet without them even noticing.
I’ve made this porridge for my nieces and nephews, and they absolutely love it—they ask for it every time they come over for dinner. My mom also swears by it for when anyone in the family has a cold, since it’s warm, soothing, and helps keep you hydrated.
So next time you’re looking for a cozy, easy, and nutritious meal, give this walnut multigrain porridge a try. I promise you won’t regret it!


