

 & Red Dates Pork Bone Soup Recipe | Nourishing Chinese Wellness Dish")


Hey there, baking lovers! 👋 Let me tell you a little story first—last week, my two adorable 4-year-olds had to go stay with my parents for a couple of days because of some family emergencies. Don’t get me wrong, I love them to bits, but when they left, the house felt so quiet! 😮💨 By the time I finished sorting things out, I was dying to give them a warm welcome back… and that’s when the idea hit me: a homemade yellow duck yogurt chiffon cake!
Why a duck, you ask? Well, my youngest calls everything “ducky” these days, and my oldest loves anything cute and whimsical. Plus, chiffon cakes are light, fluffy, and so easy to make—they’re basically the “I love you” of desserts! 🥰 And with yogurt instead of heavy cream, it’s healthier too! Let me walk you through how I made this tiny, adorable treat… trust me, your kids (or you!) will flip over it!
🧁 What You’ll Need: Ingredients
First, let’s gather the goods. I kept the measurements simple, so you can follow along even if you’re not a pro baker!
- 45g (1/3 cup) low-gluten flour (or all-purpose flour if you can’t find low-gluten—low-gluten helps keep the cake extra fluffy!)
- 2 large eggs (room temperature, please! Warm eggs mix better than cold ones)
- 38g (2 tbsp) plain yogurt (unsweetened is best, but sweetened works too—just adjust sugar if needed)
- 28g (2 tbsp) granulated sugar (split into 3 parts: 1/3 for egg whites, 2/3 for batter? Wait, no, 28g total—we’ll split it for the egg whites)
- 30g (2 tbsp) corn oil (or vegetable oil, but corn oil gives a subtle sweetness)
- Optional: 1/4 tsp homemade vanilla extract (or 1/2 tsp store-bought—adds a lovely aroma!)
🛠️ Step-by-Step: Let’s Make That Ducky Magic Happen!
Okay, let’s get your apron on—this is where the fun starts! I’ll break it down into easy chunks so even beginners can follow.
🧪 Step 1: Prep Your Workspace
First, grab all your ingredients and tools. You’ll need a mixing bowl, a whisk, a spatula, an electric mixer (or a hand whisk if you’re old-school!), a sieve, and a piping bag (or a zip-top bag with the corner snipped off) for pouring the batter.
Pro tip: Preheat your oven to 160°C (320°F) while you start the batter—saves time!

🥛 Step 2: Mix the Wet Batter (Yogurt + Oil)
In a large bowl, pour the yogurt and corn oil. Whisk them together until they’re smooth—no lumps allowed! This is the “base” of your cake, so make sure they’re fully combined.

🌾 Step 3: Sift the Flour
Now, sift the low-gluten flour into the yogurt-oil mix. Sifting helps break up any clumps and makes the batter super smooth. I like to do this over the bowl to avoid spills—just a little wrist flick!

🥚 Step 4: Add the Eggs to the Batter
Crack your 2 eggs into the bowl (separate the yolks and whites later!) and whisk everything together with an egg whisk until there are no white streaks left. The batter should be smooth and thick, like a creamy milkshake consistency.

🍦 Step 5: Mix in Vanilla (Optional, but Yum!)
If you’re using vanilla extract, stir it in now! It adds a subtle, sweet flavor that makes the cake taste even more “homemade.” If you skip it, no worries—your cake will still be delicious, just a touch less fragrant.

🥚 Step 6: Whip the Egg Whites (The Secret to Fluffy Chiffon!)
Now, separate the egg whites from the yolks (set the yolks aside in the batter). In a clean, dry bowl (no grease allowed!), add the egg whites and start whisking them on medium speed.
- First phase: When they start forming big bubbles, add 1/3 of the sugar (about 9g).
- Second phase: When the bubbles get smaller and the mix looks like wet foam, add another 1/3 sugar.
- Third phase: When soft peaks start to form (you can see a gentle curve when you lift the whisk), add the last 1/3 sugar.
Keep whisking until the whites are stiff—when you lift the whisk, the peaks should stand straight up, like a little mountain! 🗻

🔄 Step 7: Combine Batter & Egg Whites (Folding Magic!)
Now, take 1/3 of the stiff egg whites and gently fold them into the yolk batter. Think of it like “cutting and turning” the batter—don’t stir in circles! Just scrape down the sides and fold from the bottom up, like you’re making a new friend.
Once that’s smooth, pour the rest of the egg whites into the batter and fold again. Pro tip: Fold in 2-3 strokes, then stop—over-mixing makes the cake dense!

🧁 Step 8: Pour Batter into Piping Bag
Transfer the batter into a piping bag (I used a large one for this). If you don’t have a piping bag, a zip-top bag with the corner cut off works just fine! Twist the top to keep batter from leaking, then snip off a tiny corner (about 5mm) to control the flow.

🐤 Step 9: Fill the Duck Molds
Now, pipe the batter into your duck-shaped molds! Fill each mold about 3/4 full—leave some room for the cake to rise. If you don’t have a duck mold, no stress! Use a regular cupcake tin and pipe a cute duck face later—DIY is the best way!

🔥 Step 10: Bake the Cake (Patience is Key!)
Slide the molds into the preheated oven (160°C / 320°F) and set the timer for 25 minutes. Don’t open the oven during baking! The heat needs to stay constant for the cake to rise properly.
While it bakes, you can clean up the kitchen or daydream about how cute the finished duck will be—either way, the cake is in good hands!

🎉 Step 11: Cool & Unmold
When the timer dings, carefully take the cake out of the oven and let it cool for 5 minutes. Then, flip the mold upside down (like a little magic trick!) to let the cake slide out. It should pop right out—no sticking, promise!

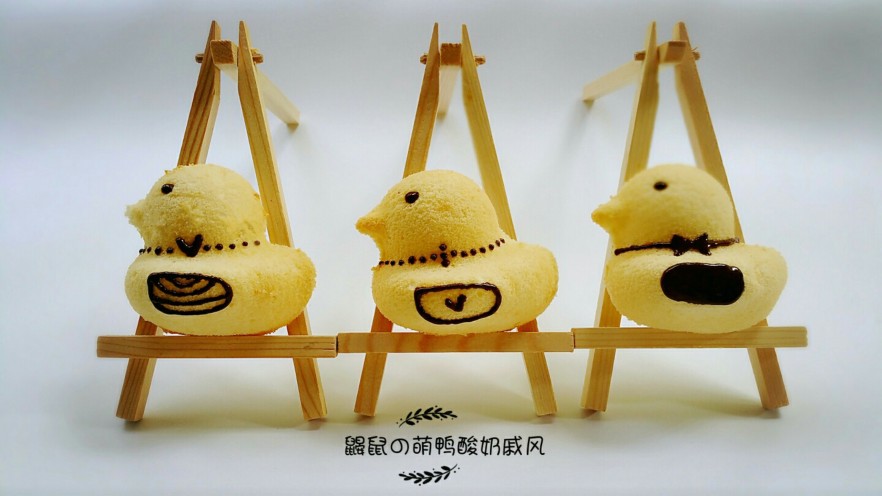
🎨 Step 12: Decorate with Chocolate!
Now for the fun part—making your duck look adorable! Melt 10g of dark chocolate in the microwave (set to 50°C/122°F for 30 seconds, stir, then another 10 seconds if needed). Transfer to a small piping bag, snip the tip, and draw:
- Two tiny dots for eyes
- A little “V” for the beak
- Two small triangles for the wings (or whatever shape your ducky heart desires!)
- A tiny rectangle for the bow tie (optional, but extra cute!)
Let the chocolate dry for 2-3 minutes, then you’re done!

🥄 Step 13: Turn It into a Lollipop Cake!
To make it extra kid-friendly, stick a lollipop stick into the bottom of the cake (about halfway up). Now your little yellow duck is ready to be held and devoured—so fun!

💡 Mole’s Little Tips (From a Mom Who’s Tried & Tested!)
1. Post-egg method for smooth batter: Always mix dry ingredients (flour) after adding the eggs to the wet mix—this keeps the batter super creamy, no lumps!
2. Preheat early: Start preheating your oven while you prep the batter—saves time, and your cake will rise perfectly.
3. Folding like a pro: Use the “cut and fold” technique (like slicing a cake and turning it) to keep the egg whites from deflating. Think of it like you’re folding a napkin, not stirring soup!
🌟 Final Thoughts: Why This Cake is a Must-Try
This yellow duck yogurt chiffon cake is more than just a dessert—it’s a hug in cake form! Light, fluffy, and packed with that tangy yogurt flavor, it’s perfect for:
- Kids’ birthdays or playdates
- Surprises for loved ones (no one can resist a cute duck!)
- Lazy weekend afternoons with tea
And guess what? It’s easy enough for beginners! I messed up my first chiffon cake once (oops, overmixed the batter 😅), but with these tips, you’ll nail it.
So grab your ingredients, put on your favorite baking playlist, and let’s make some ducky magic! Tag me if you try it—I’d love to see your little yellow duck creation! 🐤🍰


")


")

")