


 – Easy Recipe for Summer")

Summer’s here, and you know what that means? ICE CREAM SEASON! 🍦 If you’re like me, you’re either already hoarding your freezer with store-bought treats or planning to make some fresh, homemade ones to beat the heat. Let me tell you—homemade ice cream? Game-changer. No weird additives, just pure, fruity goodness. And today, we’re making something extra special: Passion Fruit Mango Ice Cream. It’s bright, tangy, and so creamy you’ll want to eat the whole tub… but don’t worry, we’ll keep it healthy (and no, you won’t feel guilty afterward).
Why This Recipe?
First off, let’s talk about the stars here: passion fruit and mango. Passion fruit is like a flavor explosion in your mouth—super tangy, with little seeds that add a fun texture. Mango? Sweet, tropical, and packed with vitamins. Together, they’re a flavor dream team. Plus, making it at home means you can skip the artificial colors and preservatives. No more wondering what’s in your ice cream! And it’s so easy—even if you’re not a kitchen pro, this recipe will have you grinning from ear to ear once you take the first bite.
What You’ll Need (Ingredients)
Let’s gather the goods! This recipe is simple, using just 4 main ingredients (plus sugar to taste). Here’s what you’ll need:
- Passion fruit: 4 large ones (look for wrinkly, soft ones—they’re extra sweet!)
- Mango: 2 ripe mangoes (press gently—they should give a little, but not squishy!)
- Thick yogurt: 200g (Greek yogurt works great for extra creaminess, but regular thick yogurt is fine too)
- Powdered sugar: A pinch to start (adjust to your taste—more or less, depending on how sweet your fruit is!)
Pro tip: Make sure your yogurt is thick! Thin yogurt will make the ice cream watery, so skip the skimpy stuff and go for the good stuff.
Step-by-Step Guide: Let’s Get That Creamy Goodness!
Alright, let’s get cooking (or freezing)! This is where the magic happens. I’ll walk you through each step, and I promise it’s easier than you think—no fancy equipment needed, just a basic juicer/puree maker and a freezer.
1. Wash your tool: First, give that juicer (or food processor with a puree attachment) a good wash. No one wants leftover bits from last time messing up the flavor! 
2. Prep the passion fruit: Pop open those passion fruits with a spoon—scoop out the pulp and seeds. It’s okay if there are a few seeds left; they add a nice, crunchy texture! If you want completely seedless puree, you can strain it later, but trust me, the seeds in passion fruit are so good. 
3. Peel and chop the mango: Peel the mangoes (use a sharp knife to avoid accidents!) and cut them into chunks. The bigger the chunks, the easier they’ll blend later. 
4. Chop smaller (optional): For faster pureeing, cut the mango chunks into smaller pieces. But no rush—we’re taking our time here! 
5. Combine fruit: Add the passion fruit pulp and mango chunks into the juicer. Watch them swirl together like a tropical party! 
6. Juice time!: Turn on the juicer and select the ‘fruit puree’ setting. Let it run until it’s nice and smooth—you’ll know it’s done when it’s a thick, creamy consistency. 
7. Look at that puree!: The result is a silky, vibrant fruit base—this is what makes the ice cream so smooth. You can almost taste the mango and passion fruit dancing together! 
8. Sweeten the mix: Add 20g of powdered sugar to the puree and stir it in. Taste a little—does it taste sweet enough? If not, we’ll adjust later! 
9. Add yogurt: Now, pour in the 200g of thick yogurt. The yogurt is key here—it keeps the ice cream light and adds that creamy tang. 
10. Mix & taste test: Stir everything together until it’s completely blended. Taste again! If it’s too tart, add a bit more sugar. If it’s too sweet, a splash more yogurt will balance it out. You’re the boss here! 
11. Grab your mold: Get out your ice cream mold—silicone ones are easiest to pop out, but any shape works. If you don’t have a mold, use paper cups with sticks for DIY popsicles! 
12. Pour the mixture: Fill the mold almost to the top—leave a tiny bit of space so it doesn’t overflow when it freezes. 
13. Freeze time!: Stick the mold in the freezer and let it freeze for at least 4 hours. Overnight (6-8 hours) is even better for a rock-solid, scoopable texture. 
14. Unmold magic: When it’s ready, pop the ice cream out of the mold. Gently twist or tap the bottom—if it’s still a bit hard, let it sit for 5 minutes to soften just a little. 
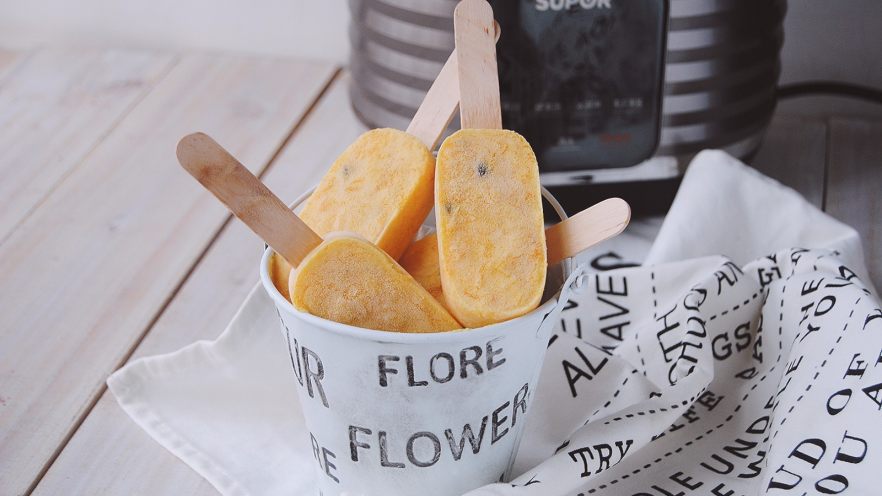
15. Take a bite!: Look at that beauty! Take a big scoop—see how smooth and creamy it is? The passion fruit and mango flavors blend perfectly, and the yogurt keeps it light. Chef’s kiss 
Pro Tips for Perfect Ice Cream Every Time
Now, let’s level up your game with some pro tips:
- Sugar is personal: I can’t stress this enough—sugar amounts depend on your mangoes and passion fruit! Some mangoes are sweeter, some passion fruits are more tart. Taste as you go! If your mangoes are unripe (too hard), add more sugar. If your passion fruit is extra tangy, add a bit more sugar.
- Yogurt hack: For extra creaminess, use full-fat yogurt. Greek yogurt is thick and tangy, which pairs great, but regular thick yogurt works too.
- Freezing time: 4 hours is the minimum, but 6-8 hours will make it rock-solid. Perfect for a hot day when you need something icy-cold!
- Mold choice: Silicone molds pop out easily, but if you don’t have them, use paper cups with a stick for a DIY popsicle vibe.
- Crunchy bonus: Want to add a little texture? Toss in crushed nuts or chocolate chips after pouring into the mold, before freezing. Yum!
This recipe makes about 8 ice cream treats (or however many your mold holds). If you’re making a bigger batch, just double the ingredients!
Why This Recipe is a Summer Must-Try
Homemade ice cream isn’t just about the taste—it’s about the joy of making something fresh and knowing exactly what’s in it. No artificial colors, no weird preservatives, just pure, natural fruit flavor. Plus, it’s way cheaper than buying store-bought! You can customize the sugar to your taste, add extra flavors, or even swap the yogurt for coconut milk if you’re dairy-free.
Final Thoughts
Okay, so there you have it—your go-to summer ice cream recipe: Passion Fruit Mango Homemade Ice Cream. It’s healthy, delicious, and so easy you’ll wonder why you didn’t make it sooner. Whether you’re hosting a BBQ, cooling down after a long day, or just treating yourself, this is the perfect treat.
Pro tip: Make a double batch and share with friends! They’ll beg for the recipe. And if you do make it, tag me—I’d love to see your creations! 🍨
So, what are you waiting for? Grab your ingredients, fire up that juicer, and let’s make some magic. Your taste buds (and freezer) will thank you! 😊


")


