Introduction

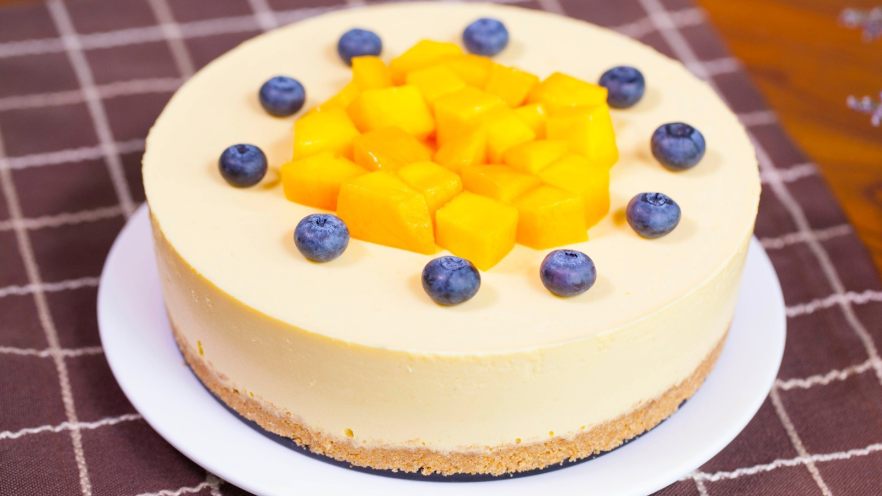
Ever scrolled through your Instagram feed and seen those stunning cake photos, thinking, “I need to make that!” but then realized you don’t have an oven? Ugh, I’ve been there too! But let me tell you—this No-Bake Mango Mousse Cake is the solution you’ve been waiting for! It’s sweet, creamy, packed with mango flavor, and totally doable without even turning on the oven. Trust me, it’s so easy, even if you’re a beginner baker, you’ll nail it first try. No stress, no fancy tools, just simple ingredients and a little patience. Let’s dive in!
What You’ll Need (Ingredients)
First, let’s list out all the supplies. You might already have most of these in your kitchen! Here’s the list:
- Digestive Biscuits: 150g (or Graham crackers if you can’t find digestive—they’ll work just as well!)
- Butter: 60g (unsalted, melted)
- Heavy Whipping Cream: 500g (this is what makes the mousse light and fluffy)
- Gelatin Powder: 20g (unflavored, crucial for the set—don’t skip this!)
- Granulated Sugar: 50g (adjust to your sweet tooth—less if you prefer less sugar)
- Mangoes: 400g total (200g for blending into the mousse, 200g for decoration)
- Cake Mold: 8-inch (preferably non-stick; a springform pan works great too)
Step-by-Step Guide: How to Make the No-Bake Mango Mousse Cake
Okay, let’s get baking! I’ll walk you through each step super clearly, so you won’t get lost. Let’s start with the crust because that’s the base of our masterpiece.
Step 1: Gather All Your Ingredients

First, check that you have all the ingredients listed above. Grab your 8-inch mold, measuring cups, a mixing bowl, and your electric mixer (if you have one—even a hand whisk works, but electric is faster!). Make sure your mangoes are ripe—soft to the touch, sweet-smelling, and bright yellow for the best flavor. If they’re too hard, they’ll be tart, so pick ripe ones! Trust me, it makes a huge difference.
Step 2: Crush the Digestive Biscuits

Now, let’s make the crust! Take the 150g of digestive biscuits and crush them into crumbs. You can use a rolling pin inside a zip-top bag (that’s my go-to trick to avoid making a mess!), or put them in a food processor and pulse until they’re fine crumbs. No need for fine dust—just a coarse crumb is okay. The goal is to mix them with butter, so the crumbs should be broken down enough to stick together.
Step 3: Melt the Butter

Next, melt the butter. Pop the 60g of butter into a small bowl and microwave it for 30-45 seconds, or melt it over a double boiler (a pot of boiling water with a heat-safe bowl on top). Be careful not to burn it—just until it’s completely liquid. Let it cool for a minute or two before using, because hot butter will melt the biscuits too much and make the crust soggy.
Step 4: Mix Biscuits with Melted Butter

Once the butter is melted and the biscuits are crushed, combine them in a large bowl. Use a spoon or your hands (I use my hands for better mixing!) to mix the crumbs with the butter. The mixture should be moist and clump together when you squeeze it in your hand. If it’s too dry, add a splash more melted butter; if it’s too wet, add a few more biscuits. Perfect balance!
Step 5: Press the Biscuit Base into the Mold

Now, it’s time to build the base! Take your 8-inch mold and line the bottom with the biscuit-butter mixture. Use the back of a spoon or the bottom of a glass to press it down firmly—this base needs to be compact so the mousse doesn’t leak through and the whole cake stays together. Press until it’s smooth and even, then pop the mold into the fridge for 15 minutes to let the base set a bit. While it chills, let’s make the mango mousse!
Step 6: Blend the Mangoes for the Mousse Layer

Peel the 400g of mangoes and remove the pits. Chop them into chunks and blend them in a food processor or blender until you get a smooth, thick mango puree. If you don’t have a blender, you can use a potato masher, but it’ll be a bit chunkier. Blend until there are no lumps—you want that silky texture! Set the mango puree aside for now, we’ll need it in a minute.
Step 7: Heat the Mango Puree & Dissolve Gelatin

Now, add the gelatin to the mango puree. Heat the mango puree gently over low heat (use a small saucepan on the stove, or even a microwave for 20-30 seconds). Once it’s warm (about 50°C/122°F—don’t let it boil!), stir in the 20g of gelatin powder. Keep stirring constantly until the gelatin is fully dissolved—no clumps! If you heat it too much, the gelatin won’t set, so watch the temperature carefully. Once dissolved, set the mango-gelatin mixture aside to cool down a bit.
Step 8: Whip the Heavy Cream with Sugar

Time for the creamy part! In a clean, dry bowl, pour the 500g of heavy whipping cream and add the 50g of sugar. Use an electric mixer (handheld is fine!) to beat the cream on medium-high speed until it starts to thicken. Beat for 2-3 minutes, or until it reaches the “5-6 point” stage. How do you know? When you lift the whisk, the cream should have soft peaks that hold their shape but are still a little pourable—not stiff like butter. If you overwhip, it’ll turn into solid cream cheese, so stop when you see those soft peaks!
Step 9: What 5-6 Points of Cream Looks Like

At 5-6 points, the cream should have visible texture—like, you can see distinct lines when you run a spoon through it. When you stop mixing, the cream should stack slightly on top of itself, not immediately fall flat. This is the perfect consistency to fold into the mango mixture without deflating it. If it’s too runny, the cake will be watery; too stiff, and it’ll be hard to mix. So this stage is key—take your time here!
Step 10: Combine the Mango Mixture with Whipped Cream

Now, pour the cooled mango-gelatin mixture into the bowl with the whipped cream. Use a silicone spatula to gently fold everything together—don’t stir hard! The goal is to keep as much air in the cream as possible. Fold until there are no streaks of mango left, and the mixture is smooth and creamy. This is your mousse filling—so exciting!
Step 11: Fold in Fresh Mango Chunks

To add texture and extra mango goodness, chop up the remaining 400g of mango into small cubes (you can use the ones you peeled earlier). Gently fold these mango chunks into the mousse mixture. They’ll give that satisfying “crunch” (well, soft crunch) when you take a bite. Be careful not to overmix, or the chunks will break apart. Just fold them in until they’re evenly distributed!
Step 12: Pour the Mousse into the Mold

Now, take the chilled biscuit base out of the fridge. Slowly pour the mango mousse mixture into the mold, filling it up to the top. Tap the mold gently on the counter a few times to release any air bubbles—this ensures a smooth top. If you see bubbles, pop them with a toothpick or small spoon. Then, cover the mold with plastic wrap (or a plate) and put it back in the fridge to set.
Step 13: Chill the Cake for 4+ Hours

Patience is a virtue here! Let the cake chill in the fridge for at least 4 hours, or overnight if you can wait longer. The longer it sits, the better the mousse will set and the more it’ll taste like a restaurant-quality dessert. While it’s chilling, you can watch Netflix, read a book, or just marvel at how easy this was—no oven needed, right?!
Step 14: Unmold & Enjoy!

After chilling, your cake should be firm and ready to eat! Now, let’s get it out of the mold. Take a warm, damp towel and wrap it around the outside of the mold for 10-15 seconds. This helps loosen the sides. Then, invert the mold onto a plate (or cake stand) and tap gently—your cake should slide right out in one piece! For extra flair, top it with more mango slices, mint leaves, or a dusting of powdered sugar. Serve with a scoop of vanilla ice cream for the ultimate treat!
Tips & Tricks for the Perfect No-Bake Mango Mousse Cake
Pro Tip: Easy Molding & Unmolding
Stuck on how to get the cake out cleanly? The warm towel trick works wonders! Just wrap a damp towel around the mold, wait 10 seconds, then flip it over onto a plate. It should slide right out in one piece. If not, use a thin knife to run around the edges gently before flipping. Once it’s out, use a flat, sharp knife to cut it—make sure the knife is clean and dry for the smoothest slices!
Storing & Making Ahead
This cake is super easy to make ahead! Assemble it up to 3 days in advance, store it in an airtight container in the fridge, and it’ll still taste fresh. If you want to freeze it, wrap it tightly in plastic wrap and then aluminum foil, and it’ll keep for up to a month. Thaw it in the fridge overnight before serving—it’ll be just as creamy as the day you made it!
Adjusting Flavors & Substitutions
Not a mango fan? Swap in strawberries, raspberries, or even chocolate for a different twist! For a richer flavor, use coconut cream instead of heavy cream (so creamy and tropical!). If you want less sugar, reduce the amount to 30g—just taste as you go. The gelatin is crucial for the structure, so don’t skimp! If you’re using agar agar instead of gelatin, adjust the amount and follow the package instructions.
So there you have it! No oven, no stress, and a showstopping mango mousse cake that’ll impress everyone. Whether you’re a beginner or a seasoned baker, this recipe is foolproof. Tag me in your creations—I’d love to see your take on this no-bake mango mousse cake! Happy baking, and enjoy every bite!