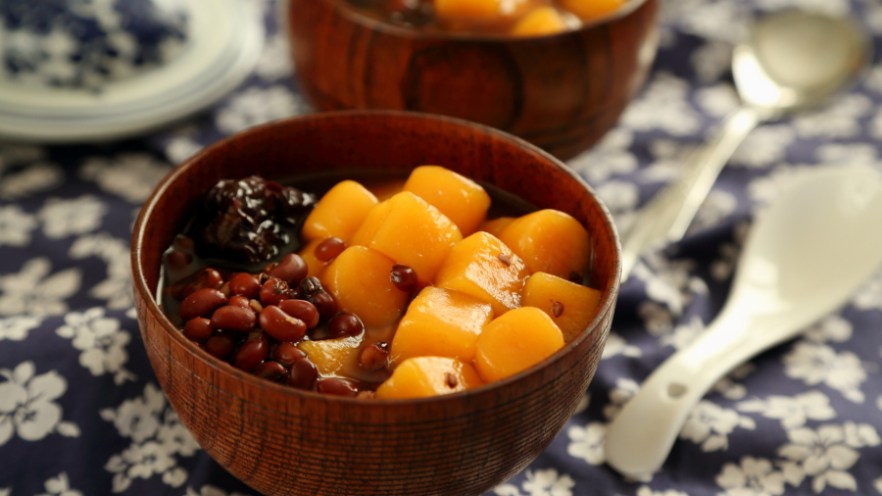

Let me tell you, there’s nothing that hits quite like a warm bowl of sweet potato ball red bean soup on a chilly day, am I right? I whipped this up last week when I had a little scratchy throat and the weather was being super moody, and it didn’t just taste amazing—it actually made me feel better too. I threw in red dates, ginger, brown sugar, and even a little dried tangerine peel, so it’s not just a sweet treat, it’s like a cozy hug for your immune system. Oh, and the chewy sweet potato balls? They turn this from a light soup into a full little meal that’ll keep you full for hours.
For anyone who hasn’t had these sweet potato balls before, they’re a classic Fujian and Taiwanese street snack staple. You make them by mixing steamed sweet potato with tapioca starch, and they have that perfect chewy, bouncy (we call it QQ in Asian food circles, you know the vibe) texture that’s so addictive. You can swap sweet potato for taro, pumpkin, or purple sweet potato too if you want to mix things up. Let’s jump into the recipe, yeah?
What You’ll Need for This Recipe
I’ve kept the ingredients super simple, you probably already have most of these in your pantry. The only thing you might need to grab from an Asian grocery store is tapioca starch, but even that’s easy to find on Amazon these days.
Ingredients for Sweet Potato Balls
- 280g mashed sweet potato (about 1 medium-large sweet potato)
- 200g tapioca starch (not regular flour, trust me, this is what gives the chew)
- 20g granulated sugar (adjust to taste if your sweet potato is already super sweet)
Ingredients for Red Bean Soup
- 100g adzuki red beans
- 8 red dates (pitted, unless you like spitting out seeds mid-sip, no judgment)
- 1 small piece of dried tangerine peel (rinse it first to get rid of any dusty residue)
- 5 slices of fresh ginger (don’t skip this, it adds the best warm kick)
- 40g brown sugar (use dark brown sugar for a deeper, caramel-like flavor)
Step-by-Step Instructions
I’ve split this into two parts: first making the red bean soup, then the sweet potato balls. You can make the soup ahead of time if you want, it tastes even better the next day! Or if you’re short on time, you can even buy pre-made sweet potato balls from the frozen section of Asian markets, but homemade is 100% worth the extra 20 minutes, I promise.
Step 1: Make the Cozy Red Bean Soup Base

First up, the red bean soup. You’ll want to soak your red beans in cold water for at least 4 hours, or overnight if you remember. I’m terrible at planning ahead, so I usually just soak them while I’m at work during the day, that works perfectly.
Once they’re fully plumped up, put them in a pot, cover with water, and bring to a rolling boil. Let them boil for 1 minute, then drain all the water out. This trick gets rid of that slightly bitter, beany aftertaste some red bean soup has, game changer.
Add fresh cold water to the pot, along with your pitted red dates, ginger slices, and rinsed dried tangerine peel. Bring back to a boil, then turn the heat down to low, cover, and simmer until the beans are soft and tender. How long this takes depends on how you like your beans:
- If you love super creamy, sand-like red bean soup: Let it simmer for 1.5-2 hours, or 20 minutes in a pressure cooker, until the beans burst open and thicken the soup.
- If you prefer intact, soft but firm beans: Add a little less water, simmer for 30 minutes, then turn off the heat and let it sit covered for 20 minutes. Repeat this 2-3 times until they’re tender but still hold their shape.
Once the beans are done to your liking, stir in the brown sugar and let it dissolve for 5 minutes. Taste it and add more sugar if you want, I like mine not too sweet so the ginger and tangerine flavor shines through.
Step 2: Prep and Steam the Sweet Potato

While the beans are simmering, you can make the sweet potato balls! Peel your sweet potato and cut it into large, uneven chunks (we call them rolling cuts in Chinese cooking, it gives more surface area so they steam faster). Pop them in a steamer basket over boiling water, and steam for about 15 minutes, or until you can poke a fork right through with no resistance.
Pro tip: Don’t boil the sweet potato! It’ll get waterlogged and you’ll have to add way more tapioca starch, which makes the balls taste less like sweet potato. Steaming is the way to go.
Step 3: Mash the Sweet Potato and Add Sugar

Take the steamed sweet potato out of the steamer while it’s still hot, and mash it until it’s completely smooth with no lumps. I weighed mine after mashing and it was exactly 280g, which is the perfect amount for this recipe. Stir in the 20g of sugar while it’s still warm so the sugar melts completely. If your sweet potato is super ripe and sweet, you can even cut the sugar down to 10g, no rules here!
Step 4: Add the Tapioca Starch

Next, add all 200g of tapioca starch to the warm mashed sweet potato. Don’t wait for the sweet potato to cool down completely, the warmth helps the starch bind together better, so you don’t end up with a crumbly mess. I know some recipes say to use boiling water to activate the starch, but the warm sweet potato does that job for you, so no extra steps needed!
Step 5: Knead Into a Firm Dough

Now get in there with your hands and knead everything together until you have a smooth, fairly firm dough. Let’s talk texture here: if you use more tapioca starch, the balls will be super bouncy and chewy. If you use less, they’ll be softer and have a stronger sweet potato flavor. I like a nice middle ground, which is what this 280g sweet potato to 200g starch ratio gives you. If the dough is sticking to your hands like crazy, add a little more starch. If it’s too crumbly and won’t hold together, add a tiny splash of hot water, like a teaspoon at a time, don’t overdo it.
Don’t stress if it’s not perfect the first time! I messed up my first two batches before I got the hang of it, now I can do it with my eyes closed. You’ll figure out what texture you like best after a couple tries.
Step 6: Cut the Dough Into Bite-Sized Balls

Once your dough is ready, pat it into a rough rectangle about 1 inch thick. Grab a knife and cut it into small ½ inch squares, that’s the easiest shape to make. You don’t have to be fancy here, uneven edges just make them look homemade, which is cute.

If you want a nicer shape, you can also take small pieces of dough and roll them into thin logs, then cut the logs into little cylinders. Quick tip here: if you can roll the dough into a log super easily without it cracking or breaking at all, that means your dough is too soft, and the balls will be mushy when you cook them. If that happens, just knead in a little more tapioca starch. No big deal.

If you’re feeling fancy and want perfectly smooth balls, you can toss the cut pieces in a little extra tapioca starch and roll them between your palms to smooth out the edges. I usually skip this step because I’m lazy, but it does make them look nicer if you’re serving them to guests.
Step 7: Freeze Extra Balls for Later

This recipe makes a pretty big batch of sweet potato balls, so if you’re not eating all of them at once, spread the cut ones out on a baking sheet lined with parchment paper, making sure they’re not touching each other. Pop them in the freezer for 1-2 hours until they’re completely frozen solid, then dump them into a zip-top bag. They’ll keep in the freezer for up to 3 months! The best part? You don’t have to thaw them when you want to eat them, just toss them straight into boiling water from frozen. I always have a bag of these in my freezer for lazy dessert nights.
Step 8: Cook the Sweet Potato Balls

When you’re ready to eat, bring a pot of water to a rolling boil. Toss in the sweet potato balls (fresh or frozen, no thawing needed!) and give them a gentle stir so they don’t stick to the bottom of the pot. Let them cook for 3-5 minutes, until they float to the top. Once they float, let them cook for 1-2 more minutes so they cook all the way through. If you’re using frozen ones, they might take an extra minute or two, just wait until they’re all floating before you take them out.

Here’s the secret to extra chewy balls: immediately scoop them out of the boiling water and drop them into a bowl of ice cold water, or just very cold tap water. Let them sit there for 1-2 minutes. This shocks them and makes them extra bouncy, plus it stops them from cooking further so they don’t get mushy. Trust me, this step is non-negotiable if you want that perfect QQ texture.
Step 9: Assemble and Enjoy!

Drain the cooled sweet potato balls, add them to a bowl, and ladle the warm red bean soup over top. That’s it! You’re done. You can eat it warm, or if it’s a hot day, you can chill the red bean soup first for a cold dessert version, both are amazing.
Pro Tips to Make This Perfect Every Time
I’ve made this recipe so many times I’ve lost count, so here are my best hacks to make sure you don’t make the same mistakes I did when I first started:
- Adjust tapioca starch to your preference: More starch = chewier, bouncier balls. Less starch = softer, more sweet potato flavor. Play around with the ratio until you find what you love, there’s no wrong answer!
- Freeze leftovers easily: As I mentioned earlier, uncooked sweet potato balls freeze perfectly for 3 months. Don’t thaw them before cooking, just toss them straight into boiling water, it’s so convenient.
- Mix up the flavors! You don’t have to only use sweet potato. Swap it for steamed taro, pumpkin, or purple sweet potato for different colored and flavored balls. They all taste incredible, I make purple sweet potato ones all the time for Halloween, they’re so pretty.
- Don’t skip the cold water dip: It’s what gives the balls that perfect chewy texture, don’t cut corners here, it only takes a minute!
- Customize your red bean soup: Add lotus seeds, barley, or even glutinous rice balls if you want to make it even more filling. I sometimes add a splash of coconut milk on top for a tropical twist, it’s so good.
That’s the whole recipe! It’s so much easier than it looks, right? This is one of my go-to recipes when I want something cozy, not too unhealthy, and super satisfying. My friends beg me to make it for them every time they come over, it’s always a hit. Let me know in the comments if you try it, I’d love to hear how it turns out for you!