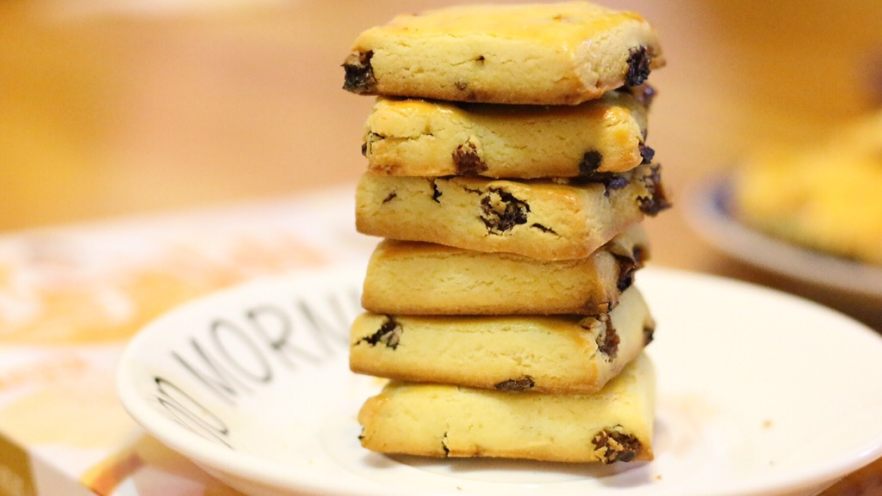

Hey there, cookie lovers! 👋 If you’re tired of baking the same old chocolate chip cookies and crave something new, buttery, and utterly satisfying, you’ve come to the right place. Today, I’m sharing my absolute favorite recipe: these Raisin Milk Crisp Cookies. They’re crispy, they’re milky, they’re sweet, and the raisins add just the right chewy contrast. Trust me, once you take a bite, you’ll be hooked—no, obsessed, even. Let’s dive in!
Why These Cookies Are a Game-Changer
First off, let’s talk about the magic ingredients. The secret? Egg yolks! They give these cookies a rich, luxurious depth that regular white cookies just don’t have. Then there’s the butter and milk powder—oh my, the butter creates that melt-in-your-mouth crispiness, while the milk powder amps up the creaminess tenfold. And raisins? They’re like little bursts of sweet, chewy goodness that keep you reaching for more. Plus, they look beautiful: golden-brown, perfectly shaped, and ready to steal the show at your next tea party or movie night. I’ve made these for friends, and now they’re all begging for the recipe. It’s that good.
What You’ll Need (Ingredients)
Let’s gather everything you need. I’ve listed the measurements in grams, but I’ll also note US equivalents if you’re more familiar with cups and spoons. Here’s the list:
- Low-gluten flour: 98g (about ¾ cup) – This is key for that tender, crispy texture. If you can’t find low-gluten, all-purpose flour mixed with 10g cornstarch works as a substitute (2:1 ratio).
- Whole milk powder: 6g (about 1 tablespoon) – The star for that milky flavor! Skip this, and your cookies will be flat and flavorless.
- Butter: 40g (unsalted, softened to room temperature) – Soft butter = perfect creaminess. If it’s too cold, it won’t mix well; if it’s melted, your cookies will spread too much. Aim for 65-70°F (18-21°C).
- Egg yolks: 2 large (room temperature) – These add richness and help bind the dough. Save the egg whites for later—you can make meringue cookies with them!
- Granulated sugar: 35g (about 2 tablespoons) – Adjust if you like less sweet, but 35g is the sweet spot for balance.
- Raisins: 35g (chopped, or use seedless for easier mixing) – Dried raisins are the classic choice, but you can swap them for cranberries, dried apricots, or even chocolate chips if you want!
Step-by-Step: Let’s Bake These Cookies!
Okay, let’s get your oven preheated (175°C/350°F, please!) and your workspace ready. Here’s how to turn these ingredients into magic:

Step 1: Gather & Prep Ingredients
First, lay out all your ingredients. Measure them out carefully—precision matters here! If you’re using regular raisins, chop them into small pieces (about ¼-inch). This ensures they’re evenly distributed. Soften the butter by leaving it on the counter for 1-2 hours, or pop it in the microwave for 10 seconds (but watch it—no melting!).

Step 2: Chop Those Raisins
Chop the raisins! If you skip this, you might get big, chewy raisin clumps in every bite. Trust me, small pieces = happy mouth. If you’re in a rush, just use a food processor or scissors to cut them quickly. No fancy tools? A kitchen knife works too—just take your time.

Step 3: Cream Butter, Sugar, & Milk Powder
Now, in a large bowl, add the softened butter, sugar, and milk powder. Using an electric mixer (or a whisk if you’re old-school), beat on medium speed for 2-3 minutes. The mixture should become light and fluffy—pale yellow, almost doubled in volume. This is the secret to that crispy texture! If you’re hand-whisking, you’ll need to work a bit harder, but it’s doable. The sugar dissolving into the butter creates tiny air pockets that make the cookies rise just enough.

Step 4: Add Egg Yolks (One at a Time!)
Now, add the egg yolks one by one. Beat on low speed for 30 seconds after each addition. Why low speed? To prevent the butter from separating! After the first yolk, the mixture might look a bit curdled—that’s normal. Keep beating, and it’ll smooth out. After the second yolk, you’ll have a lovely, creamy batter. Pro tip: Save 1 teaspoon of egg yolk for later—we’ll use it to brush the tops of the cookies for a golden shine!

Step 5: Sift Flour & Mix
Time to add the low-gluten flour. Sifting is crucial here! It removes lumps and ensures the flour mixes evenly. Dump the sifted flour into the batter and fold with a spatula until there are no dry patches. Stop as soon as the dough comes together—overmixing makes cookies tough. Think of it like “just enough” to combine, not “rubber band.”

Step 6: Fold in the Raisins
Add those chopped raisins to the dough. Gently fold them in with the spatula until they’re evenly distributed. You’ll see little bursts of dark purple—so pretty! If you’re using whole raisins, they’ll be more chewy, but chopped ones are easier to bite into. This is where the flavor really comes alive.

Step 7: Roll the Dough
Transfer the dough onto a clean cutting board. Press it into a flat rectangle with your hands, then use a rolling pin to roll it out to about 0.8 cm thick (that’s roughly ⅓ of an inch). If the dough sticks to the pin, dust it lightly with flour. The goal is an even thickness so the cookies bake uniformly.

Step 8: Cut into Rectangles
Now, use a sharp knife to cut the dough into small rectangles. Aim for 5cm x 3cm (about 2×1.25 inches)—small enough to hold in one hand but big enough to enjoy. If you’re not confident with a knife, use a cookie cutter! Just make sure the edges are clean for even baking.

Step 9: Arrange on Baking Tray
Line a baking tray with parchment paper (or use a silicone mat—so much easier than cleaning!). Place the cut cookies on the tray, leaving about 2cm between each for spreading. Don’t overcrowd them, or they’ll stick together.

Step 10: Brush with Egg Yolk (Optional But Highly Recommended)
Remember that extra egg yolk we saved? Now’s the time to use it! Brush a thin layer over the tops of the cookies with a pastry brush. This gives them that glossy, golden-brown finish in the oven. It’s like a little luxury touch that makes them look restaurant-worthy.

Step 11: Bake to Perfection
Slide the tray into the preheated oven (175°C/350°F) and set the timer for 15 minutes. Watch them closely in the last 2-3 minutes—they’ll go from pale to golden brown quickly! The cookies should be set but still slightly soft in the center (they’ll firm up as they cool).

Step 12: Cool & Enjoy!
Let the cookies cool on the tray for 5 minutes, then transfer them to a wire rack. Once they’re completely cool, they’ll be crisp and ready to eat. The best part? Let them sit for 30 minutes after baking—this lets the flavors meld and the texture become even crispier. Trust me, patience = better cookies.
Pro Tips for Success ✨
Here are some hacks to make your cookies extra perfect:
- Save the dough scraps: If you cut too many cookies or have leftover dough, press it back together, roll it out again, and cut more. No waste here!
- Egg whites? Don’t throw them away! The recipe uses 2 yolks, so you’ll have 2 whites left. Whip them with a pinch of cream of tartar and sugar to make meringue cookies—they’re crispy and sweet, perfect for a second treat.
- Swap raisins for fun add-ins! Not a raisin fan? Try dried cranberries, chocolate chips, or even orange zest for a citrusy twist. The dough is super versatile!
- Adjust sweetness: If you prefer less sugar, reduce to 30g. For more sweetness, add 5g more—taste as you go!
Final Thoughts
These Raisin Milk Crisp Cookies are more than just a recipe—they’re a hug in cookie form. Whether you’re serving them with a cup of tea, sharing with friends, or munching on them straight from the oven, they’re guaranteed to impress. The buttery, milky goodness paired with chewy raisins is the ultimate comfort food. I’ve made these for every holiday, birthday, and “I need a pick-me-up” moment, and they’ve never failed me.
So, what are you waiting for? Grab your ingredients, preheat the oven, and let’s get baking! Tag me when you make them—I’d love to see your golden-brown creations. Happy baking, and enjoy every crispy, milky bite! 🧡